Documentation
System Requirements
Flangapp PRO is designed in a way that it can be installed and used even on the simplest shared hosting with support for PHP and MySQL databases. However, we recommend considering installing the script on a virtual server, where you can have more flexible configuration control.
- PHP 8.2
- Minimum 2 GB of RAM
- MySQL databases support
- MySQLi driver
- PhpMyAdmin (optional)
- OpenSSL cryptographic encryption support
- Minimum 3 minutes PHP process execution time (recommended execution time is 10 minutes)
- Your hosting provider should not remove or modify server request headers
- 2 domain names (or subdomains) with installed SSL certificates (free letsencrypt certificates work perfectly)
In this document we show the installation process using the CloudPanel control panel https://www.cloudpanel.io/.
This free server management software is the easiest way to get started.
Also, after the installation process is finished, you need to configure some rules for running CRON tasks. If your hosting provider does not support CRON tasks you can use free third-party services for scheduling requests, such as https://cron-job.org/en/.
Before you begin the installation process, make sure you have accounts in the API services, which platform uses:
- Github account
- Codemagic account
There are 2 parts of the product assets:
- Backend: a server-side PHP script that manages your project's API
- Frontend: a js script that is run in the browser environment.
You should have 2 domains: one for installing the backend part (this could be a subdomain like api.example.com) and another main domain for installing the frontend part (example.com).
Neither backend nor frontend requires any precompilation or preparation. If you plan to make changes to the frontend part, you need to open the Vue.js source files and make a new compilation with the updated files uploaded to your server.
Unpacking Files
Download the archive with your purchase from your account on the flangapp.pro website. Unpack it and you will see 4 folders:
- Backend
- Frontend
- Vue source template
- Flutter app template

Prepare and set up 2 domains that will be used for installation.
You can use any control panel, for example cPanel and others. Here we use CloudPanel.
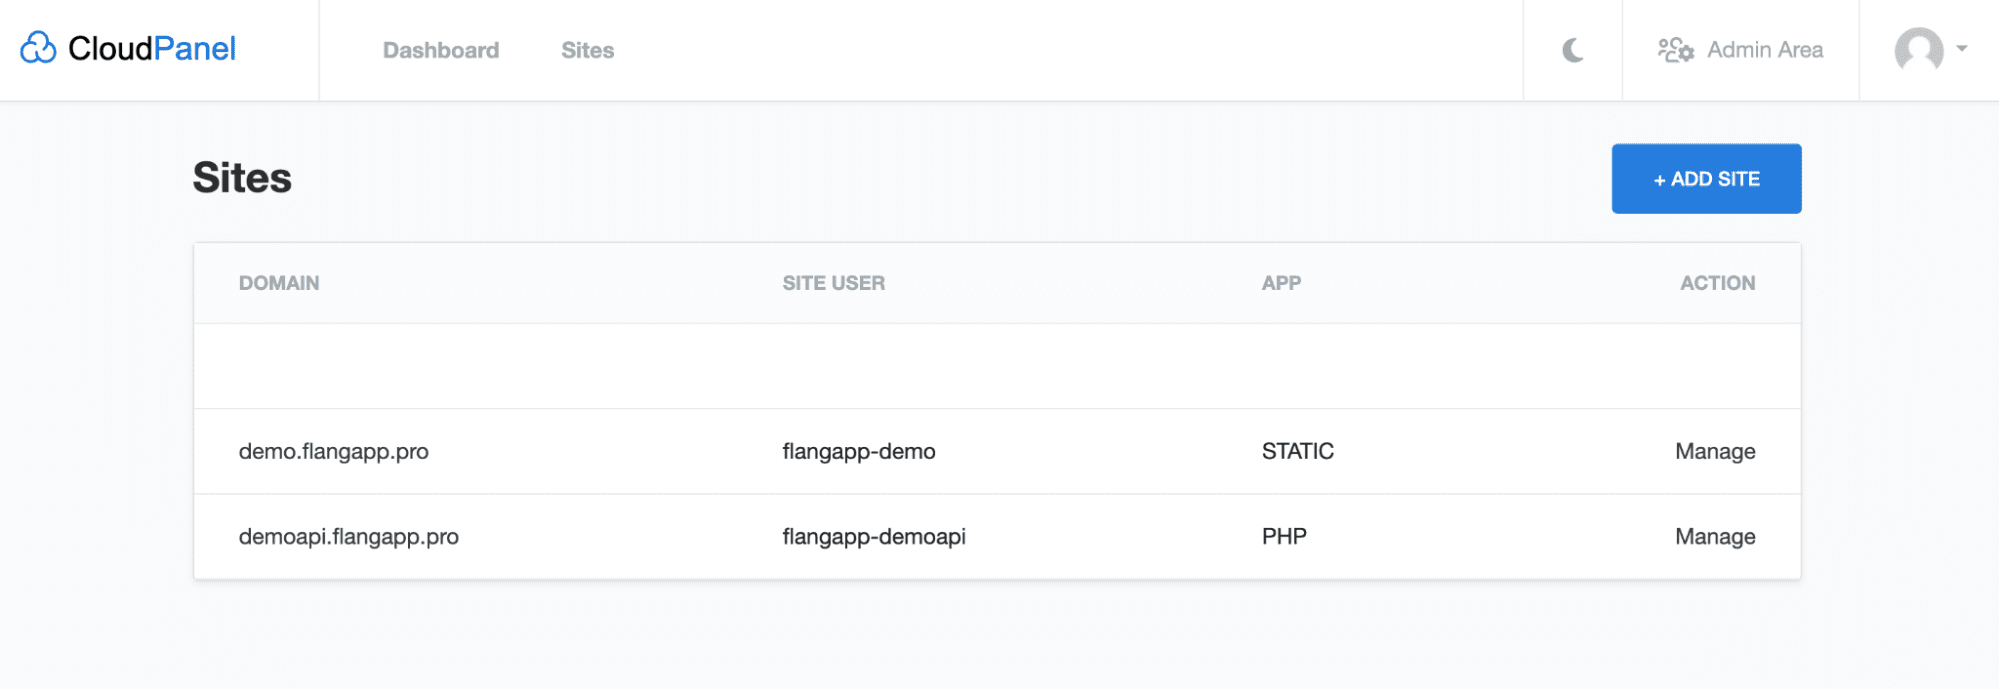
As an example, we added 2 domains: demo.flangapp.pro to host the frontend statics (this is what you see in the browser, the main domain) and the demoapi.flangapp.pro domain to host the backend, the server part of the application.
Go to the file manager to download previously unpacked files. You can use either visual upload interface or any other FTP client to transfer files.
Let's start with the domain folder where our backend will be located and transfer all the files that are in the “Backend” folder of the previously downloaded archive with the purchase to the root folder of the domain.
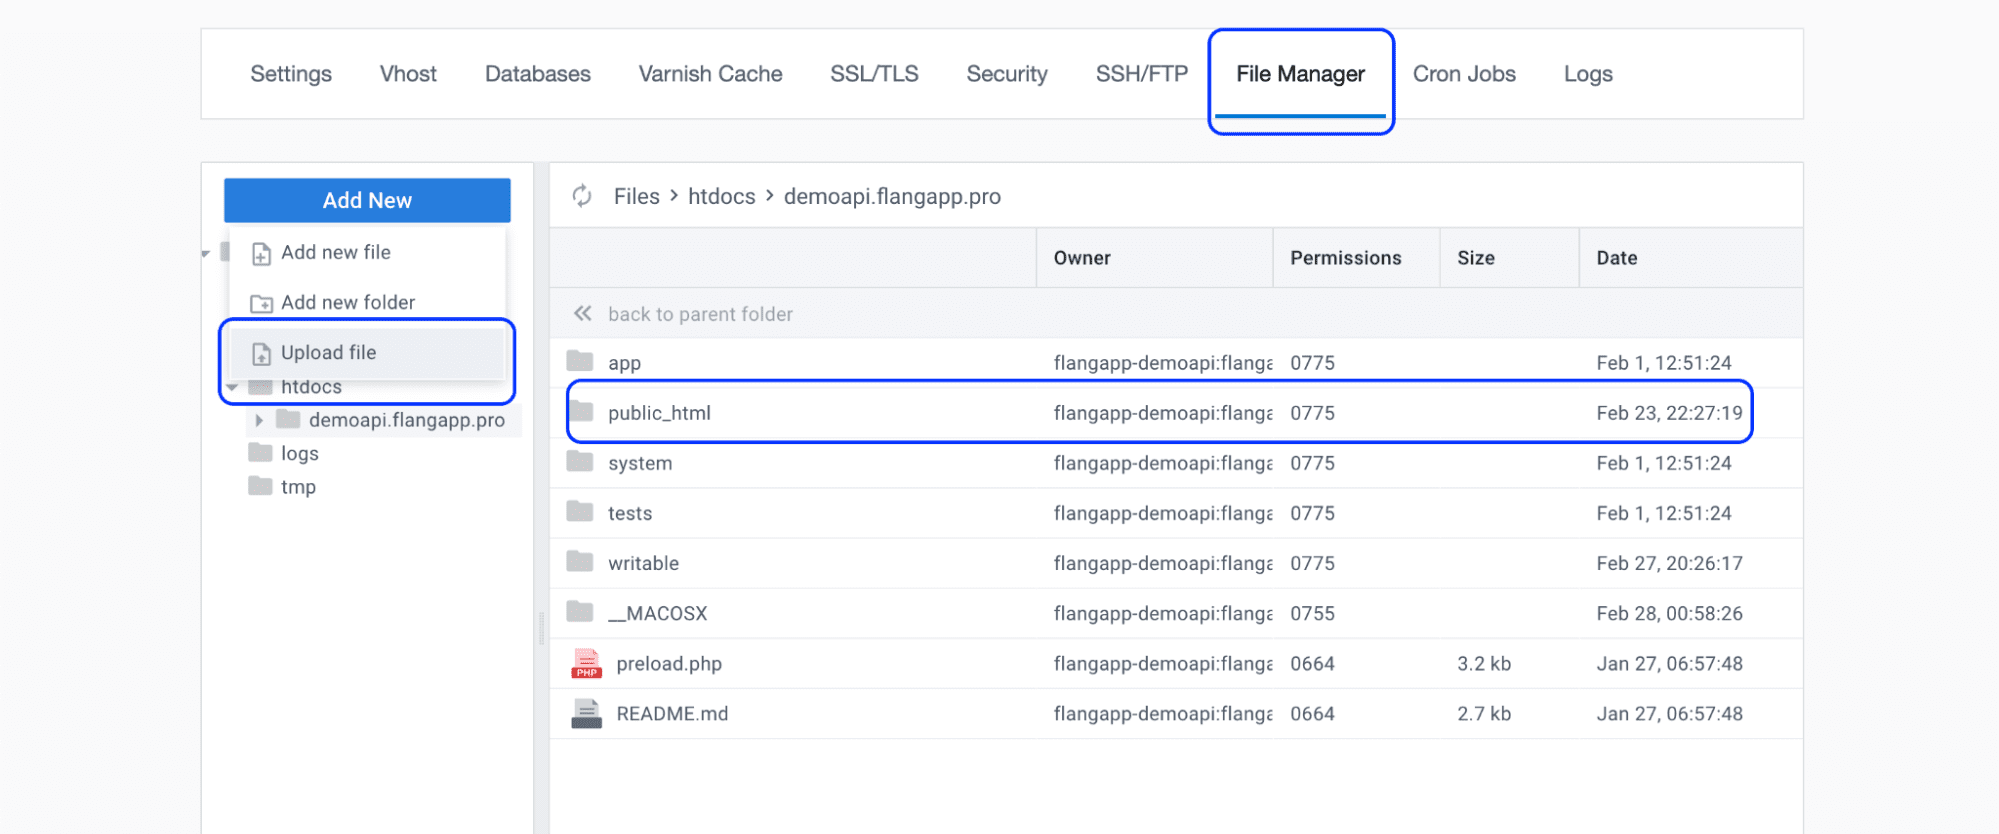
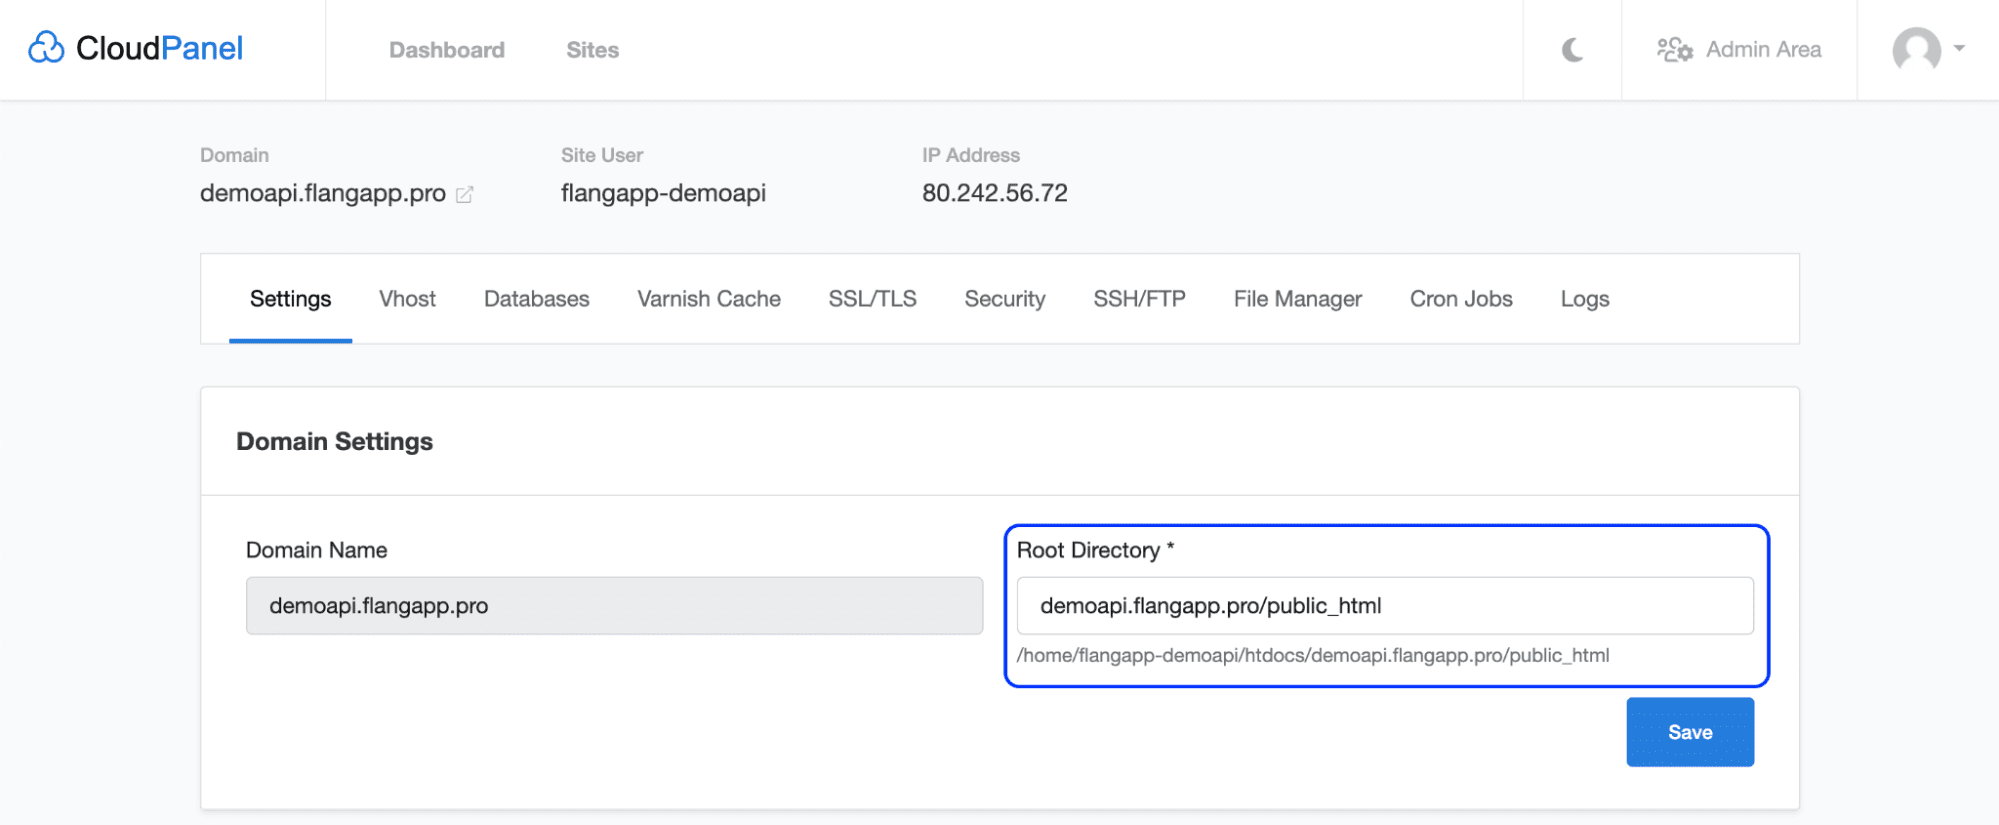
We`ve uploaded all the files to the root folder of the htdocs/demoapi.flangapp.pro domain. All controllers, configuration files, storage folders, etc. must strictly be placed outside the public directory. The structure of files and folders should look exactly like in the screenshot. Please note, that by default the system uses the public_html folder to place public files. Depending on your provider this folder may have different name - just public for example. In this case, you need to change your site settings and redefine the public folder. For example, in CloudPanel you can do this in the website settings:
Now we need to do the same with the frontend files. Go to your main domain (in our case it is demo.flangapp.pro) and transfer all files from the “Frontend” folder to the public folder of the domain.

Unlike the backend part, all files here must be located in the public folder of your website.
Database setup
In order to store data about your users, created applications and other important information, we need to create a MySQL database. Depending on your server control panel, the database management section may be named differently. In CloudPanel, we need to go to the domain where the backend is located and select the “Databases” section to create a database. Click the “Add Database” button and fill in the form:
Database Name: any name without spaces or numbers
Database Username: user login without spaces or numbers
Database Password: user password.
It should look like this:
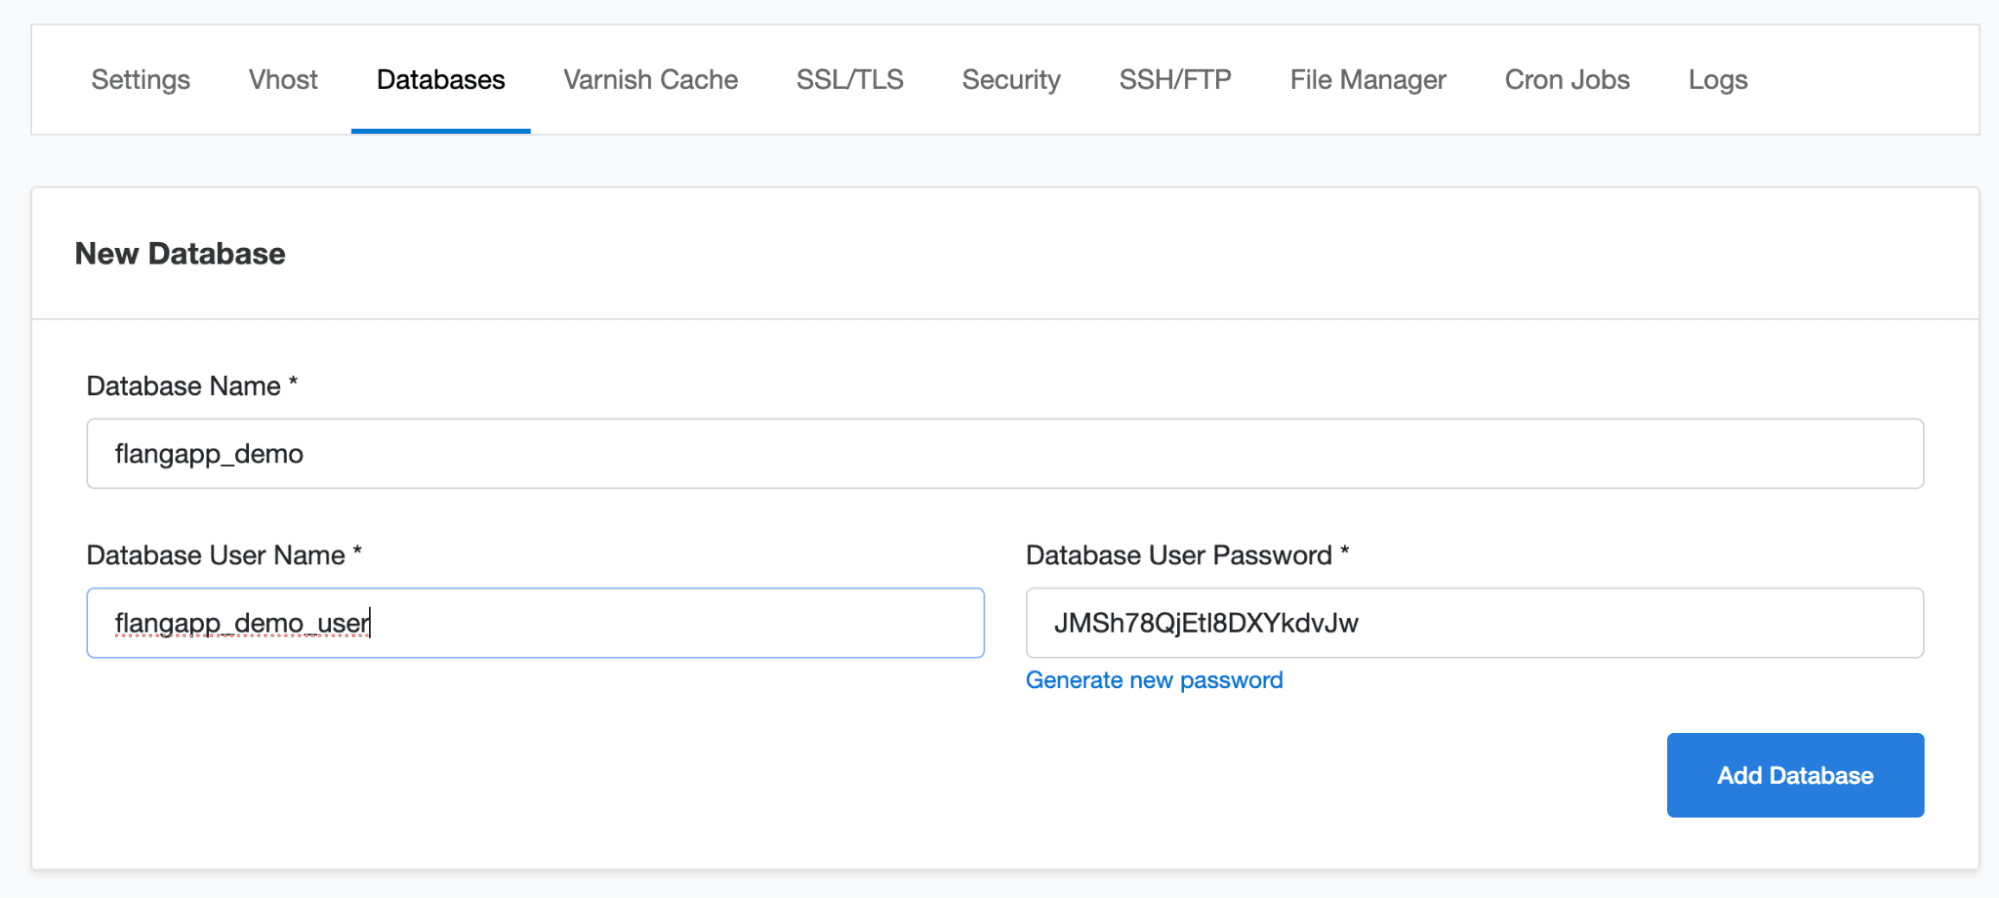
Save your data (we will need them in the next step) and click the “Add Database” button. Now it's time to move on to the installation process!
In your browser, go to
https://demoapi.flangapp.pro/install/step/1
where https://demoapi.flangapp.pro is the address of your domain where
the backend is hosted. You should see the first step of the installation
process:

Fill in the form:
- Base site url
This is your website address where the backend part is placed. For example, https://demoapi.flangapp.pro/. Please note, that the slash at the end of the line is required.
- Database name
The database name that was specified in the previous step.
- Connection port
The connection port that is used to communicate with the database. Usually this is 3306.
- Hostname
It is the IP address of the server where the database is located. If you`ve created a website and a database inside one panel and environment, you can just enter localhost.
- Database username
It is User login that was entered during the database creation step.
- Database password
It is user password that was entered during the database creation step.
Click the “Continue” button. If you`ve entered the correct data, the script will connect to the database, create all the required tables and make the initial setup.
Github API Connection
Flangapp uses Github repositories to store the source code of your users' mobile app projects. For each new mobile application is created a unique branch in the repository, where changes are made: loading application icons, changing application settings, etc.
To use this functionality, you have to use your Github account and issue an API key.
Go to your account settings, choose section “Developer settings” - “Personal access tokens” - “Tokens (classic)” - “New personal access token (classic)” https://github.com/settings/tokens/new
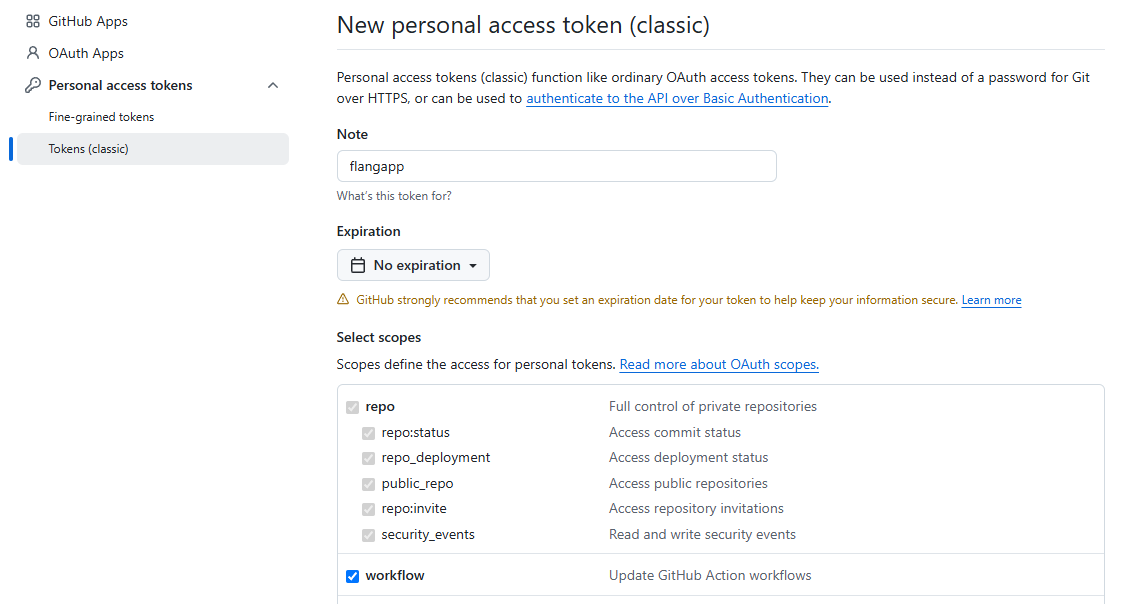
To issue a new token, fill in the form:
- Note
Enter any name for your token that will only be used by you, for example, “My Flangapp PRO”.
- Expiration
It is token validity period. Yours should be unlimited - select the “No Expiration” option.
- Select scopes
It is the scope of rights that the token can use. Mark the values: repo:status, repo_deployment, public_repo, repo:invite security_events, workflow. Click the “Generate token” button. Copy the received key and paste it into the installation process form 2:
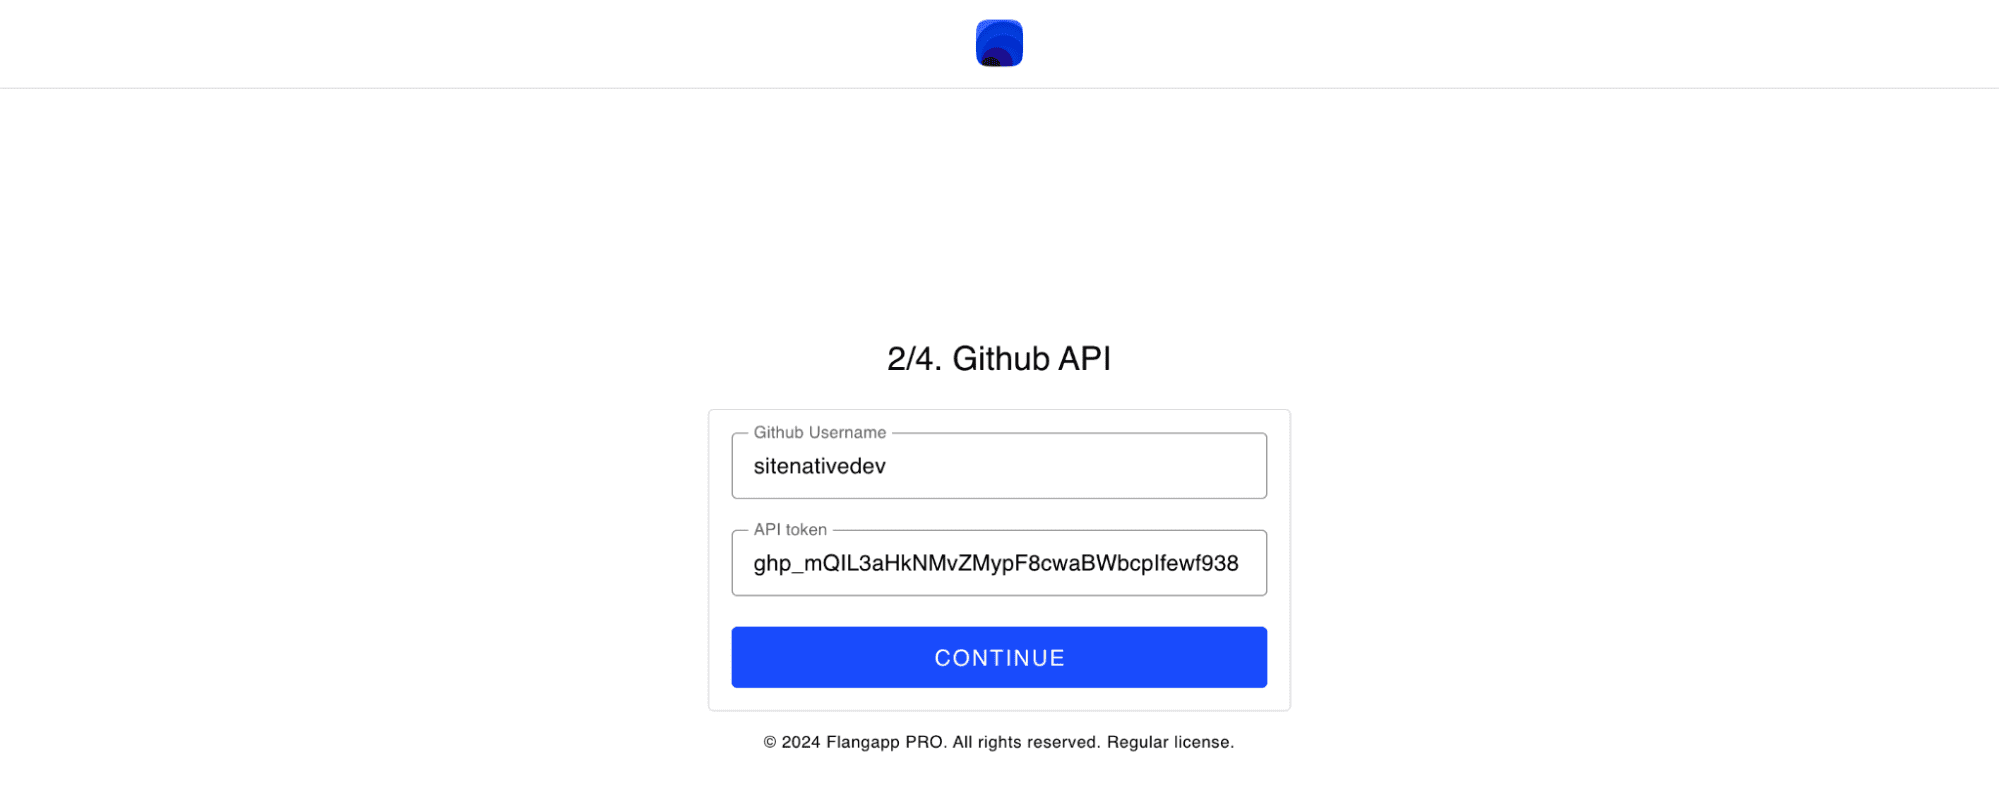
Enter your Github username along with the token.
Before clicking the “Continue” button, make sure that there is no repository named “flangapp_pro” in your Github account. This name is reserved by the platform and will be used to create a new repository. After clicking the button, you will be redirected to the next installation step.
ATTENTION
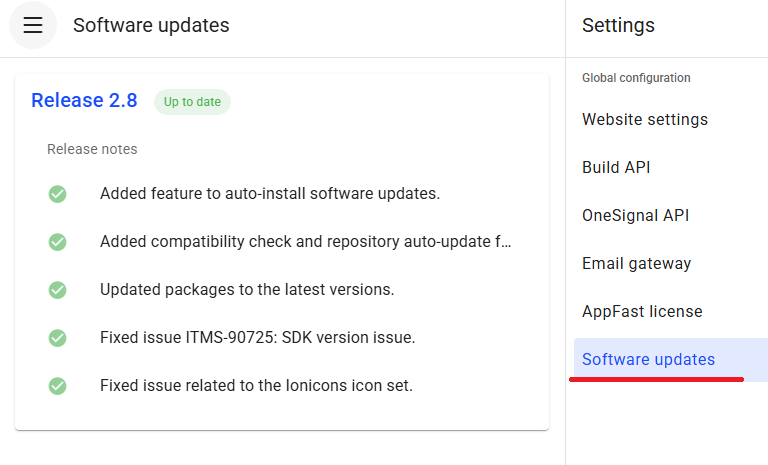
If you have updated your installed version of flangapp, generate a new github token, update it in settings (token only)
Go to the Software updates section and update your repository
Creating an administrator account
IYou need to create an account with administrator rights to access the site management dashboard.
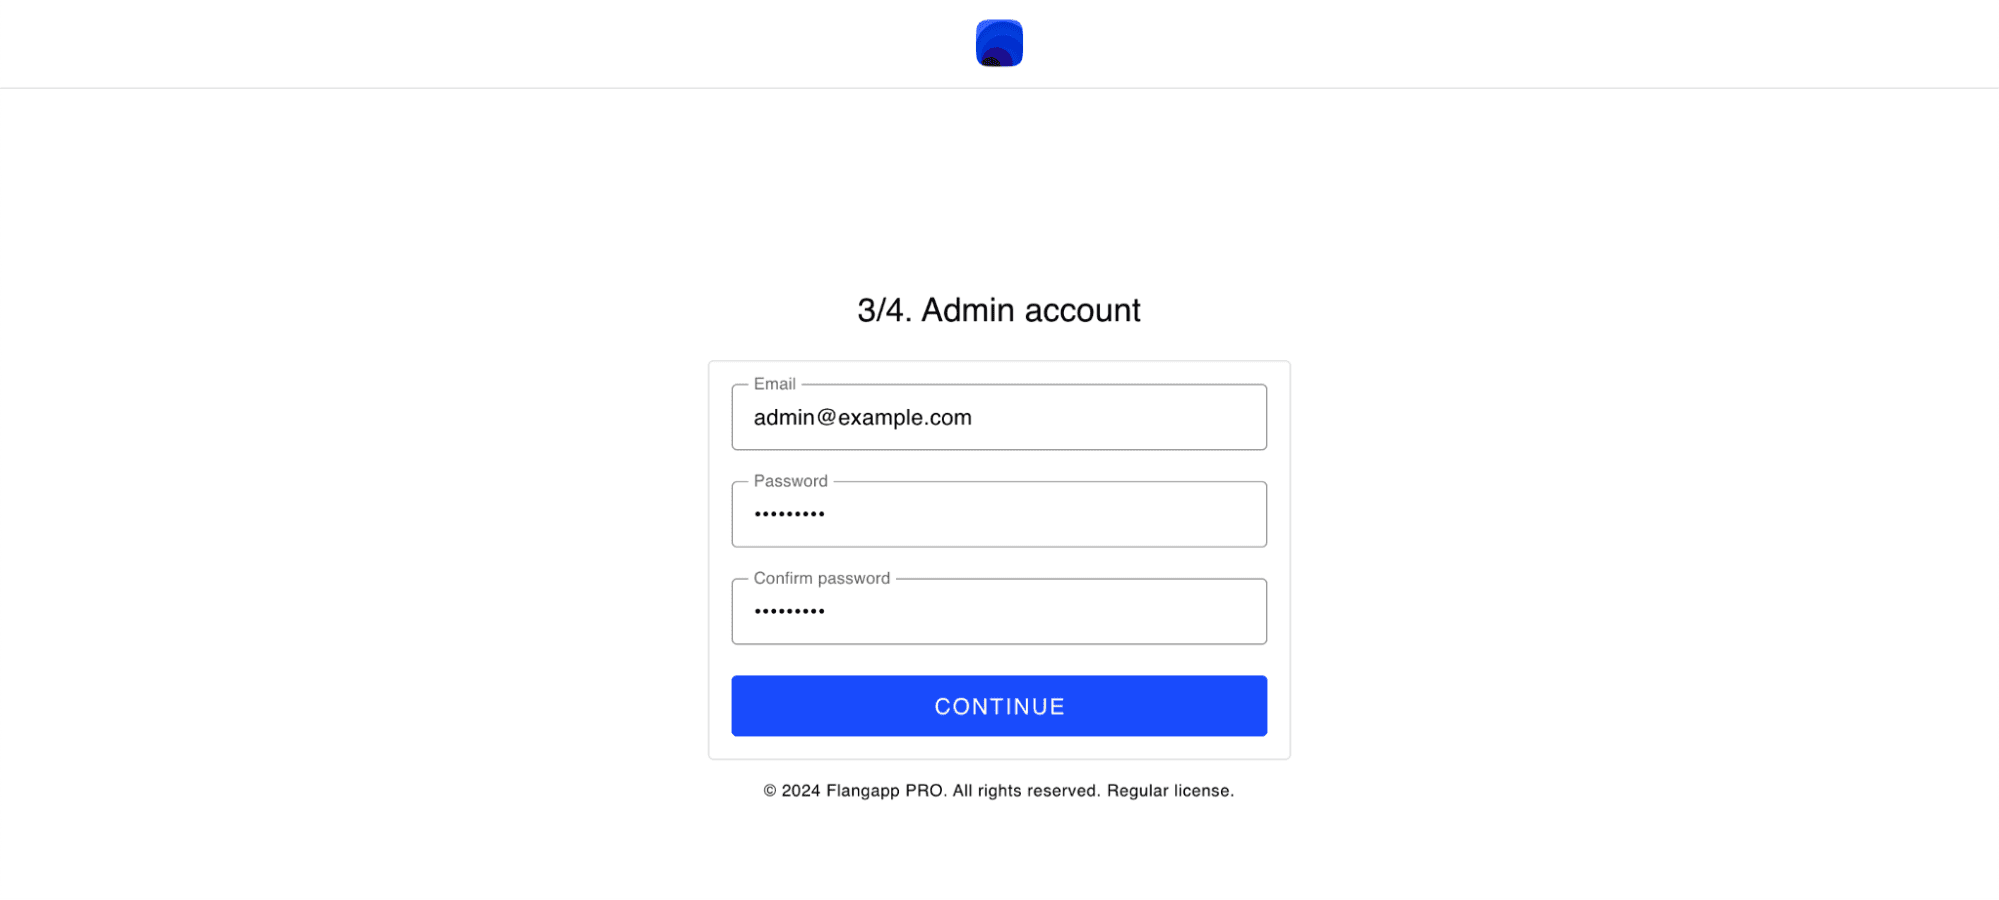
Enter your valid email address and strong password.
You will be able to change your email address or create a new user with administrator rights in the future.
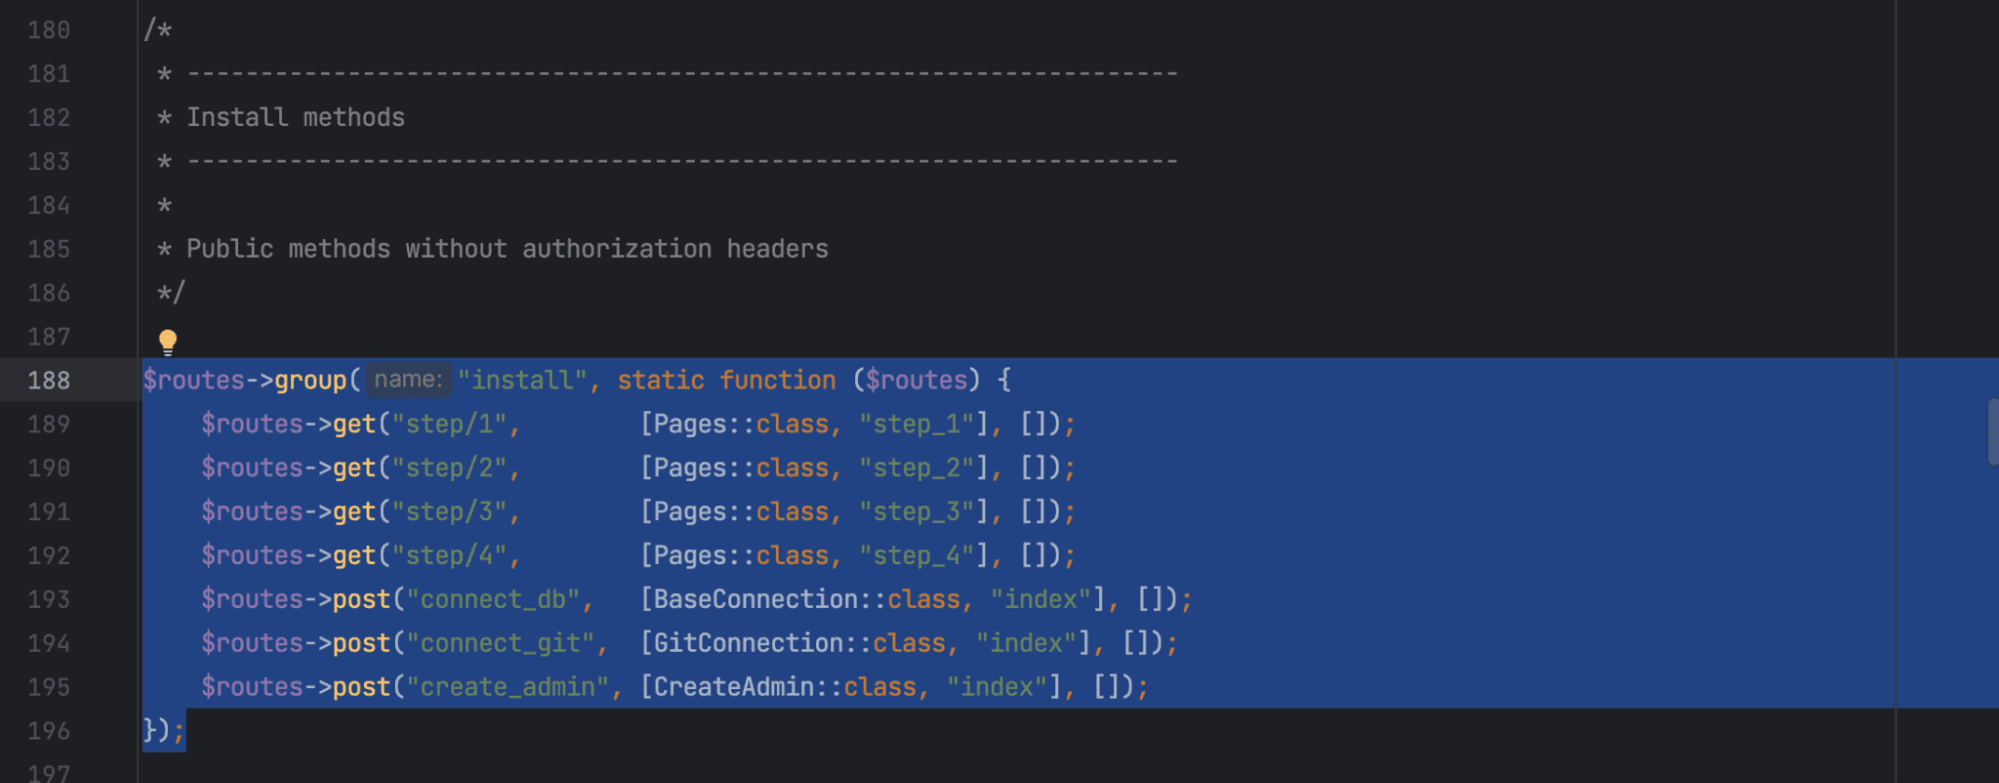
Removing installation routes
At the final installation step, you need to remove some code to prevent re-installation and problems with the website.
Open the file app/Config/Routes.php and delete the route code from lines 188 to 196 as shown in the screenshot:
Congratulations! You have successfully installed the Flangapp PRO API!
CRON settings
PHP is a single-threaded language, so we cannot start the build process immediately after an action in the user account.
So that the client does not have to wait too long for a response from the server, we use the CRON scheduler.
Once every 3 minutes, Flangapp script should check for requests for assemblies and transfer application objects to the repository.
Create a new CRON task in your hosting control panel:
*/3 * * * * wget -qO- https://demoapi.flangapp.com/public/bundle/create
Where is demoapi.flangapp.com the address of your domain with the backend.
If your hosting provider does not have a CRON scheduler, you can use cloud alternatives such as https://cron-job.org/en/ and others.
Frontend installation
Go back to your main site domain where the frontend files are located. Open the data/config.json file and enter the address of your backend site in the “api_url” variable as shown in the screenshot:

Please note that the slash at the end of the address is required.
Now you can open your website demo.flangapp.pro and log in to the system!
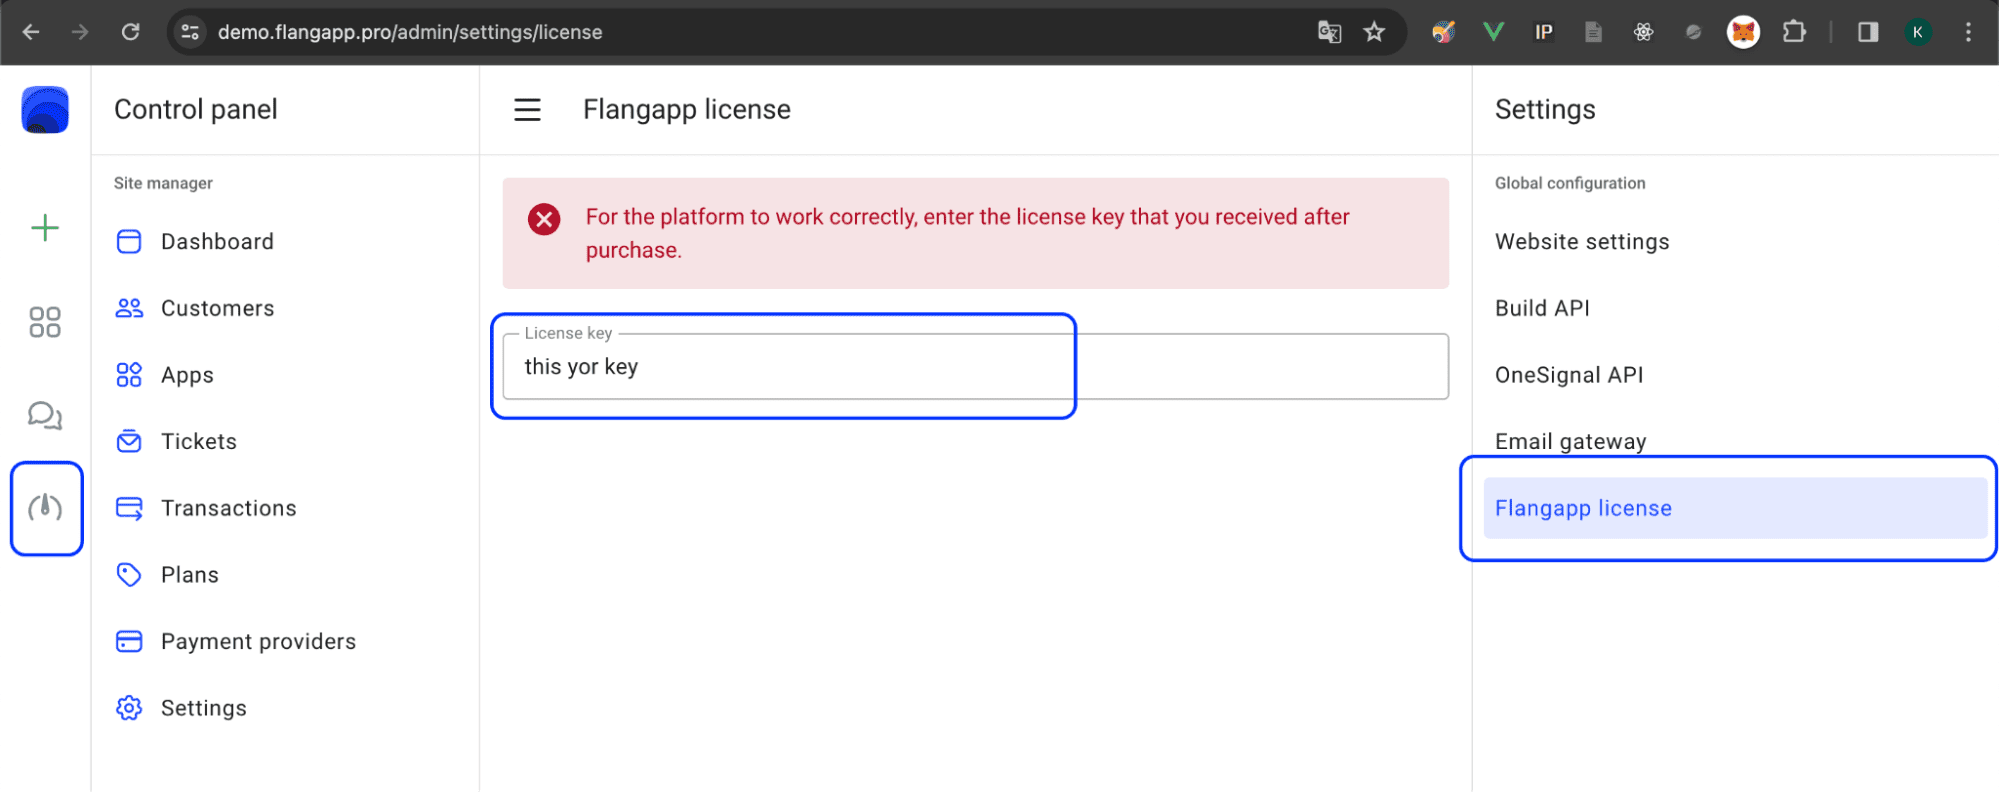
License activation
You need to activate the license key for correct work of all platform services. Log in with administrator rights, go to Dashboard - Settings - License Activation. Paste the license key into the activation form that was generated and issued to you after purchasing Flangapp PRO.
Keep in mind that you can only use a license key to activate Flangapp PRO on one domain. For each new domain/project you need to buy an additional license.
In some cases you can ask Help Desk to change the original domain. For example, resetting the activation key is possible when you change the test domain to a production domain after the development process.
Codemagic API settings
We need to connect to the Codemagic build virtual machine service and link the previously created Github repository to the Codemagic project to build the final application files (apk, aab and ipa). If you don't have an account yet, register a new one on the official website https://codemagic.io/. Go to the “Apps” section and add a new application by clicking the “Add your first app” button:
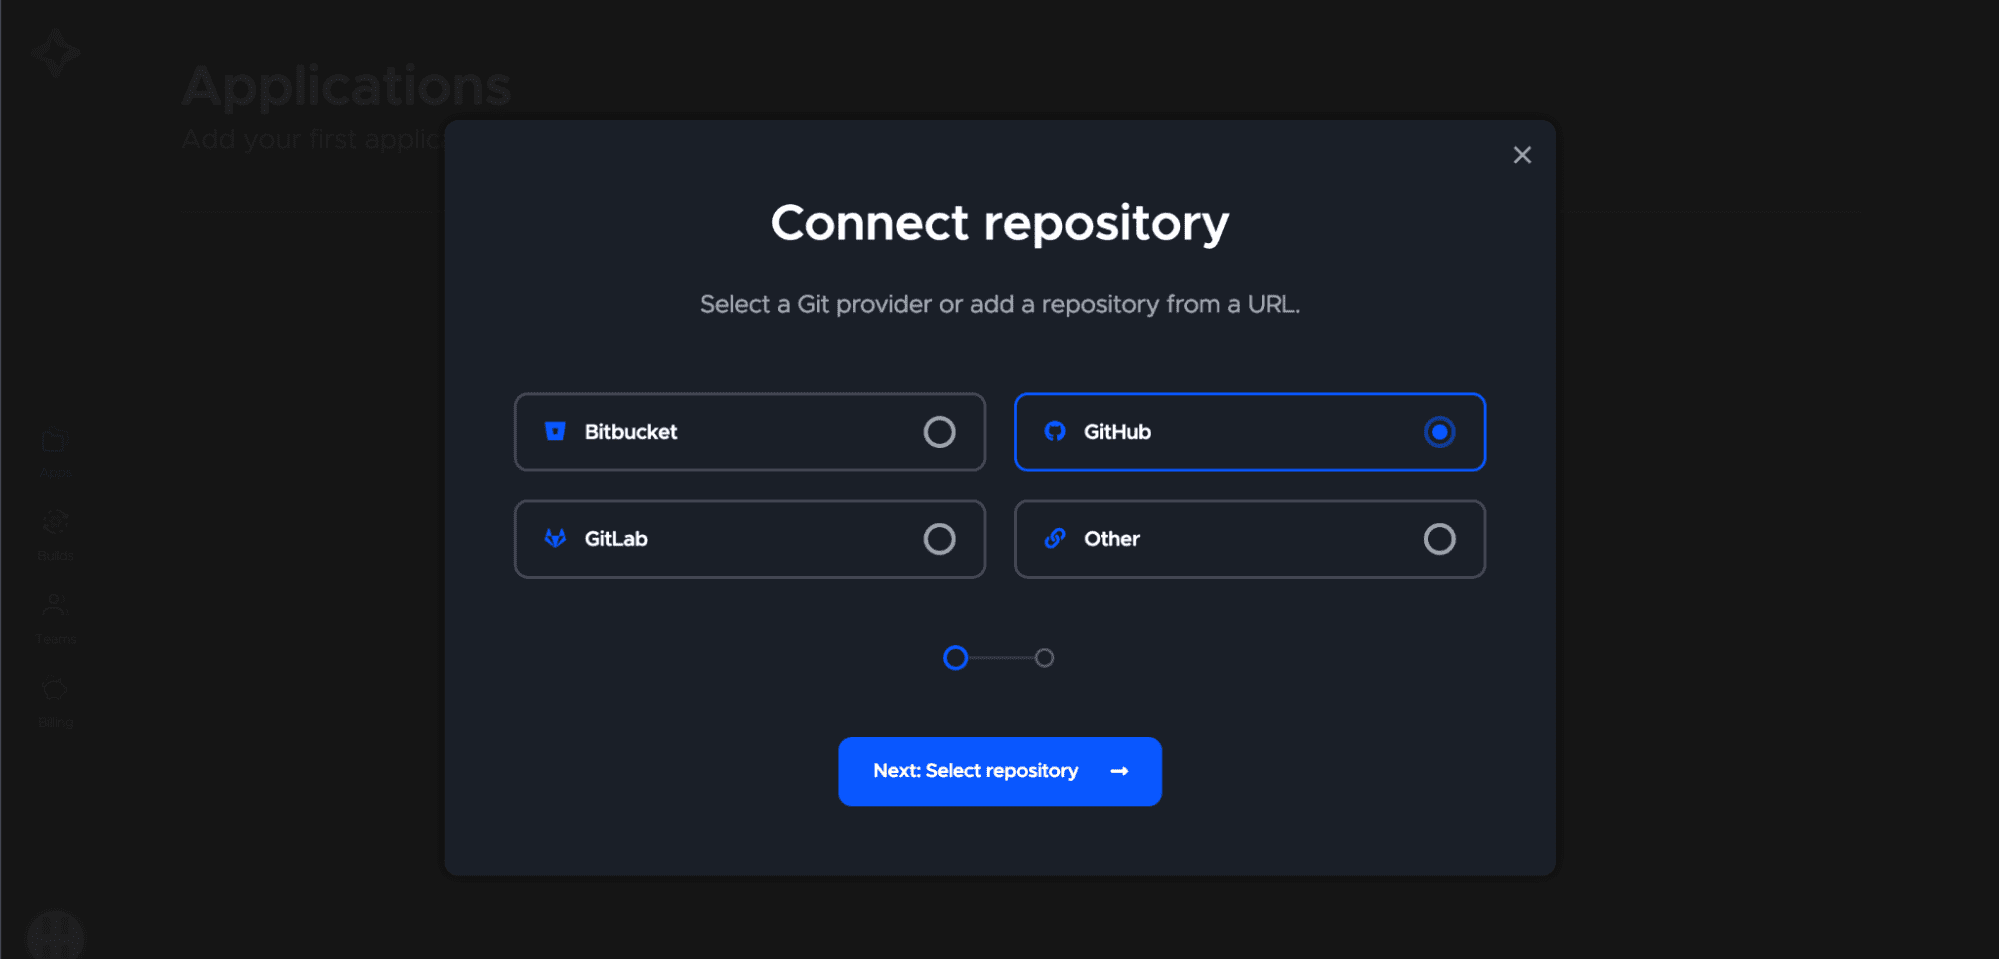
Select Github during the step of choosing a Git provider.
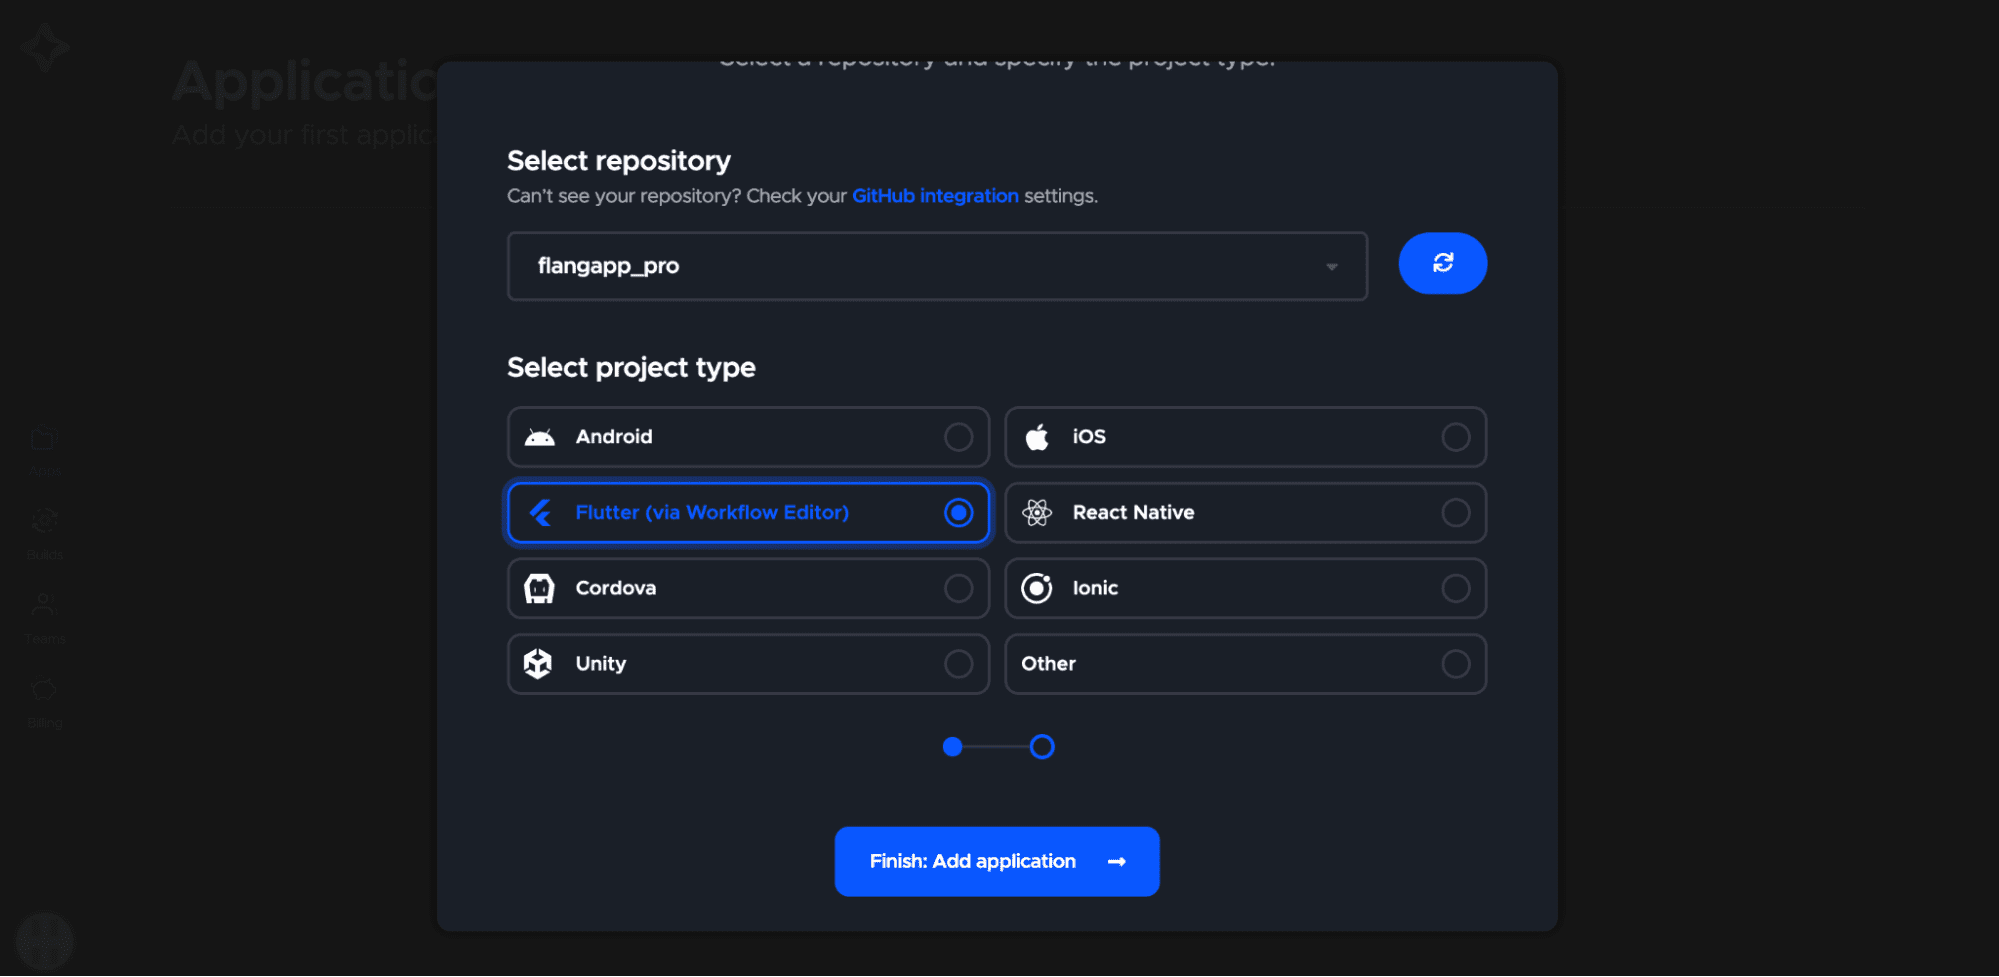
Select “flangapp_pro” repository and “Flutter (via Workflow editor)” project type. Click the “Finish: Add application” button.
Now you see the project settings page.
You don't need to change anything on this page because Flangapp PRO uses build process customization via codemagic.yaml files.
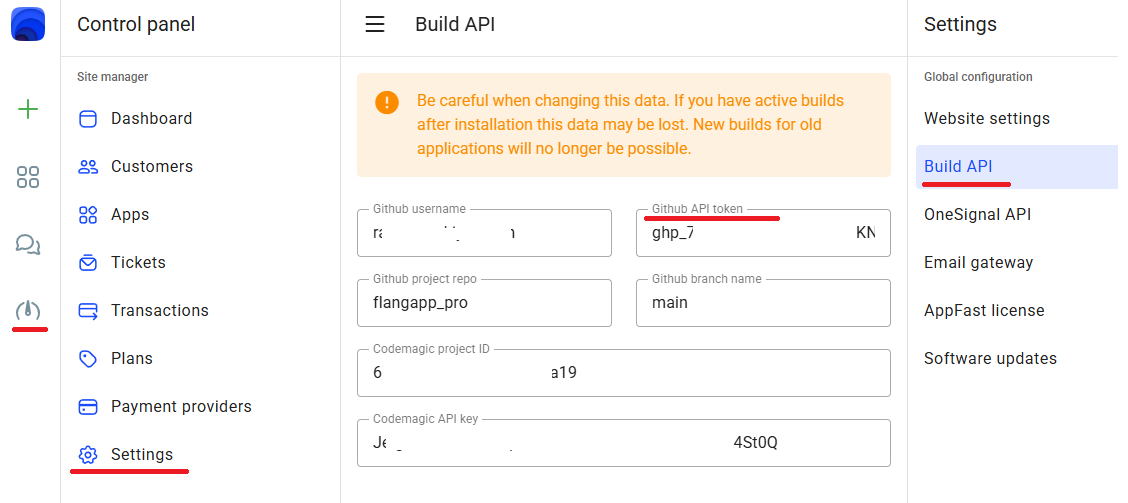
We just need to copy the APP ID - you can find it in the browser address bar:
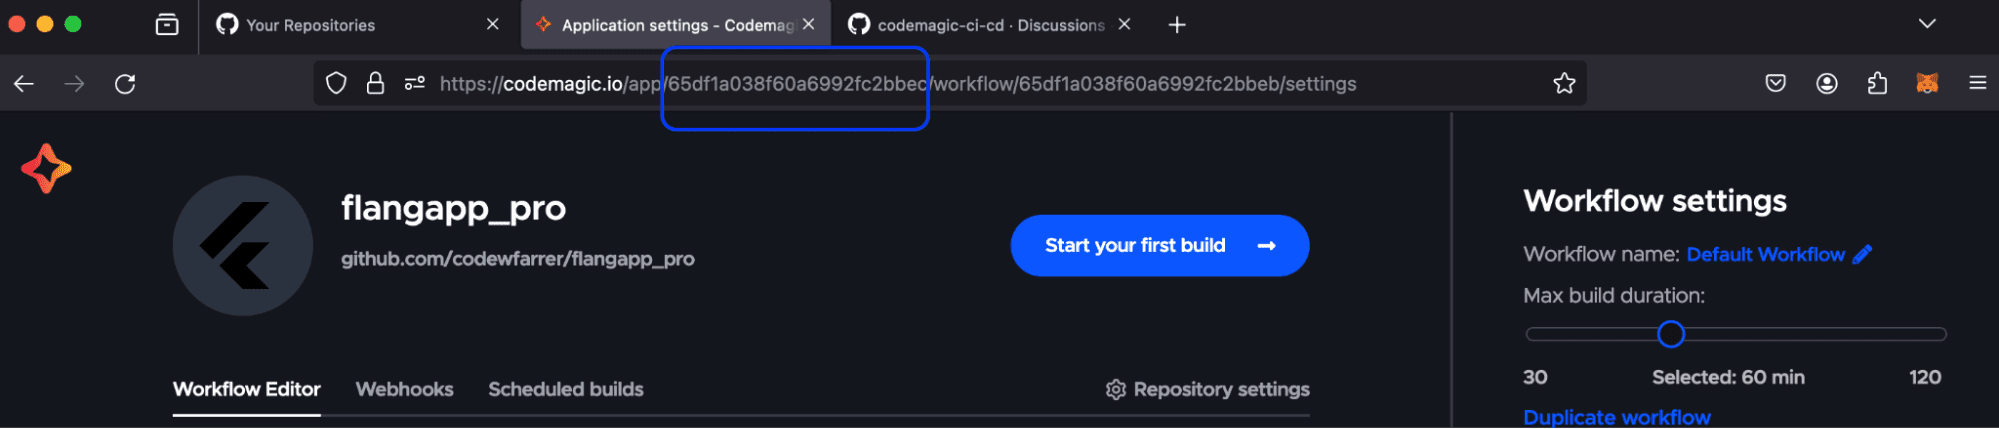
Save this value - we need to save these values in your project settings. Also we need to get an API key. Go to “Team” settings:
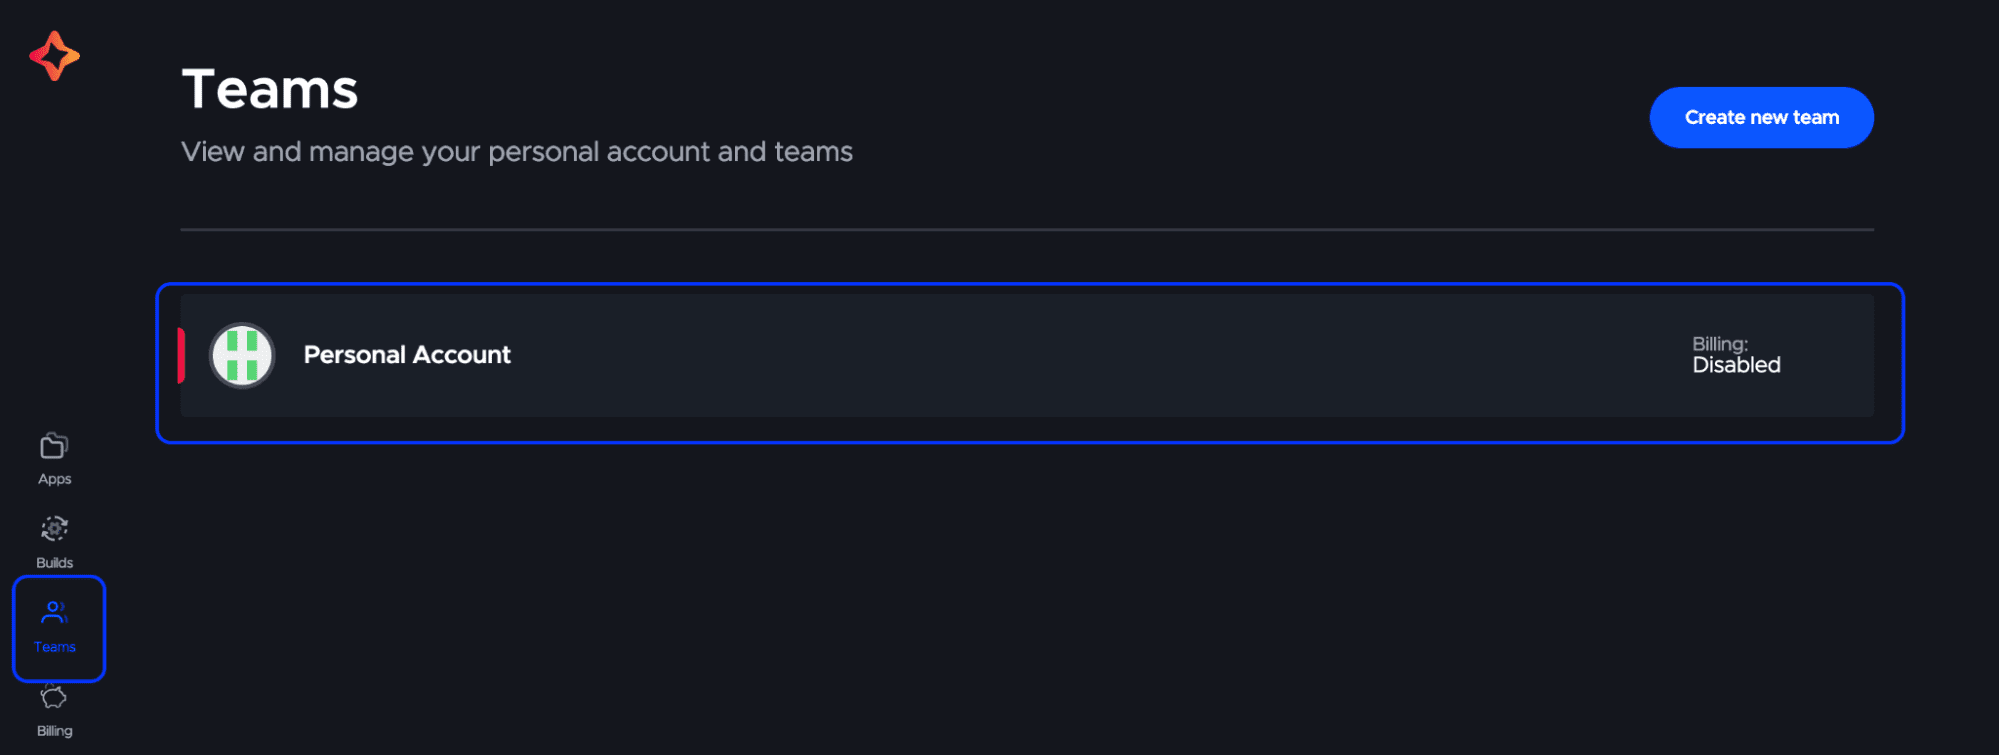
Click the “Personal account” section, select the “Integrations” tab:
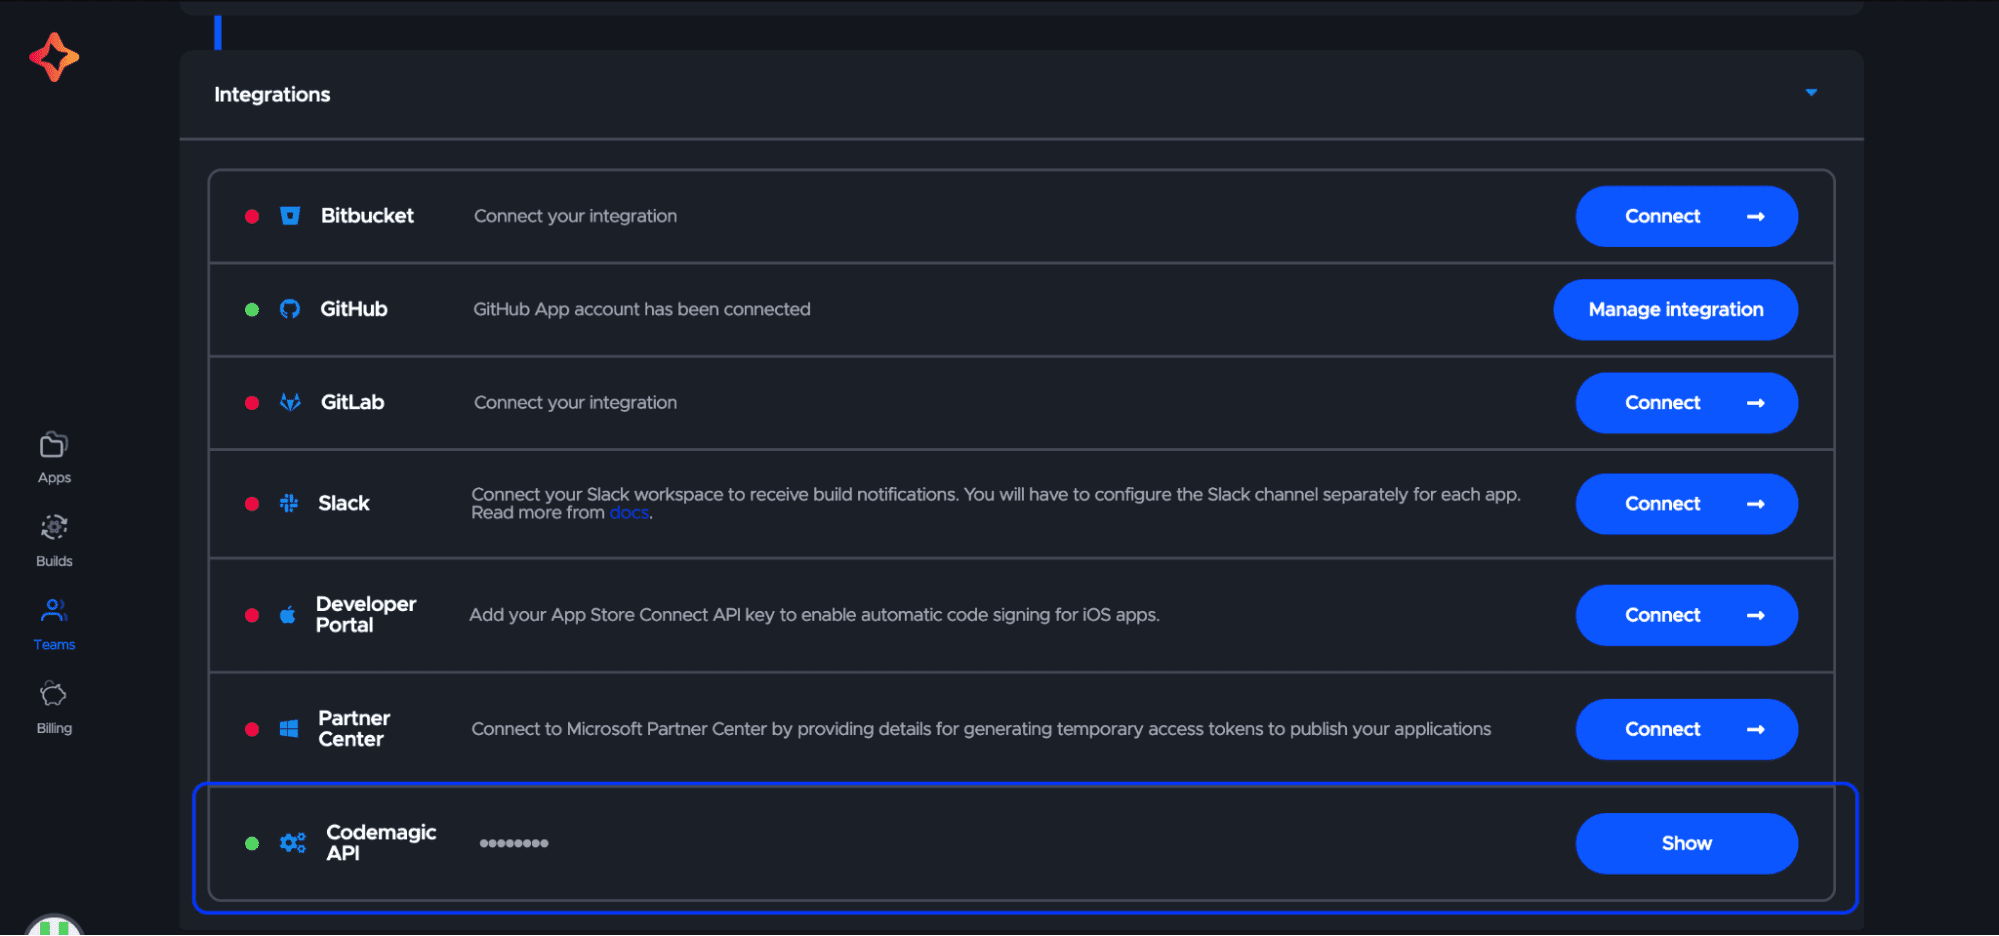
Click the “Show” button in the “Codemagic API” section. Copy and save the received API key. Go to Flangapp Dashboard - Settings - Build API. Paste the previously generated App ID and API key into the form:

Congratulations! You have successfully connected the API of the build and now you can move on to the next step of setting up your project configuration.
OneSignal API Settings
The function of sending push notifications is available for all Android applications created with Flangapp PRO. This is possible thanks to integration with OneSignal API. OneSignal sends notifications using the Firebase Cloud Messaging service. You need to register (if not already) accounts on the following sites:
- https://console.firebase.google.com/
After registration go to the Firebase control console and create a new project. Go to the project settings in the “Cloud Messaging” tab:
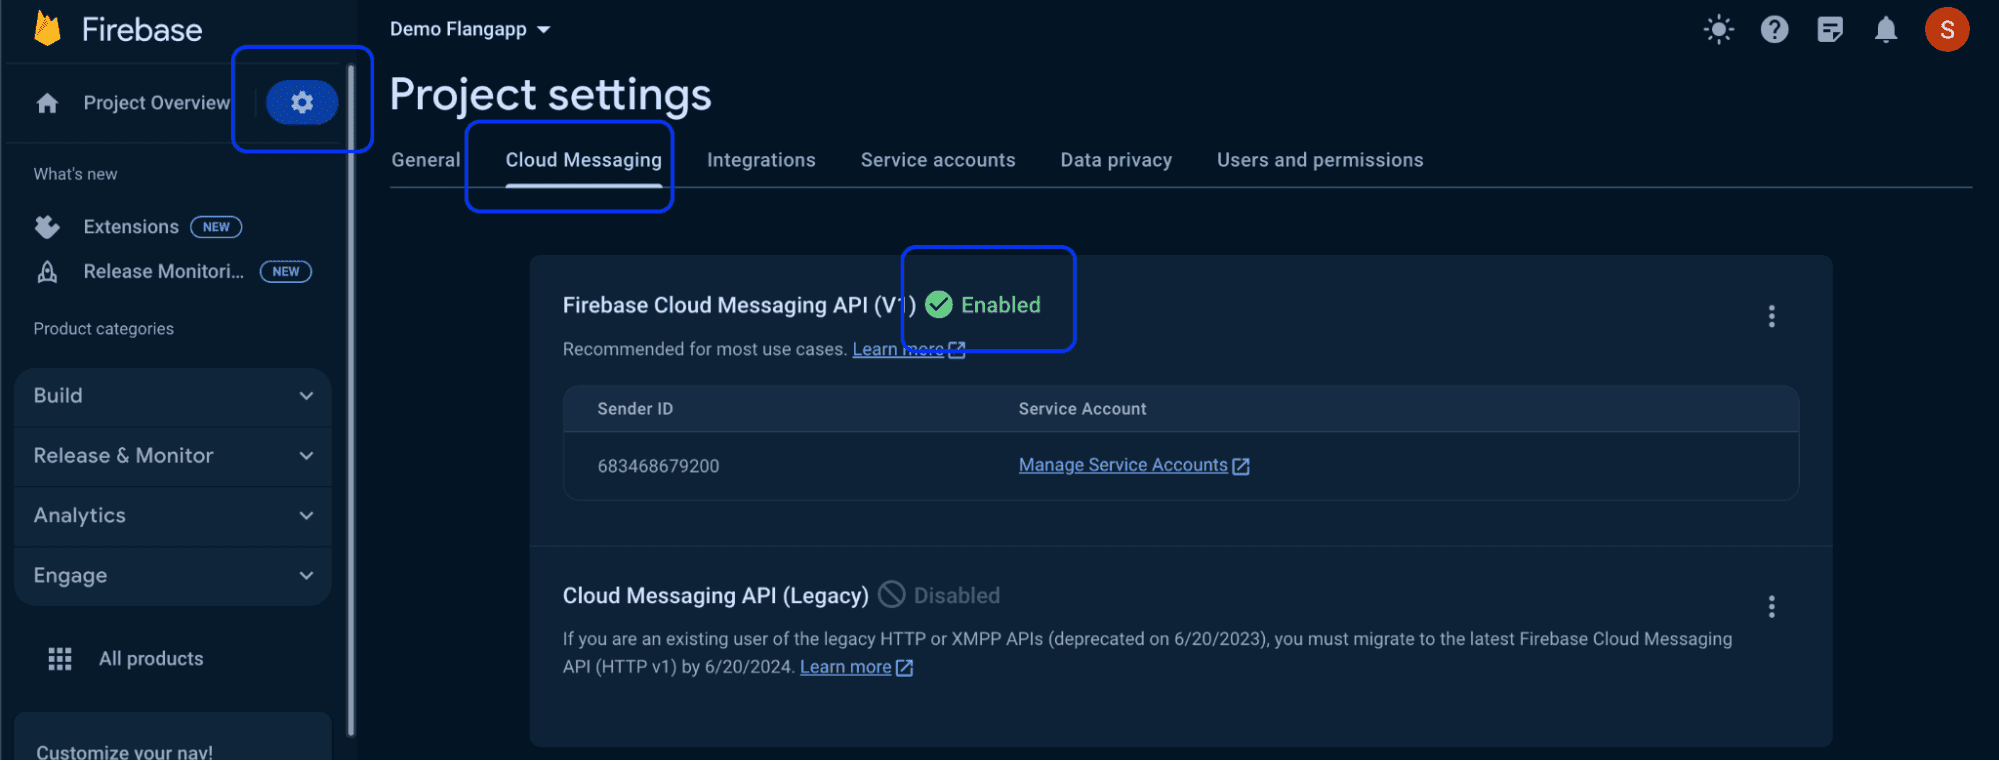
If Firebase Cloud Messaging API (V1) is disabled, click the kebab menu icon in the top right corner and open the link.
On the next page click Enable. You may have to wait a few minutes for the action to spread all over the Firebase systems.
Create a JSON private key file: go to the “Service accounts” tab and click the “Generate new private key” button:
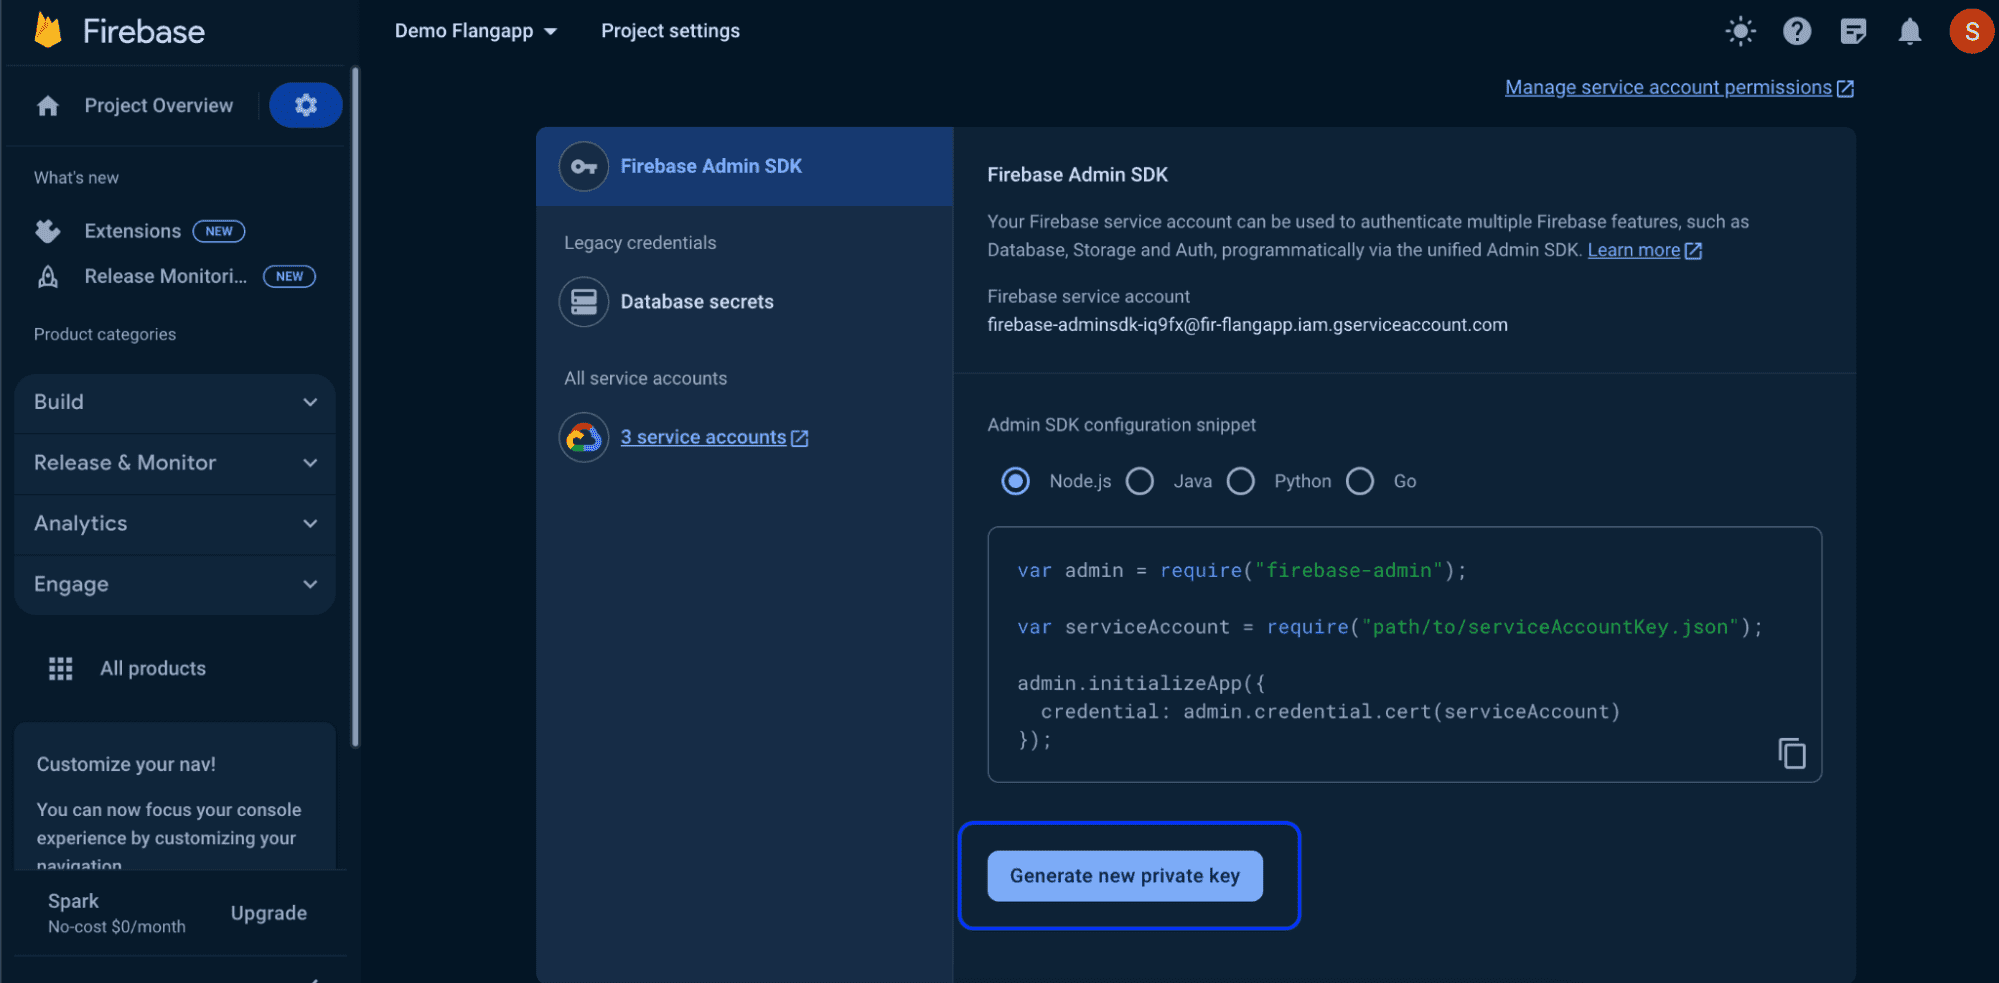
Keep the key you receive and do not give it to anyone.
Now we can set up OneSignal - go to the OneSignal control console and create a new organization at https://dashboard.onesignal.com/organizations/new

Copy and save your organization ID from your browser's address bar:

Go to your OneSignal account settings and find the “User Auth Key” section:
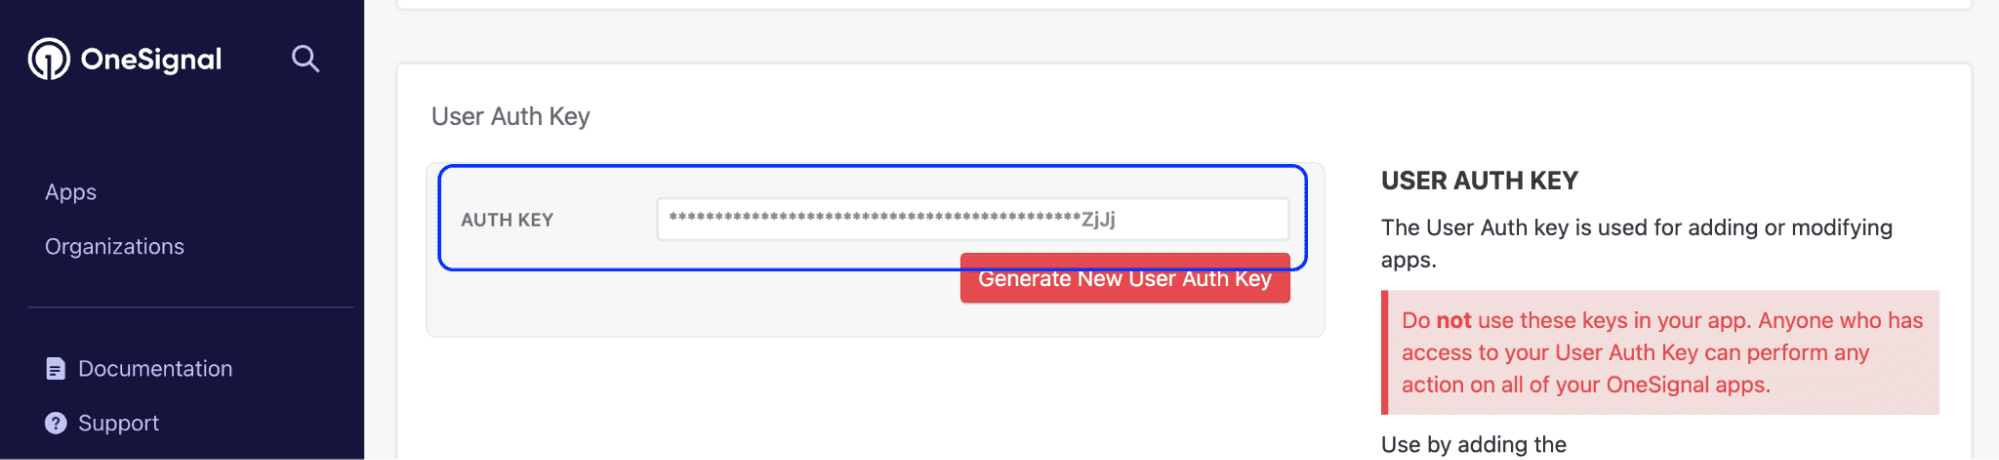
Copy and save Auth key.
It is almost ready!
Now all we have to do is to enter all the received values into the settings of your site. Go to Dashboard - Settings - OneSginal API and fill in the form:
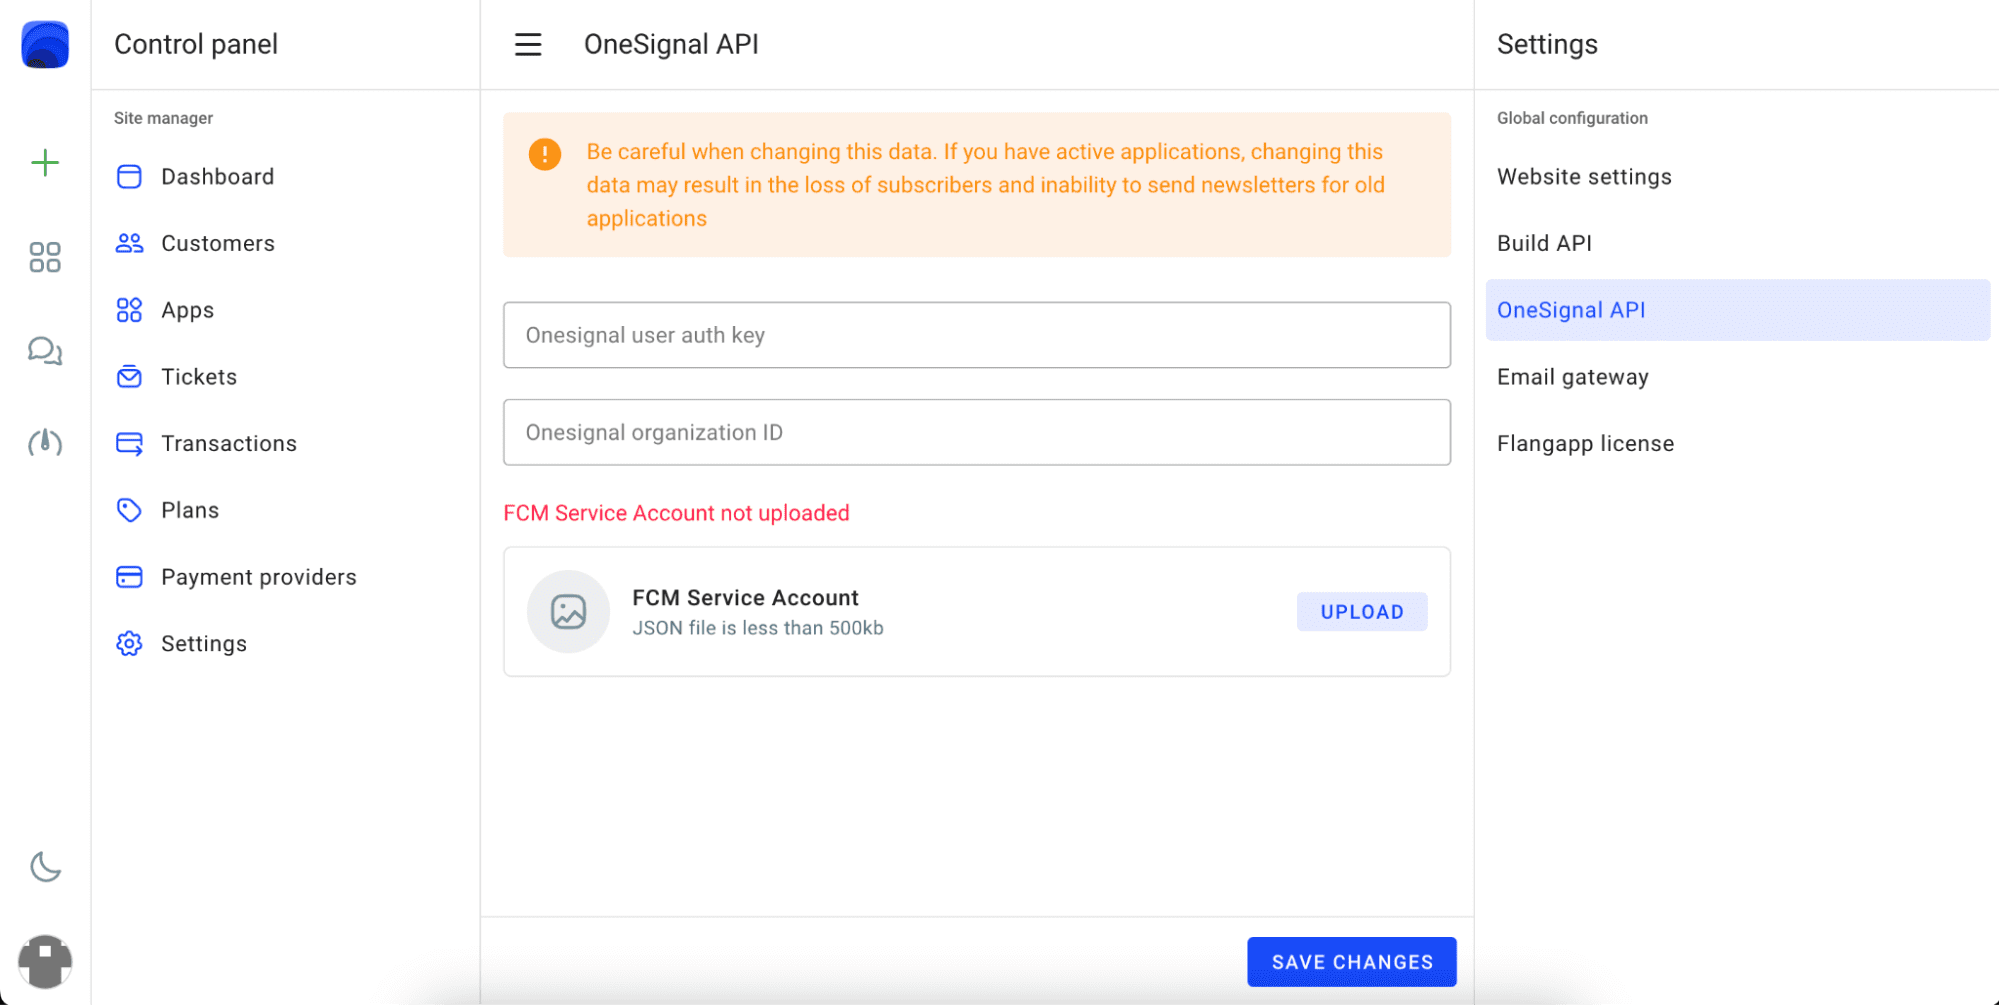
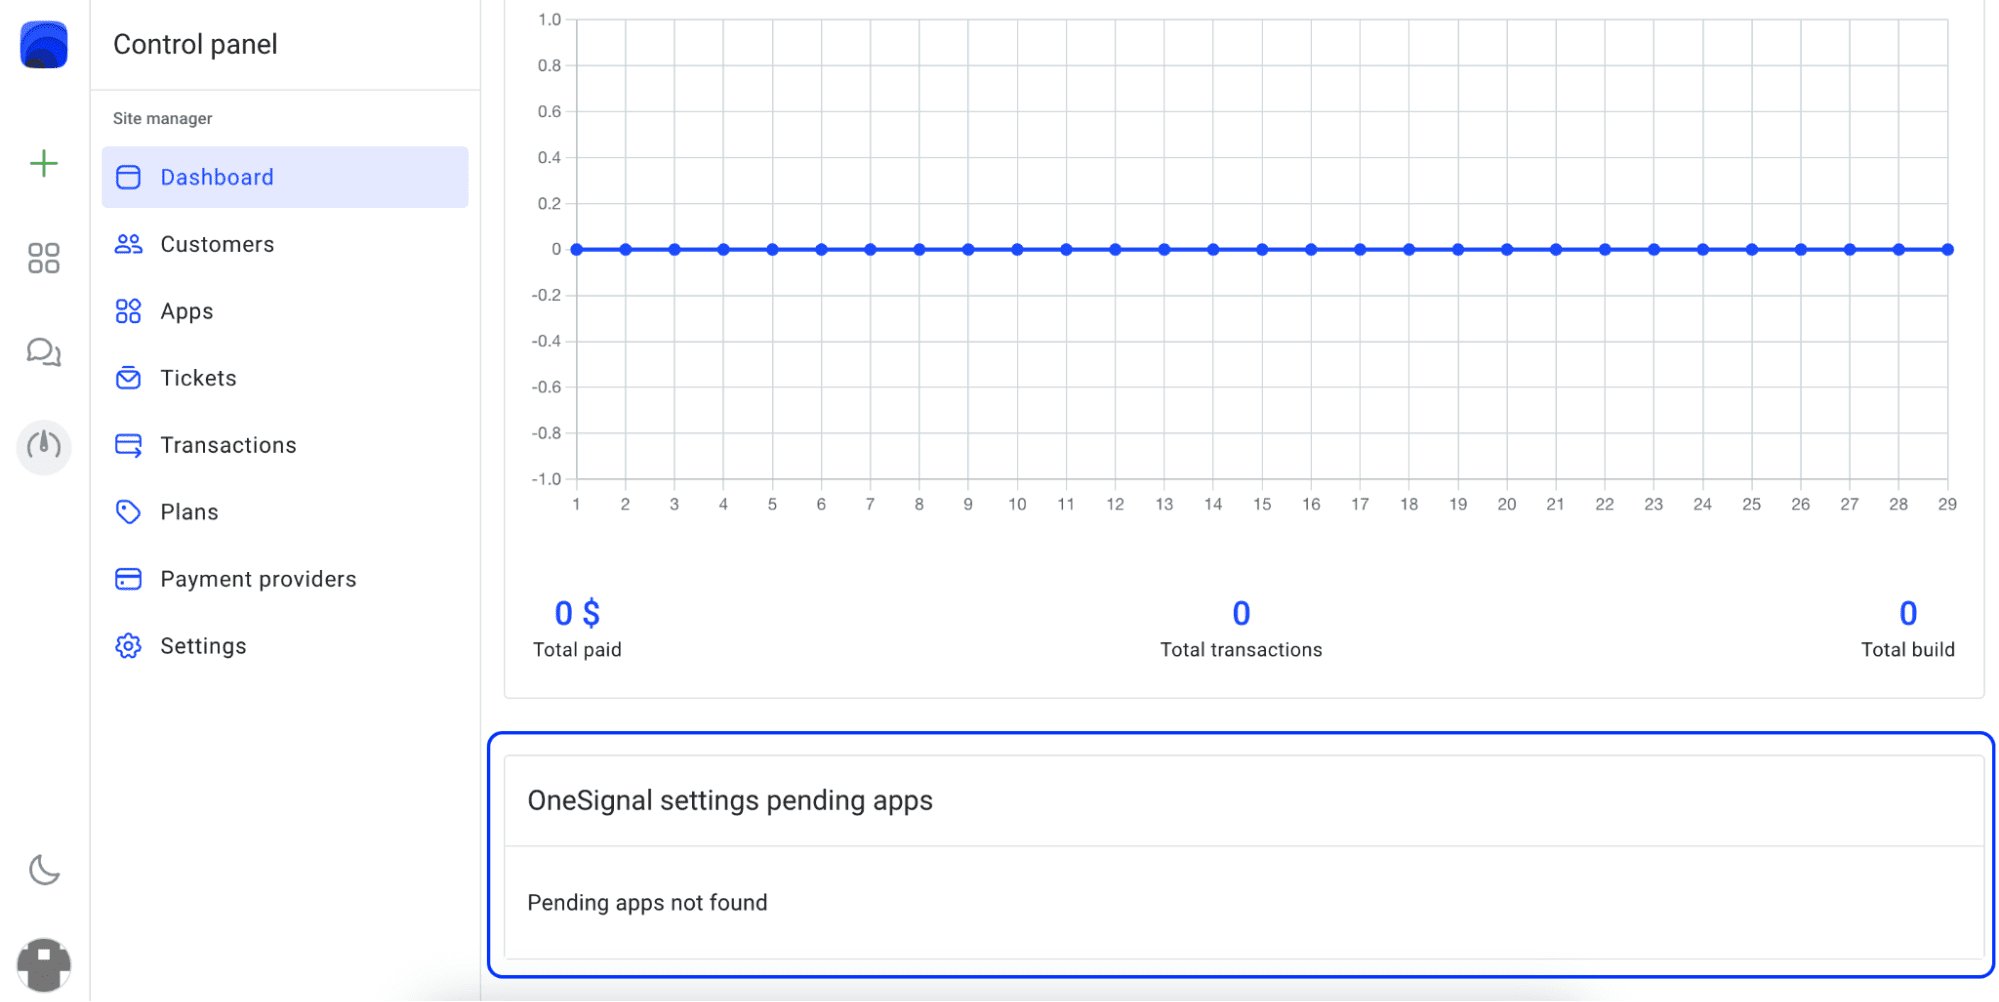
All applications will be created automatically in the OneSignal console as soon as you start building the application. However, OneSignal can not automatically transfer application API keys to create newsletters. You have to enter these values manually for each customer-paid application. If this is required you will see it in the dashboard in the “OneSignal pending apps” section.
When it is possible, you can go to the application settings and enter the integration key:
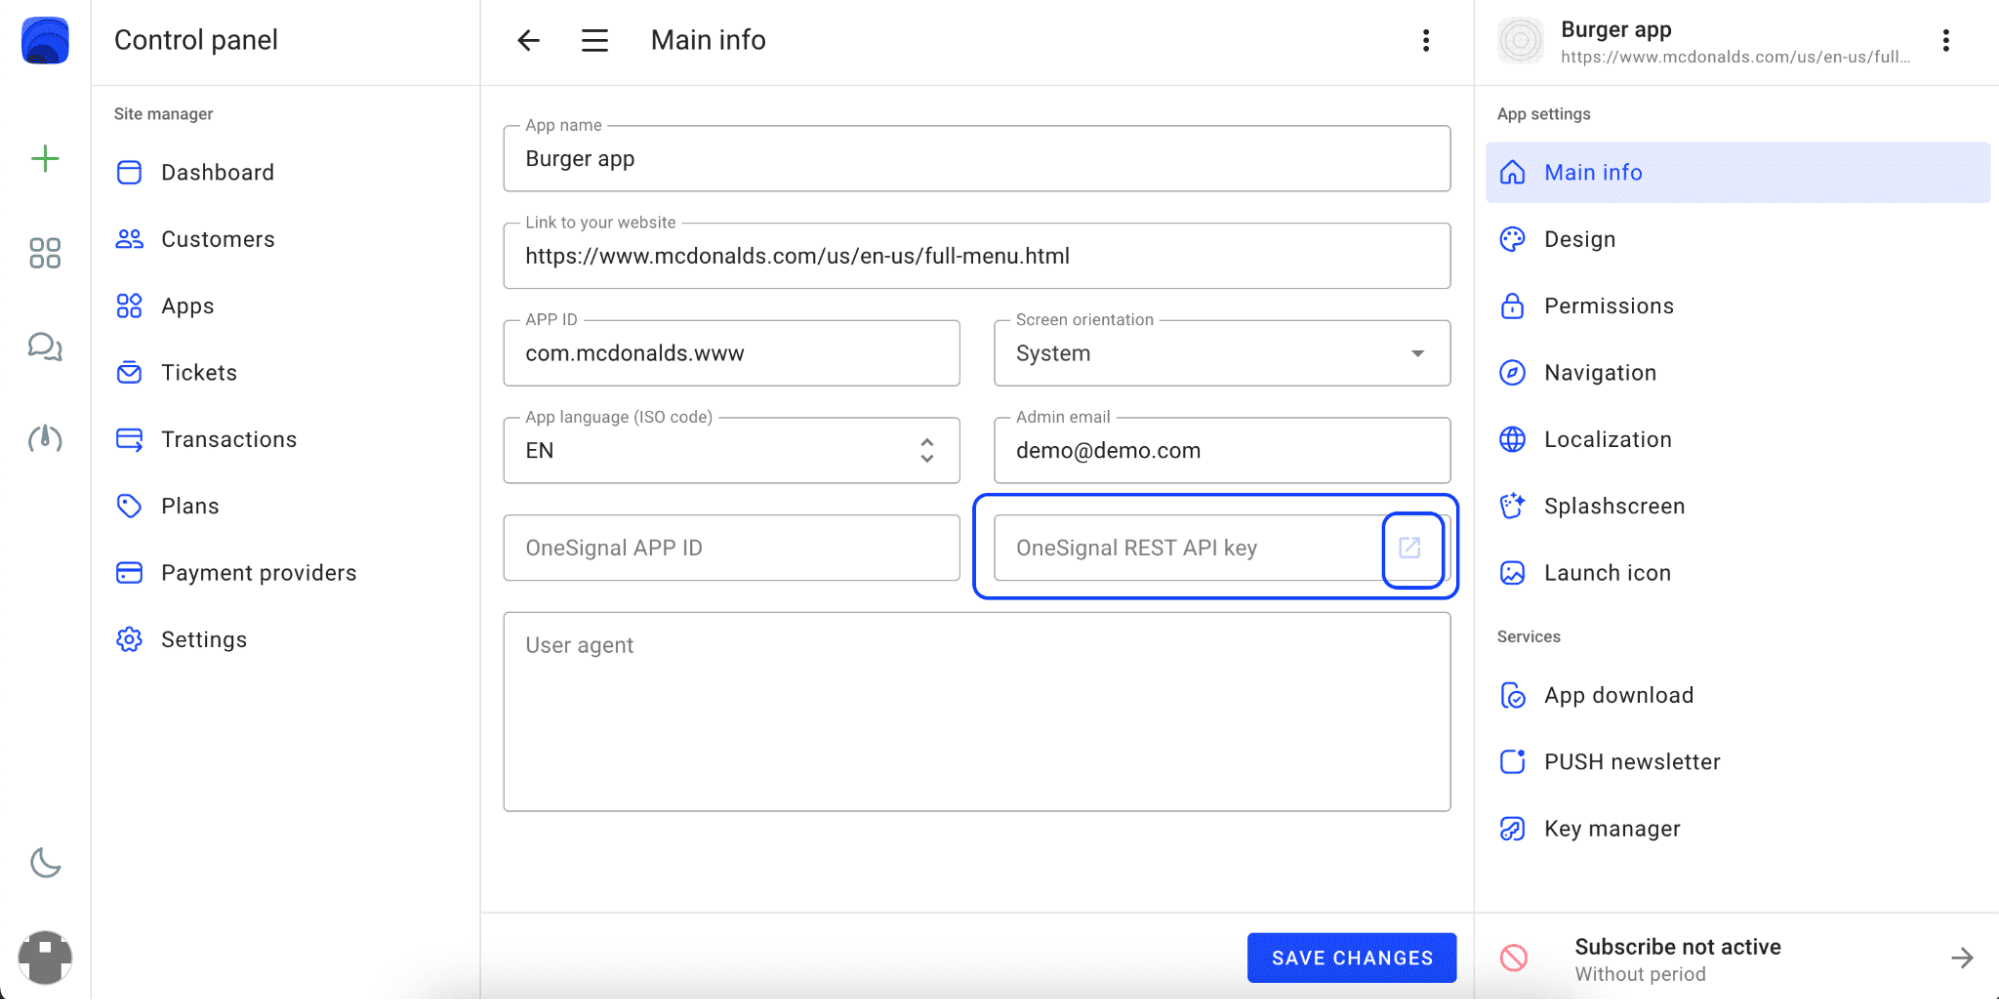
When you click the external link button a page with a key opens:
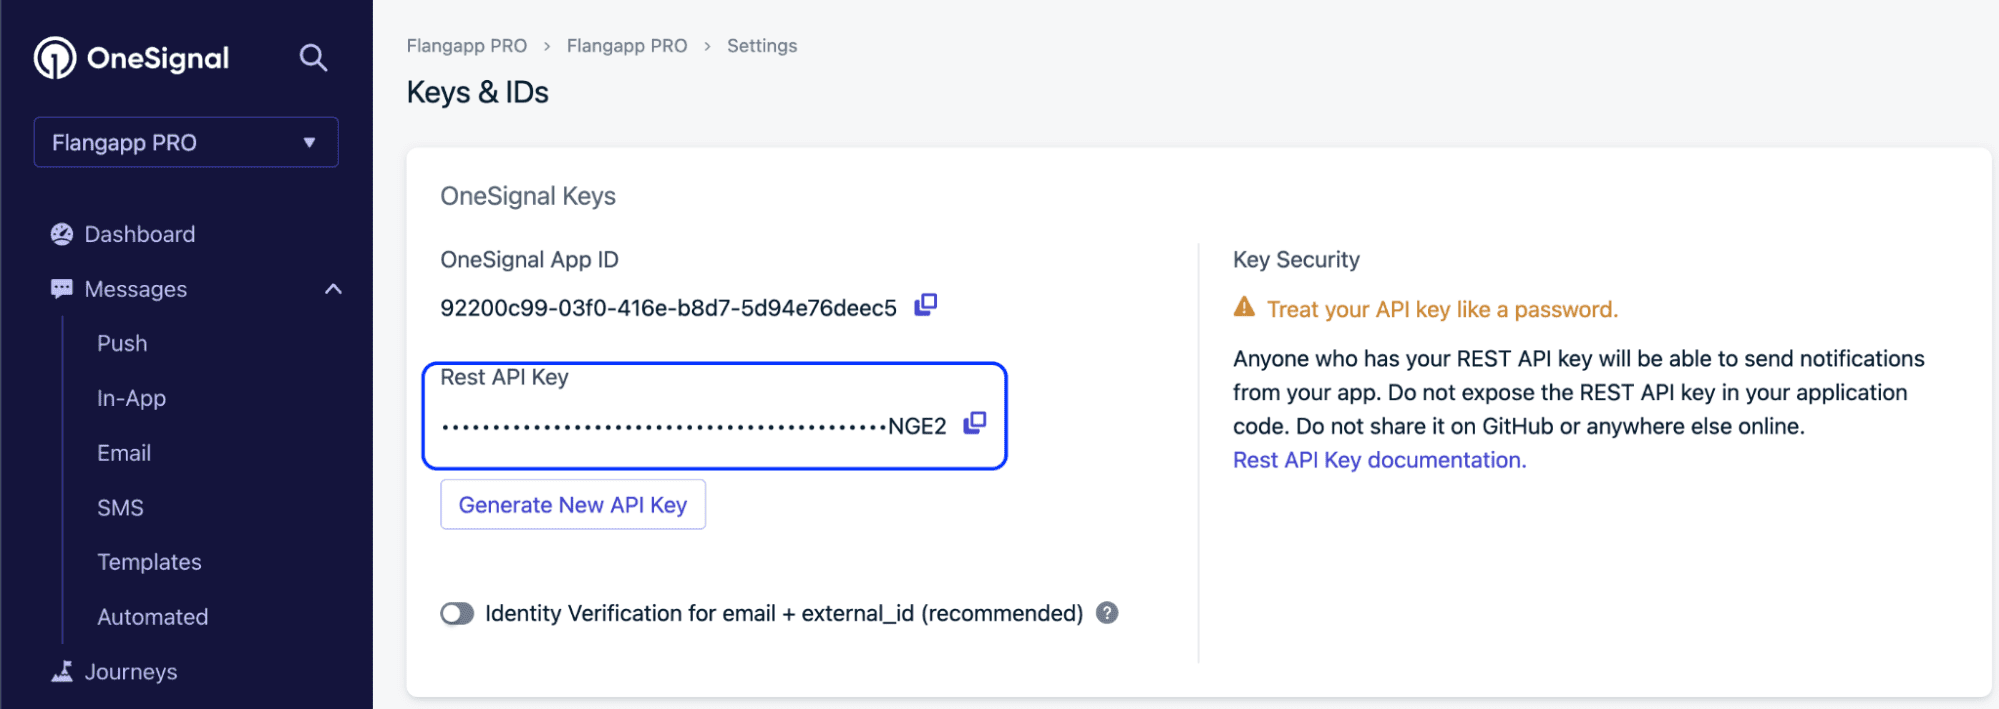
Copy the Rest API key and enter it in the “OneSignal REST API key” field.
Until you do this, your client will receive a notification that the mailing service has not yet been activated and it may take some time.
The ability to activate the service appears after the first subscription payment and the creation of the first application build.
Setting up an Email Gateway
Flangapp uses the SMTP email message protocol to deliver some notifications about build status or password recovery. You need to set it in the Dashboard - Settings - Email gateway section.
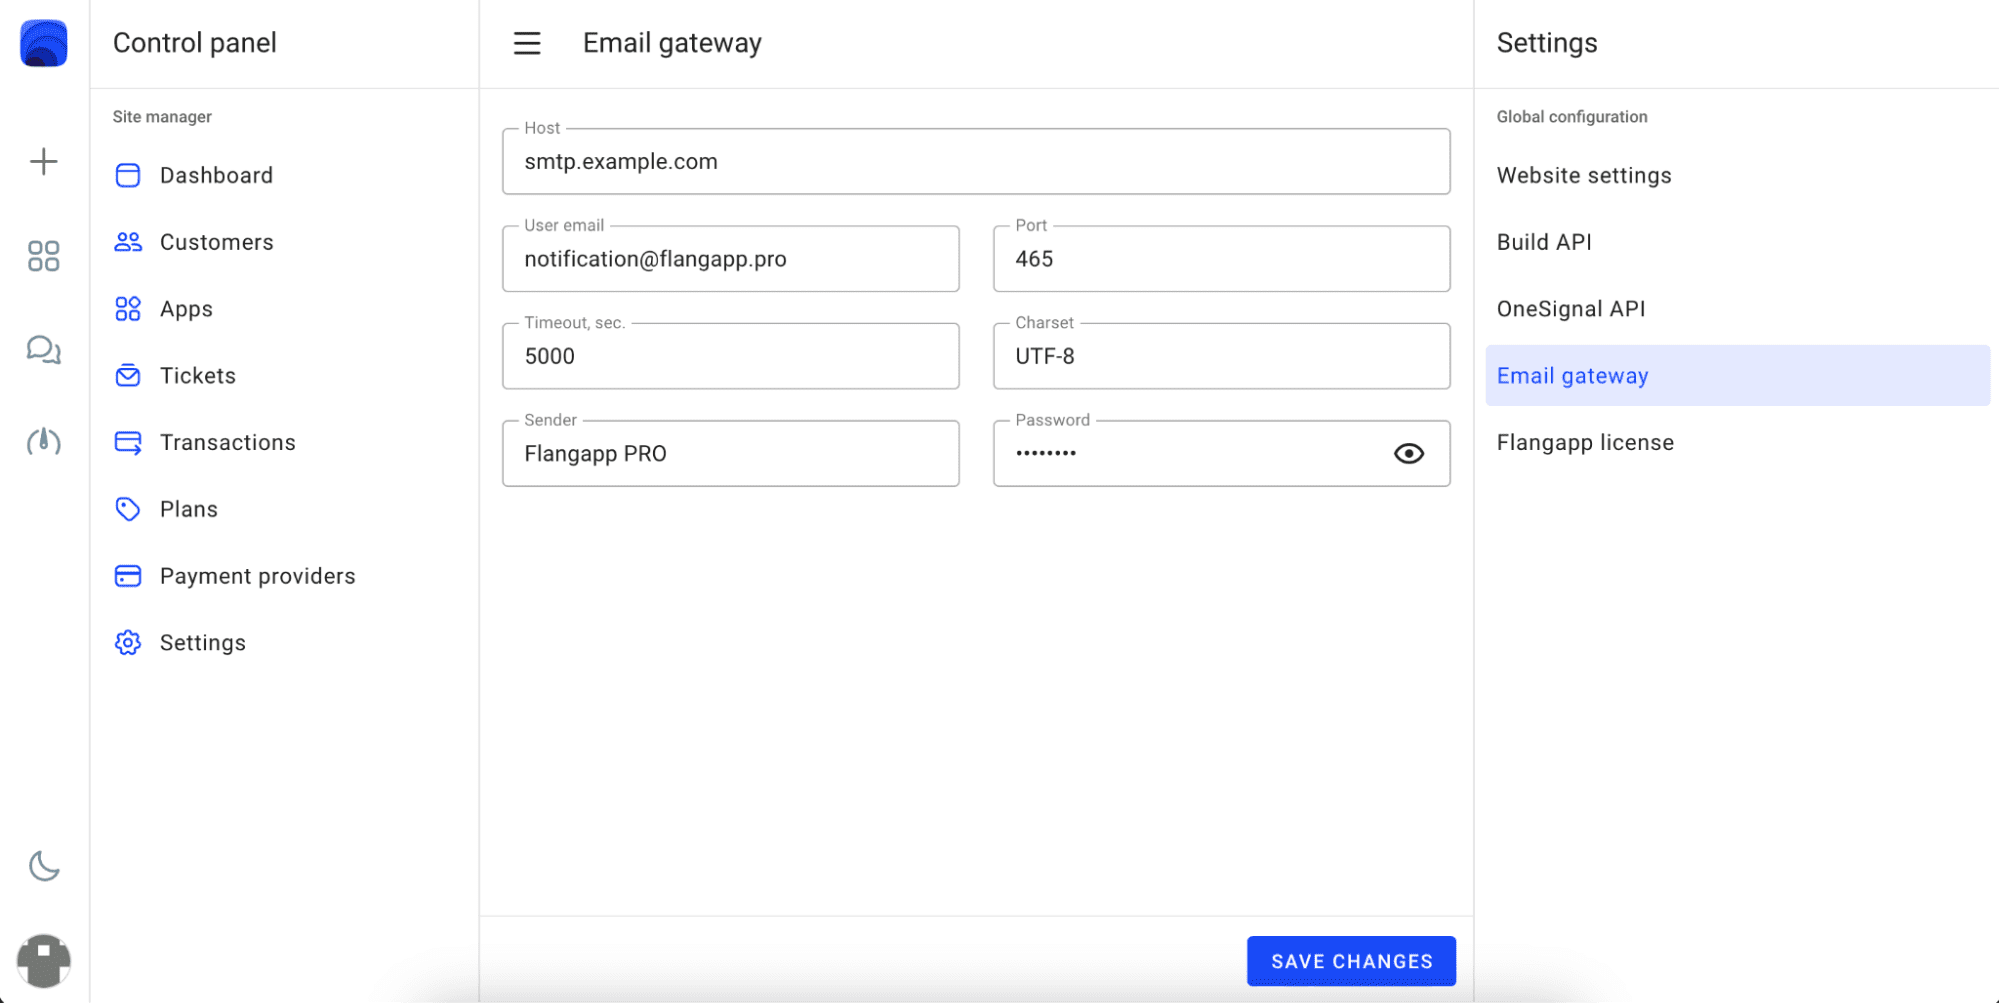
Fill in this form. You can get your mail account necessary data from your provider.
Stripe settings
You can use Stripe to manage payments from your customers' app subscriptions. Go to the Dashboard - Payment Providers and click on the “Stripe” section:
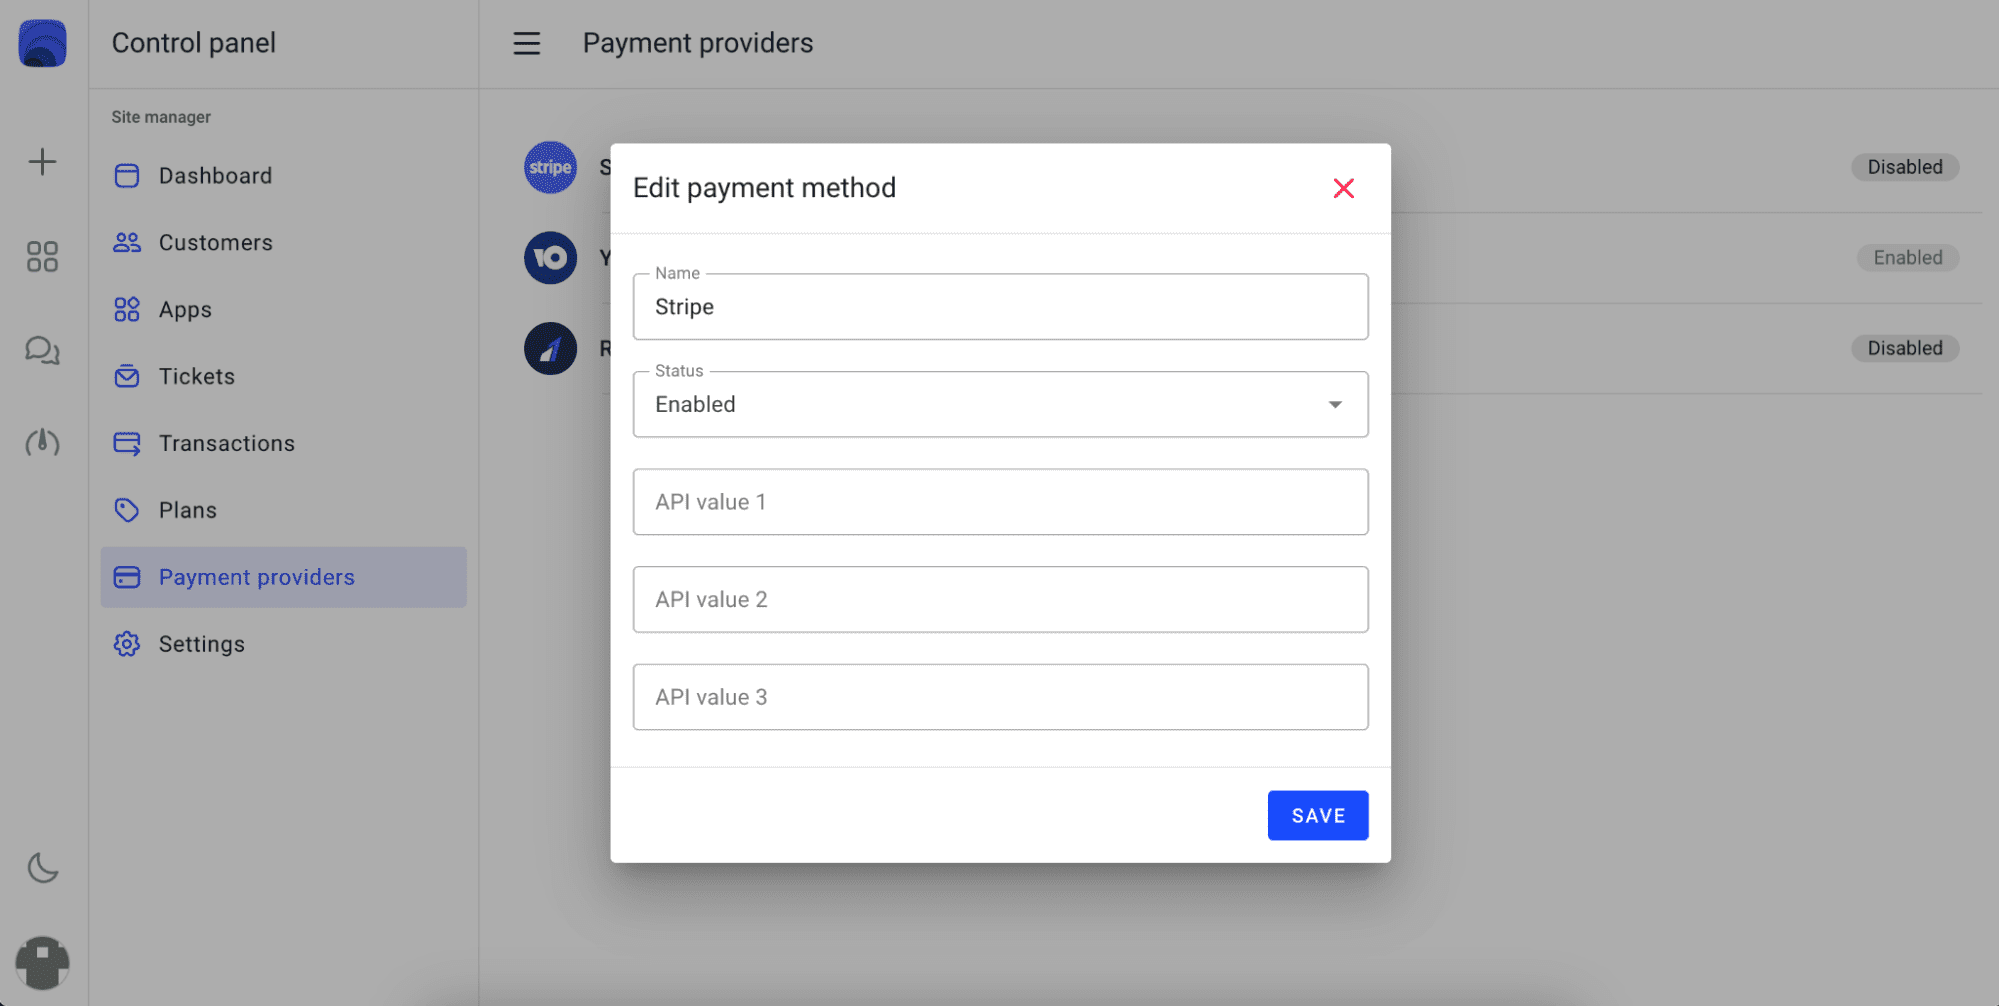
Fill in the form by entering the values as shown below:
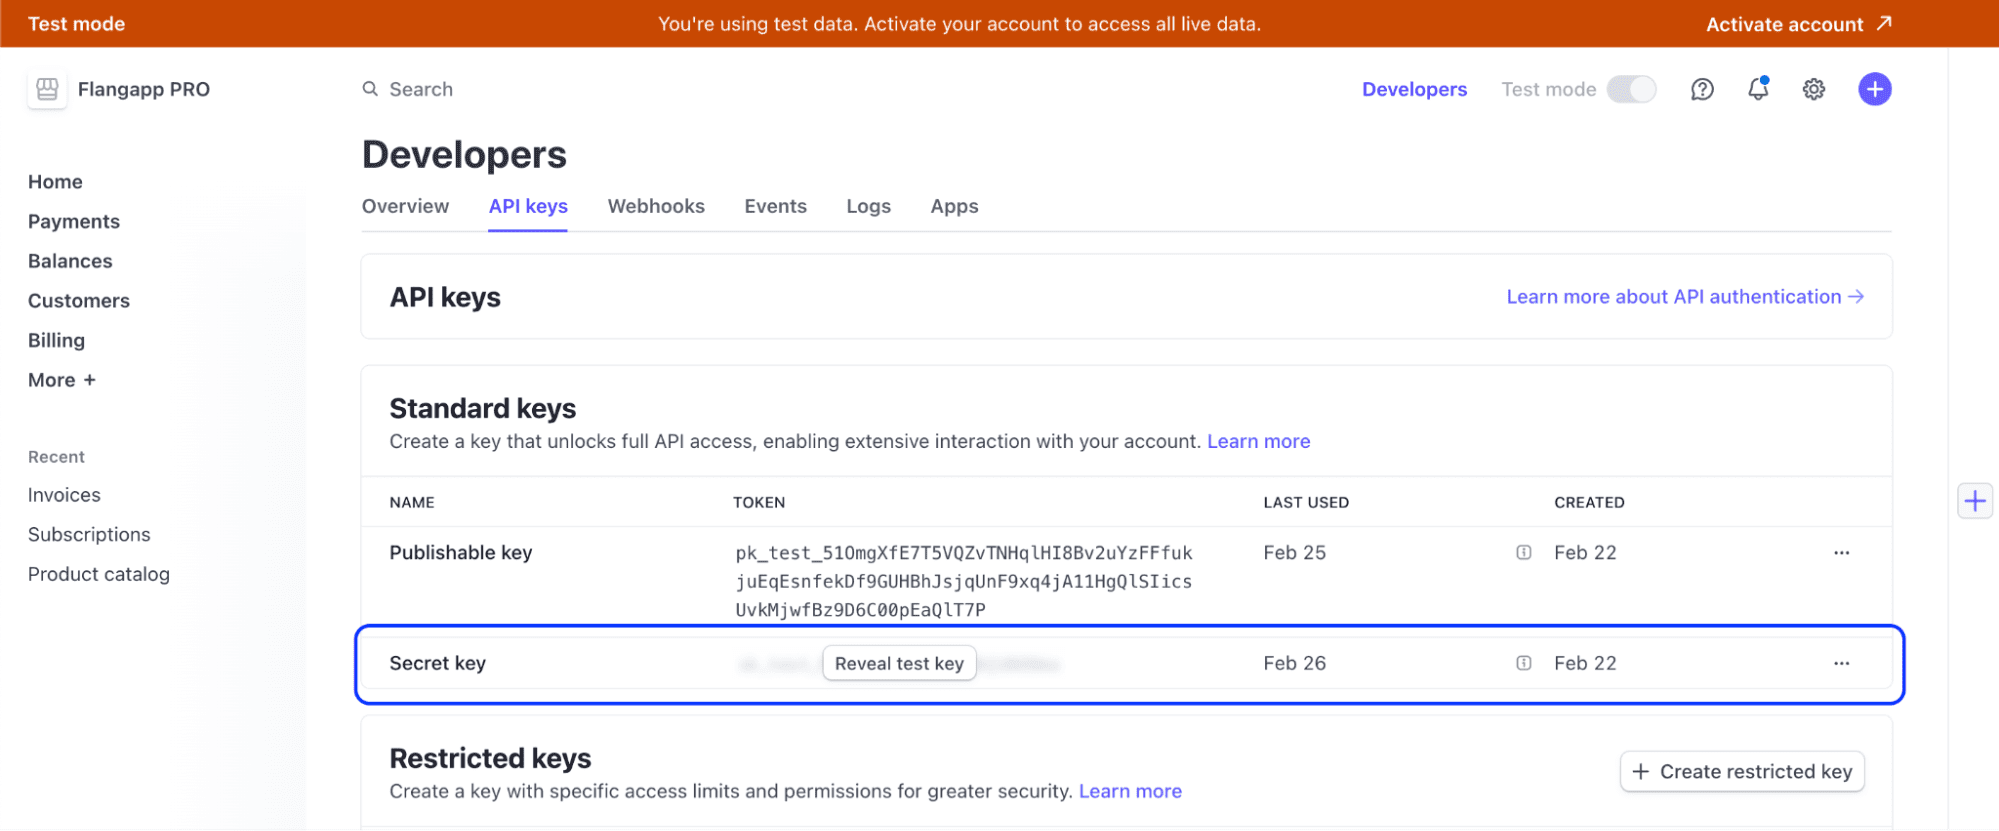
1. Api value 1
Secret key is created in your Stripe account at https://dashboard.stripe.com/apikeys
2. Api value 2
Signing secret for checking incoming notifications.
You need to set receiving incoming webhooks first to get this value. Go to the Webhooks section https://dashboard.stripe.com/webhooks click the “Add destination” button and fill in the form as shown below:
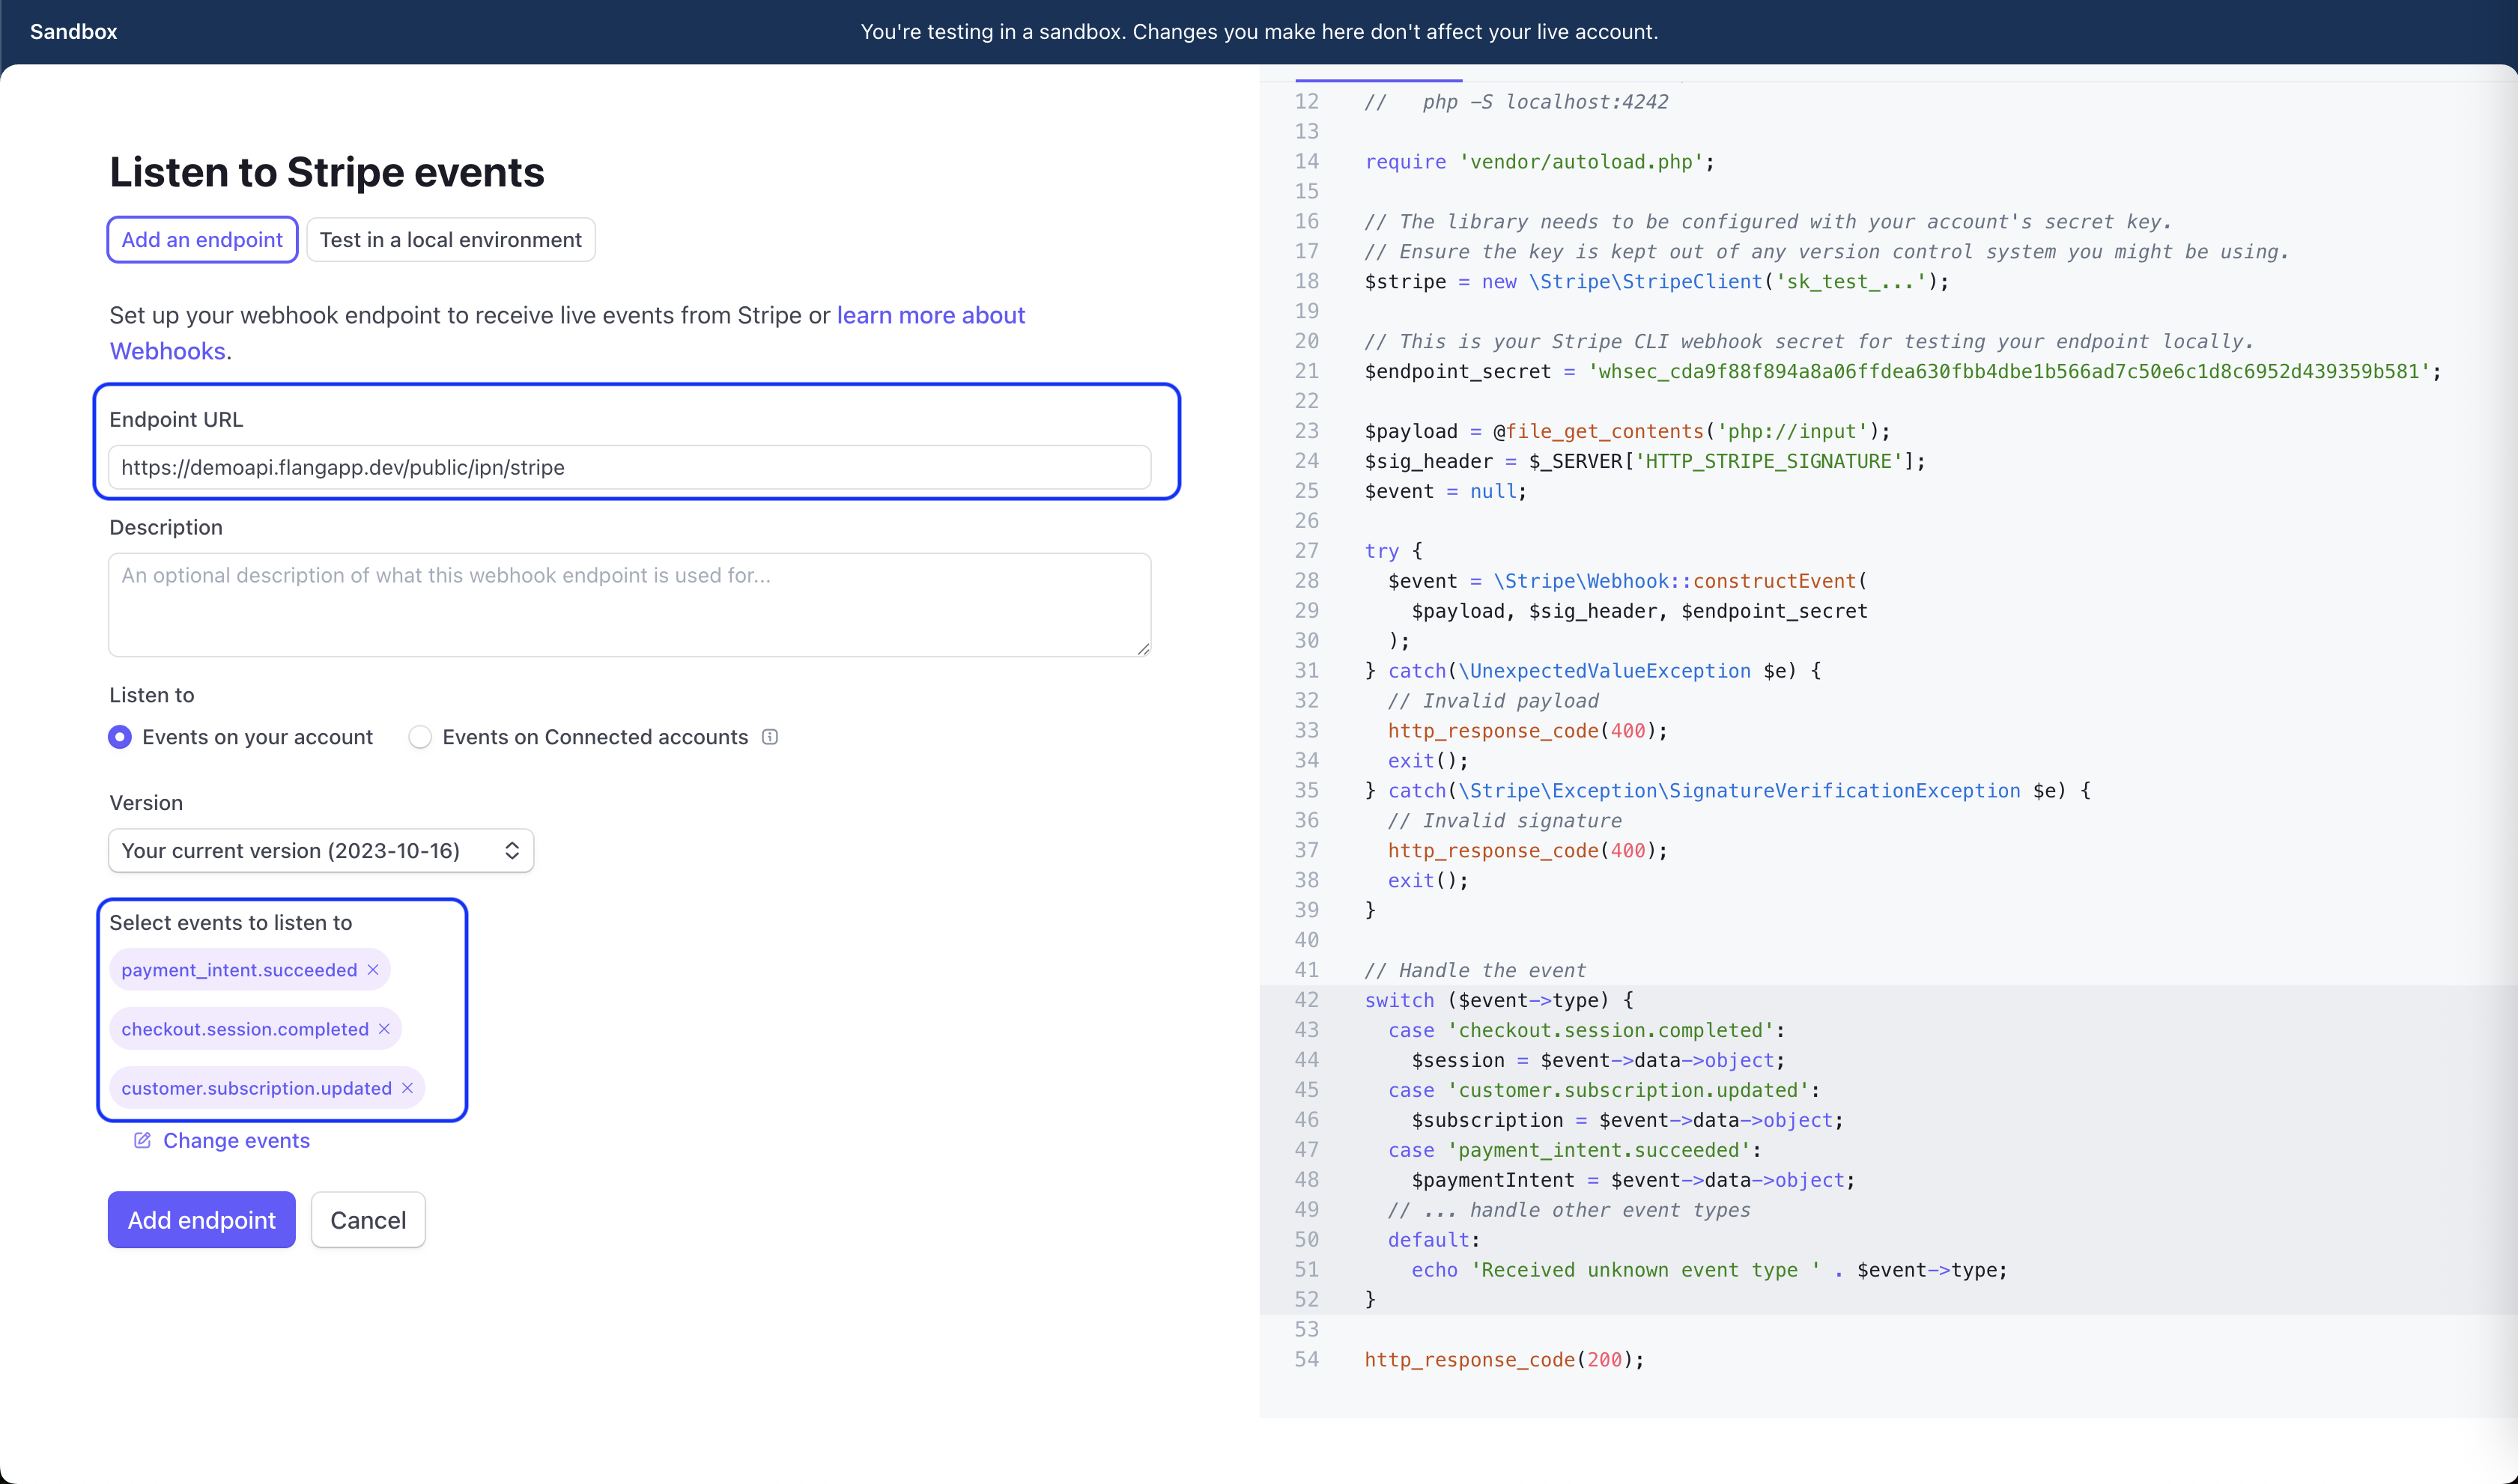
In the Endpoint URL, enter the addresses https://api.example.com/public/ipn/stripe where api.example.com is the address of your domain where the backend part is located. Select these events in the Listen to field:
* Updated (Version 2.9)
- checkout.session.completed
- payment_intent.succeeded
- customer.subscription.updated
Click the Add endpoint button.

On the new webhook settings page, click the “Reveal” button in the Signing secret section, copy the value and paste it into the Api value 2 field in the Flangapp payment method settings.
3. Api value 3
Leave this field blank.
It is ready! You can now accept payments and create subscriptions through the Stripe provider.
YooKassa settings
You can use YooKassa to manage payments from your clients' app subscriptions. Go to the Dashboard - Payment Providers and click on the “YooKassa” section:
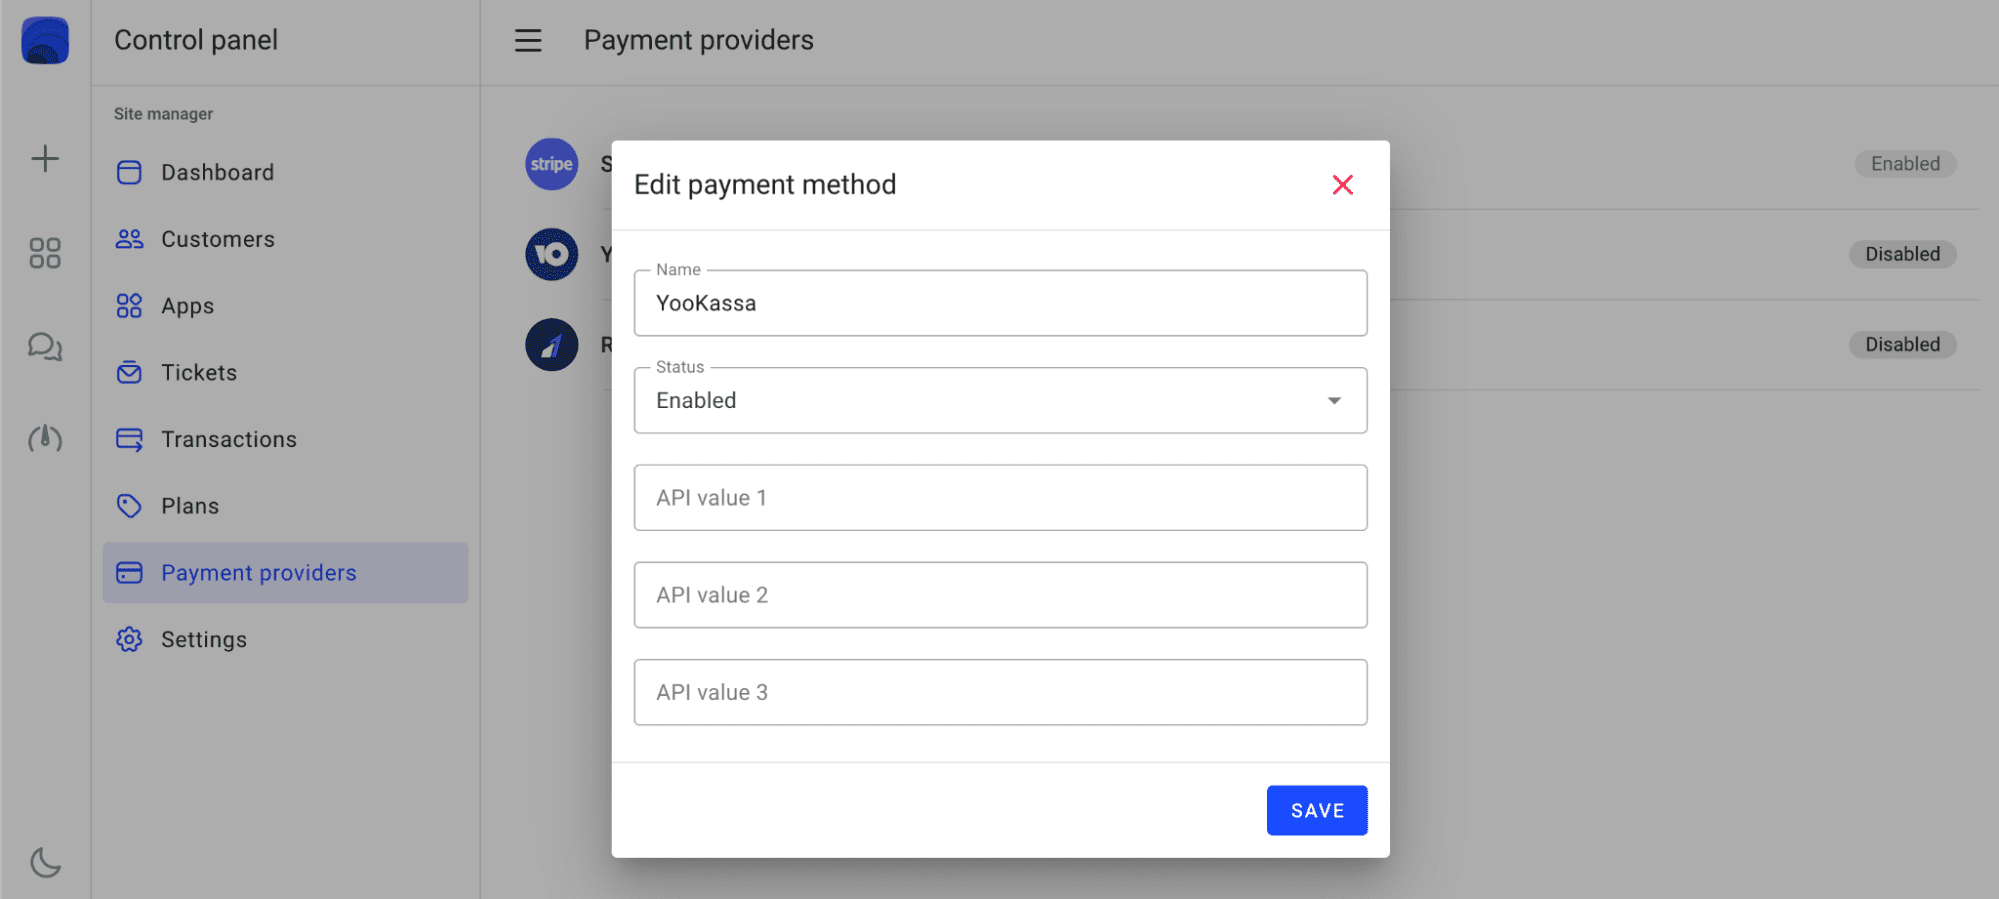
Fill in the form by entering the values as shown below:
1. Api value 1
API key for creating payments. Go to page https://yookassa.ru/my/merchant/integration/api-keys

Copy your key and paste it into the Api value 1 field.
2. Api value 2
Signing secret for checking incoming notifications.
It is your store ID. Go to page https://yookassa.ru/my/shop-settings
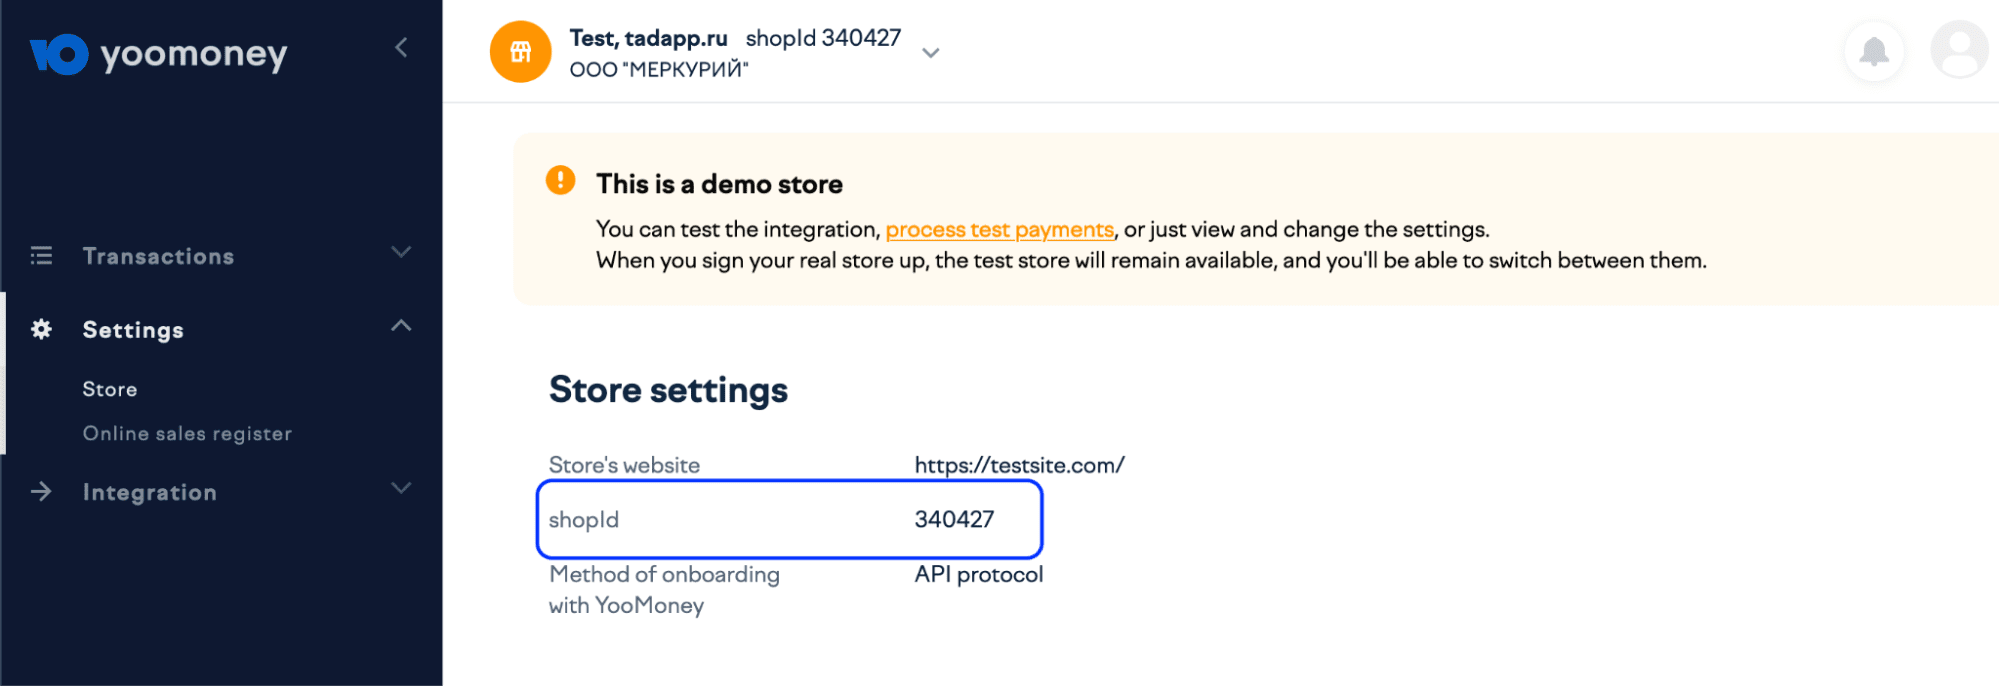
Copy your store ID-Shop ID and enter Api value 2 in the field.
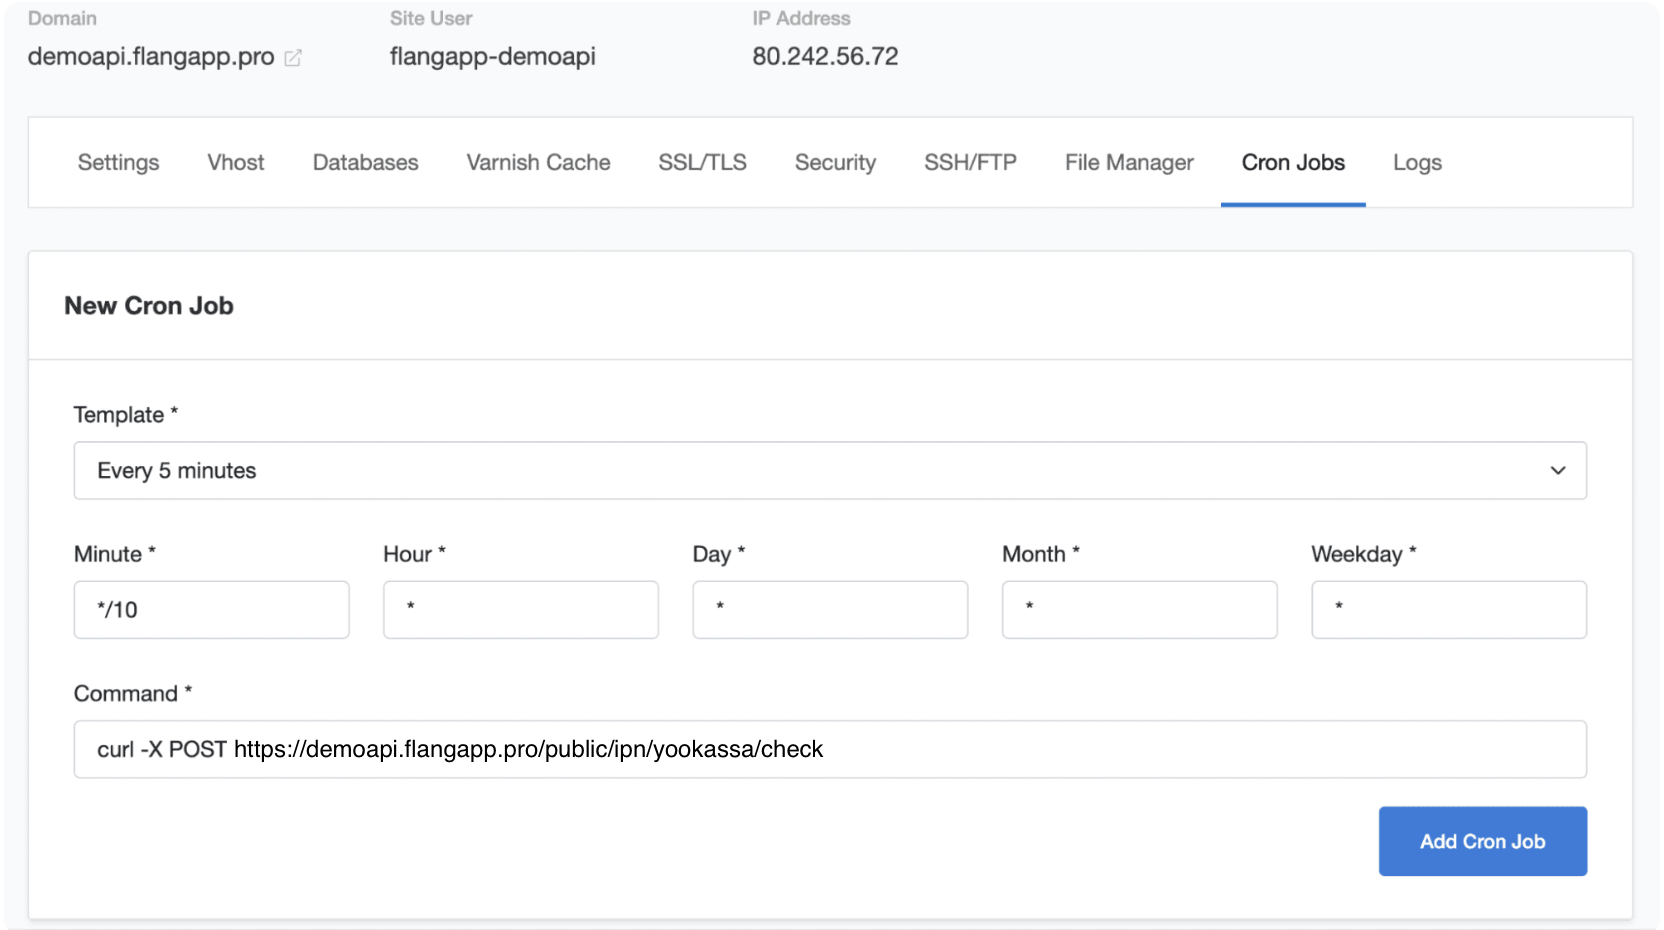
YooKass, unlike the Stripe or RazerPay, does not provide methods for managing the subscription payment cycle. Flangapp PRO has to independently track subscription expiration dates and automatically charges customer's credit card instead.
You need to run a CRON task, which according to a set schedule will check the activity of the subscription and if it expires charge payments and extend the subscription. Depending on the hosting provider, the process of creating a CRON task may look slightly different. Your task should look like this:
*/10 * * * * curl -X POST https://demoapi.flangapp.pro/public/ipn/yookassa/check
Where demoapi.flangapp.pro is the address of your domain where the backend part is located.
If you use CloudPanel you can create a task this way:
3. Api value 3
Leave this field blank.
RazorPay settings
You can use RazorPay to manage payments from your customers' app subscriptions. Go to the Dashboard - Payment Providers and click on the “RazorPay” section:

Fill in the form by entering the values as shown below:
1. Api value 1
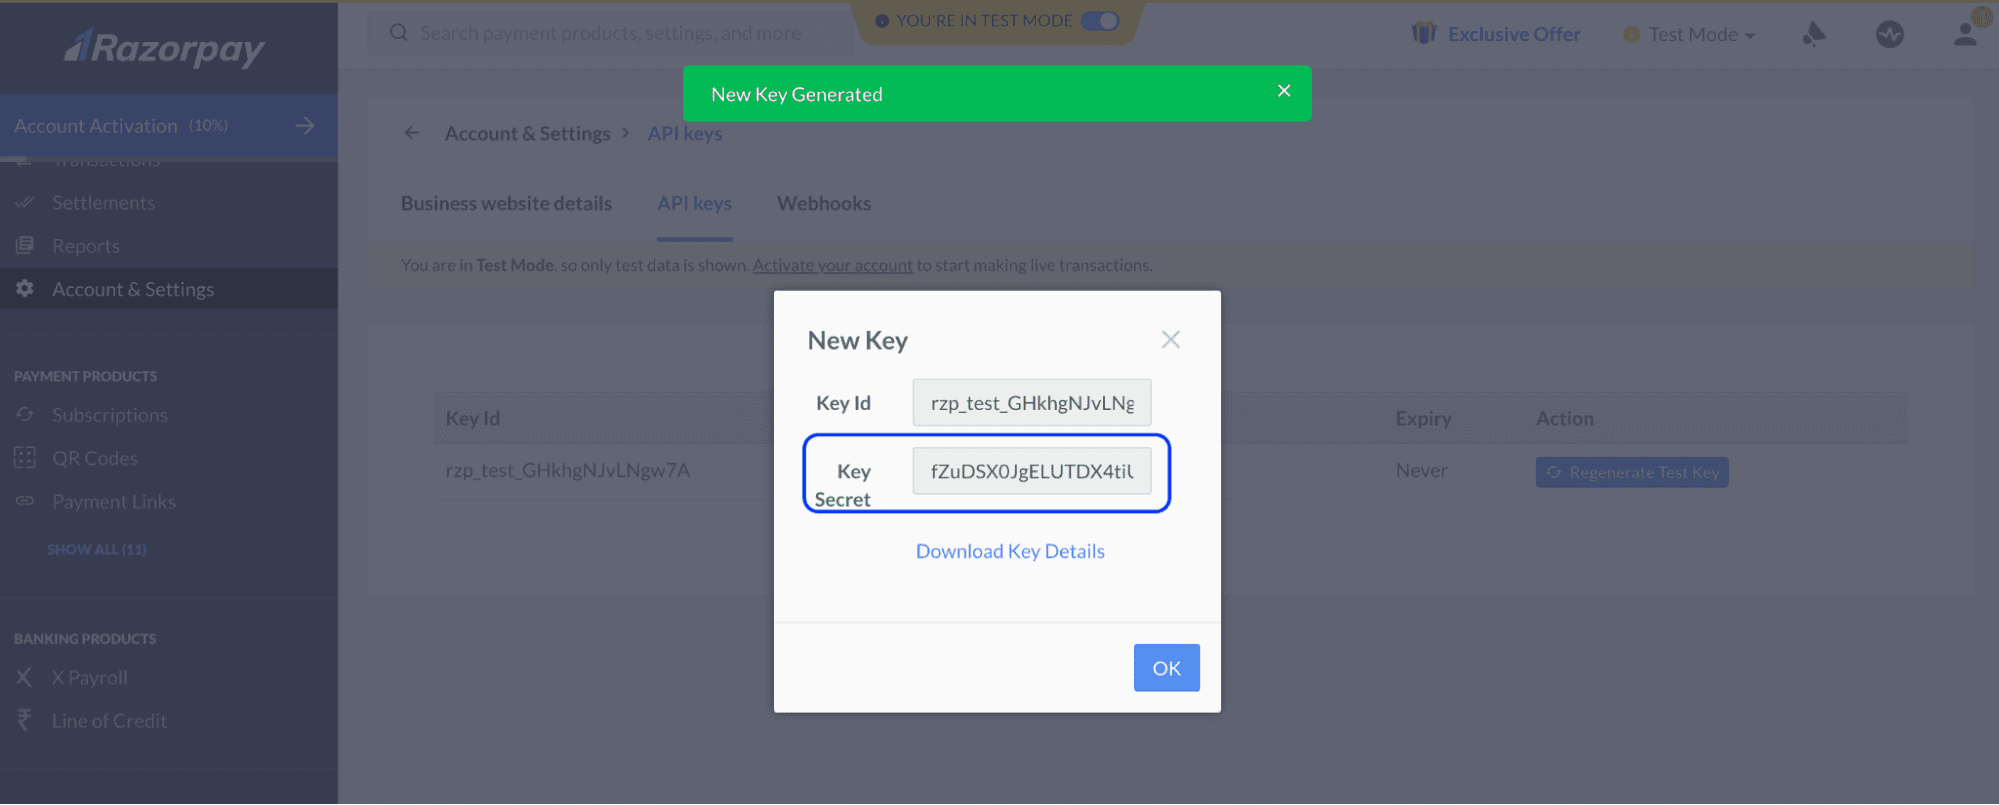
It is Key ID for the payment creation API key. Go to page https://dashboard.razorpay.com/app/website-app-settings/api-keys and issue a new key:
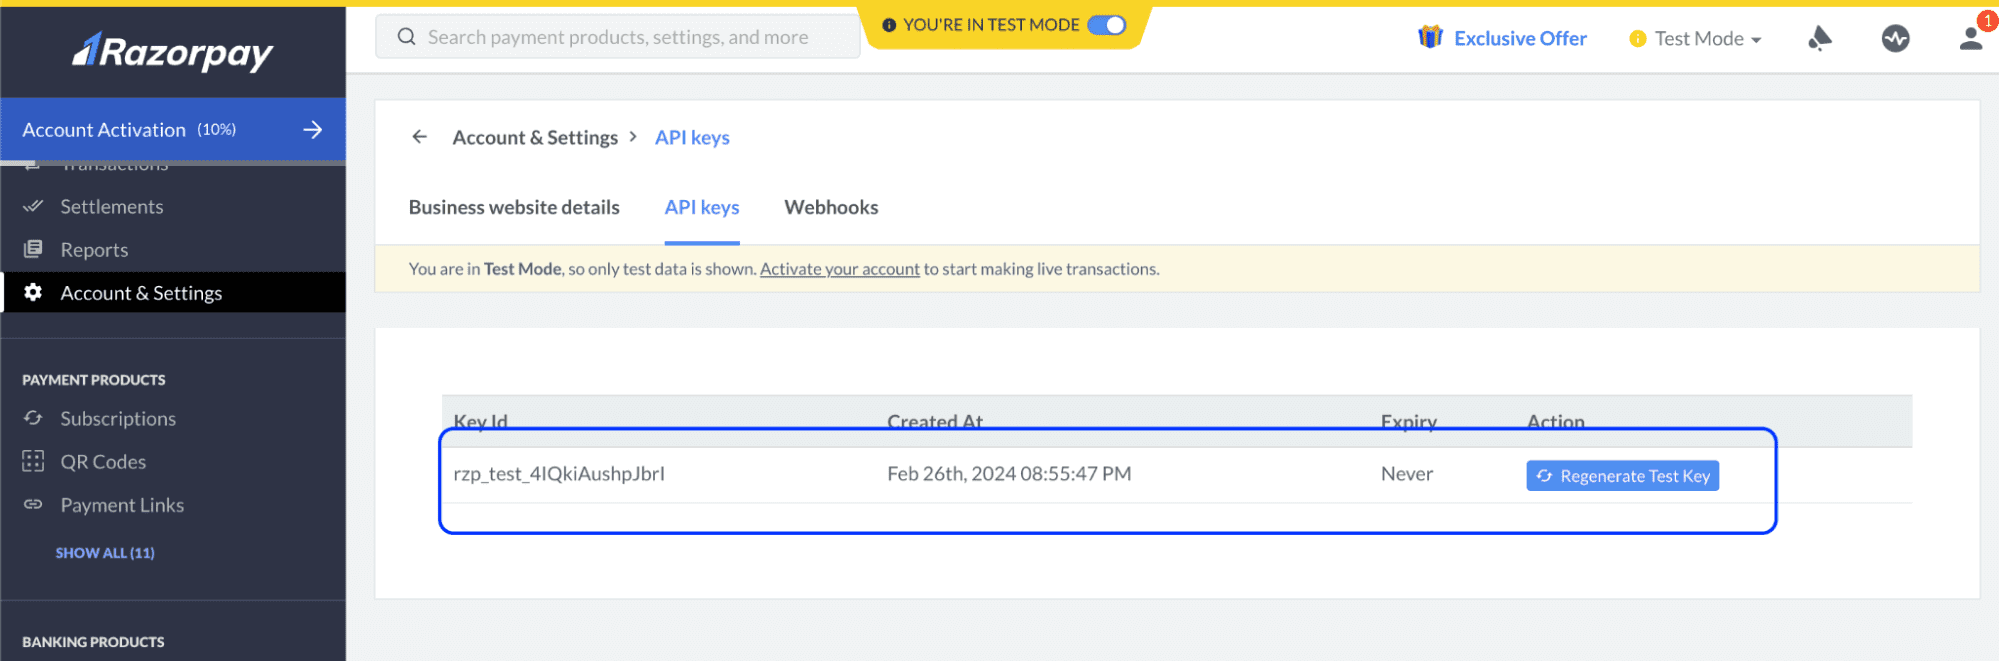
Copy this key and paste it into the Api value 1 field.
2. Api value 2
API key secret. You can get it at the moment of generating the key in step 1:
3. Api value 3
Secret for checking incoming notifications. You need to set receiving incoming webhooks first to get this value. Go to the Webhooks section https://dashboard.razorpay.com/app/developers/webhooks , click the “Add New Webhook” button and fill in the form as shown below:
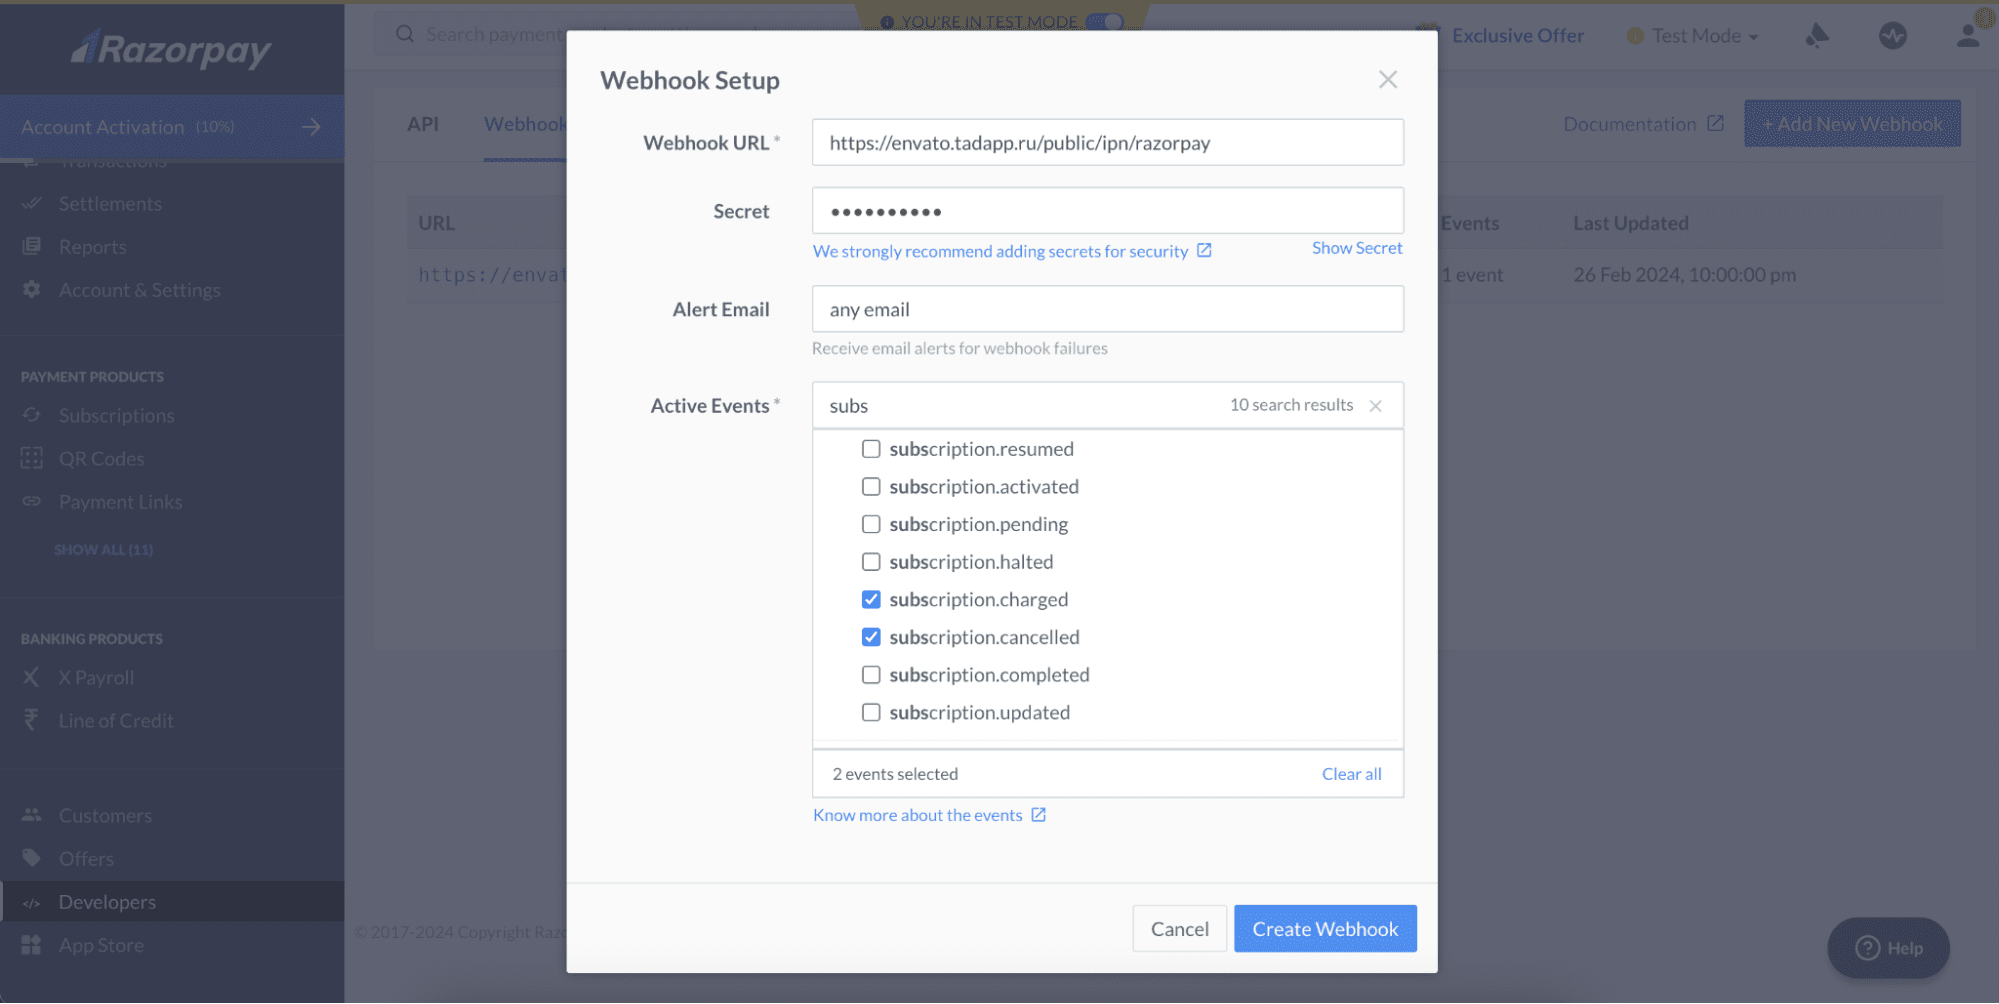
In the Webhook URL set the value https://api.example.com/public/ipn/razorpay where api.example.com is the address of your domain where the backend part of the project is located.
In the secret field, create a password. Save it - this value must be entered in the Api value 3 field in the Flangapp settings.
Choose Active events:
* Updated (Version 2.9)
- subscription.charged
- subscription.canceled
- payment_link.paid
It is ready! You can now accept payments and subscriptions through the RazorPay gateway.
Paypal settings
Go to the Dashboard - Payment Providers and click on the “Paypal” section:
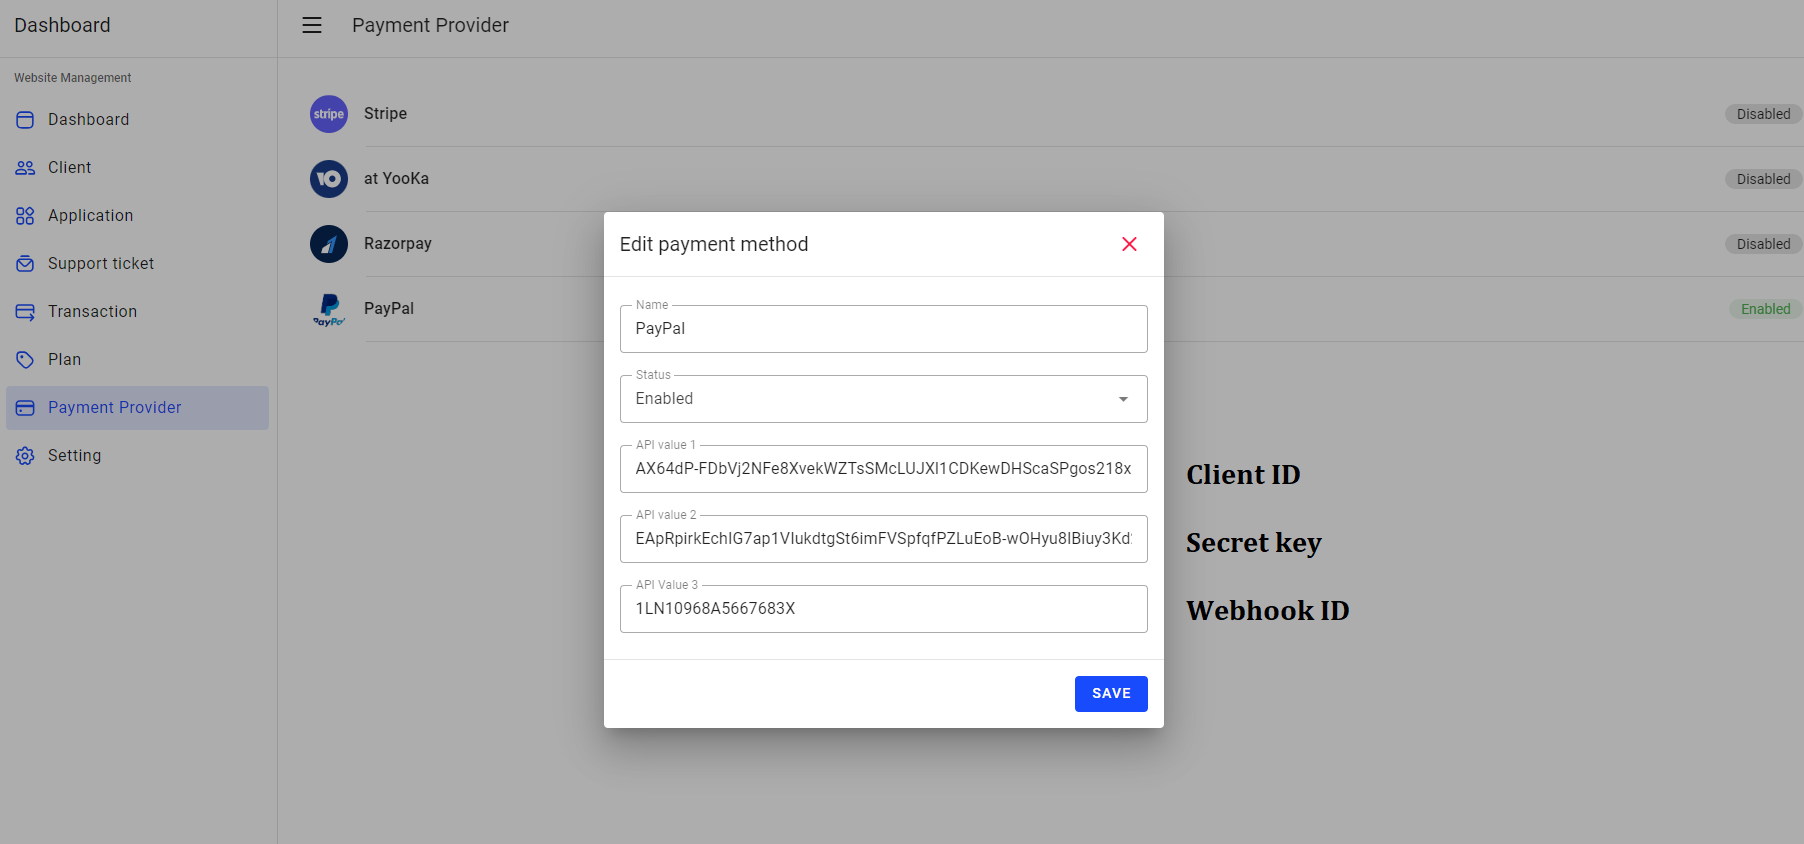
Fill in the form by entering the values as shown below:
1. Cliend ID & Secrer key
Go to PayPal Developer 👋 and sign in with your PayPal account.:
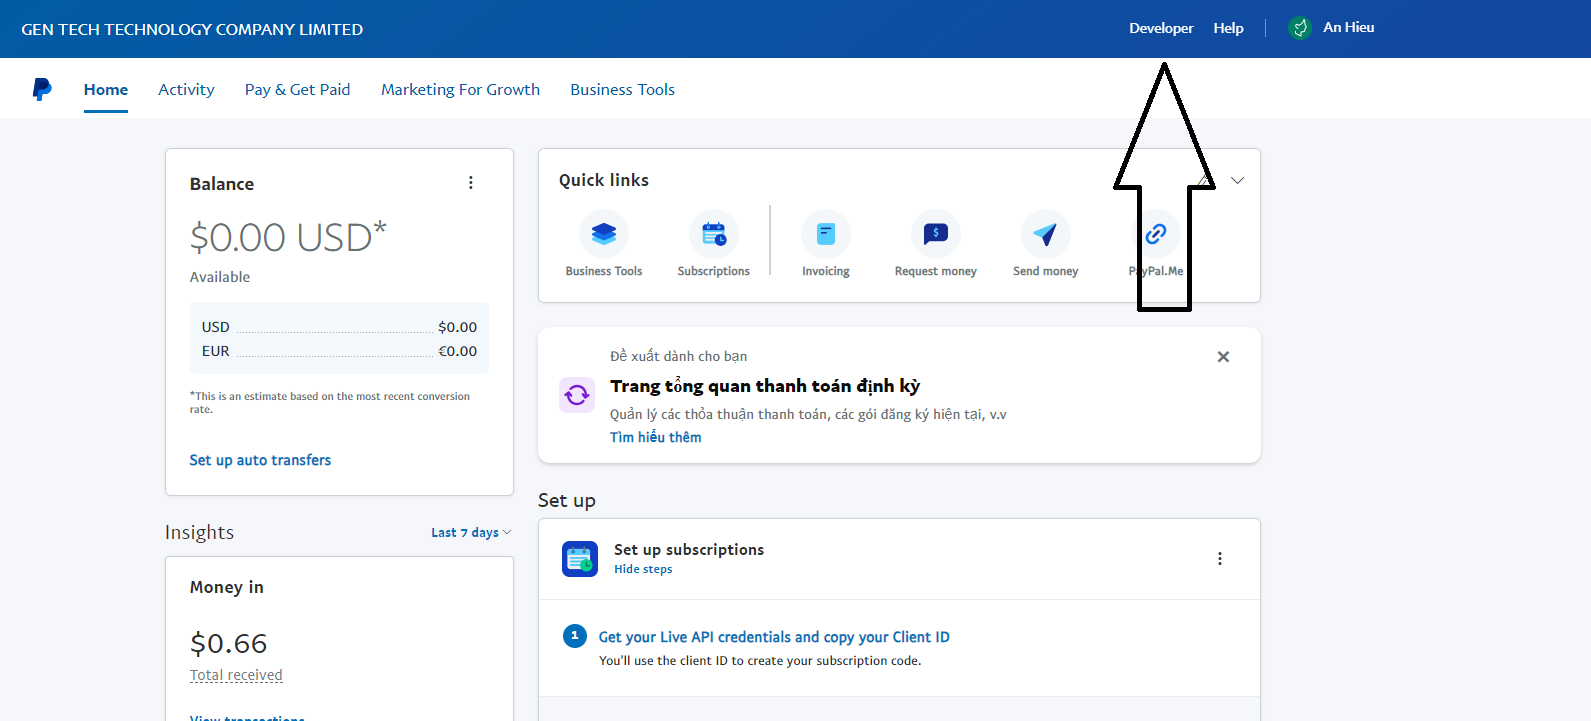
- Click "Dashboard" and select "Apps & Credentials"
- Click "Create App"
- Fill in the application name and select live account
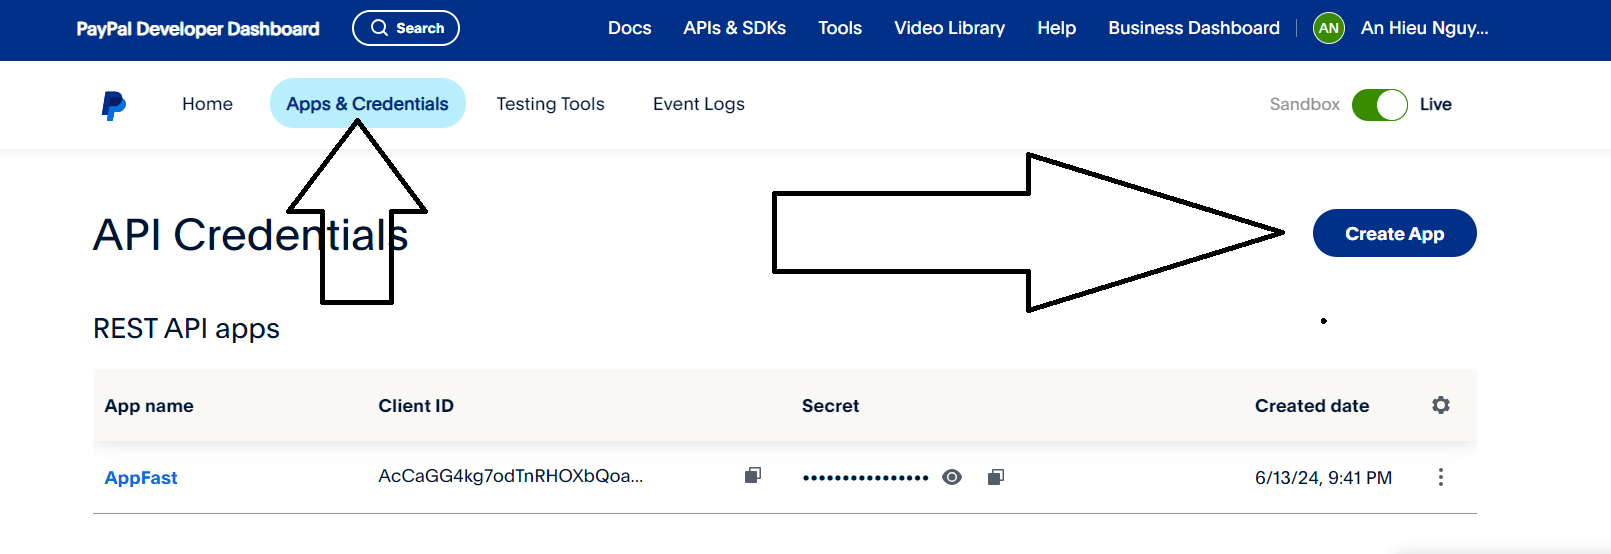
After creating the application, you will see the Client ID and Client Secret. Record this information for use in your source code.

2. Create Webhooks
In your app page, scroll down to the "Webhooks" section. Click "Add Webhook".
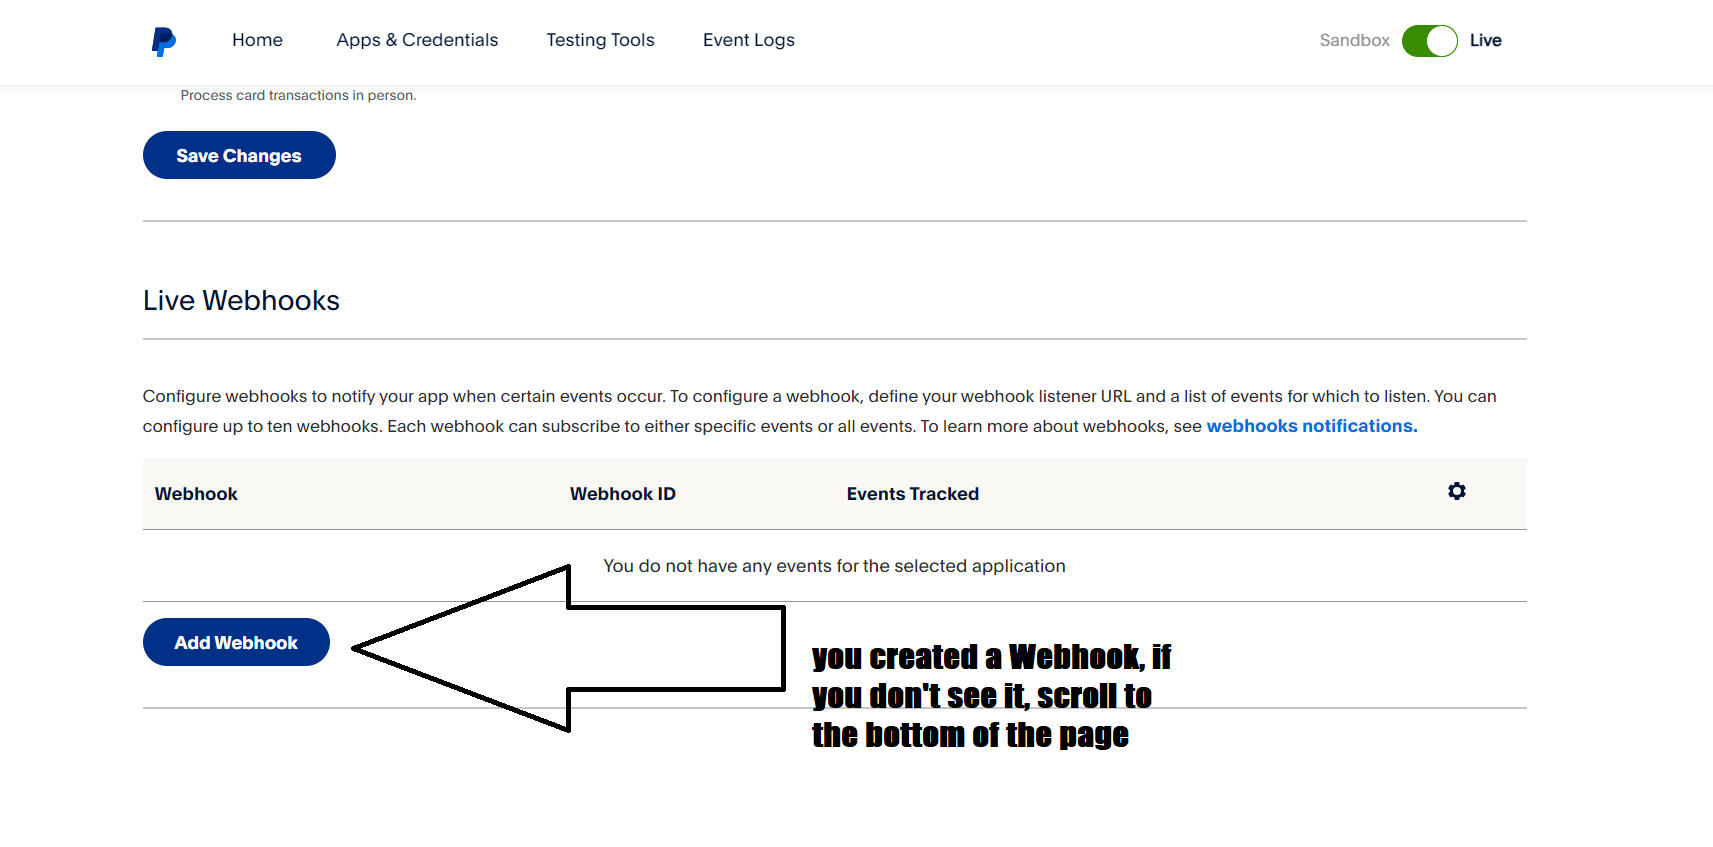
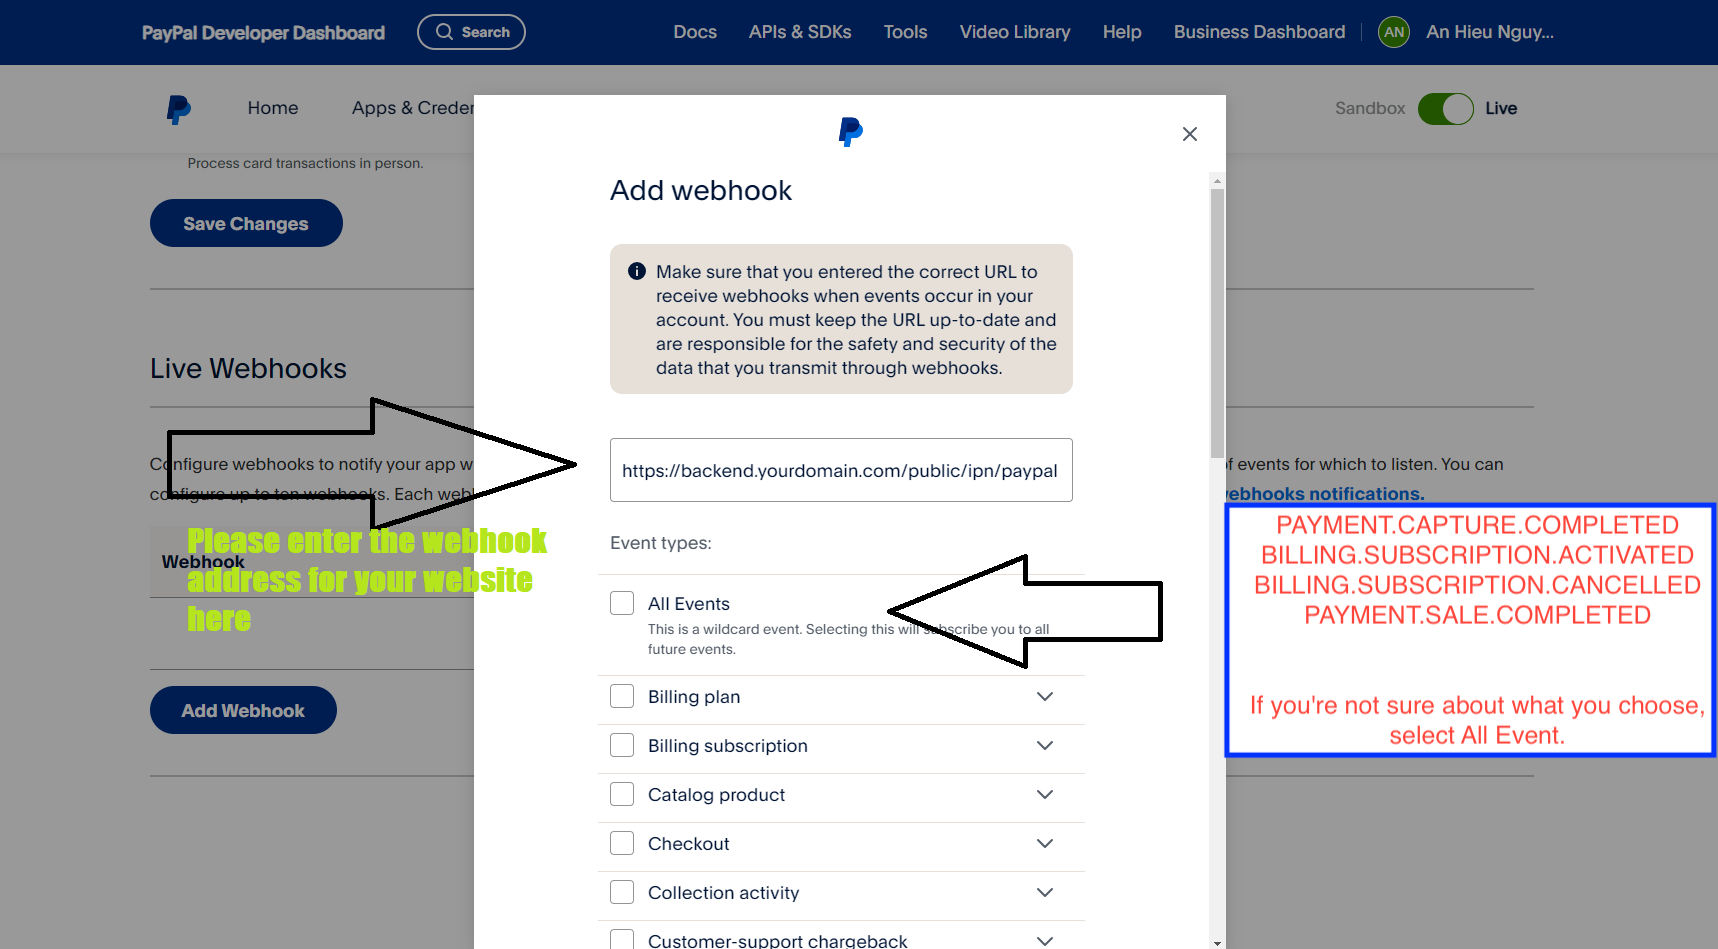
Fill in your webhook URL. This is the URL on your server that will receive notifications from PayPal.
The Webhook url will be:
https://backend.yourdomain.com/public/ipn/paypal
please replace it with your exact backend page path.Fill in your webhook URL. This is the URL on your server that will receive notifications from PayPal.
* Updated (Version 2.9)
Select the events you want to receive (e.g. PAYMENT.CAPTURE.COMPLETED, BILLING.SUBSCRIPTION.ACTIVATED, BILLING.SUBSCRIPTION.CANCELLED, PAYMENT.SALE.COMPLETED). If you're not sure about what you choose, select All Event
Your webhook ID has appeared

Copy Client ID, Secret ID and Webhook ID into the corresponding fields, your Paypal is ready to use.
Paystack settings
1. Secret Key & Public Key
Go to Paystack dashboard and go to settings
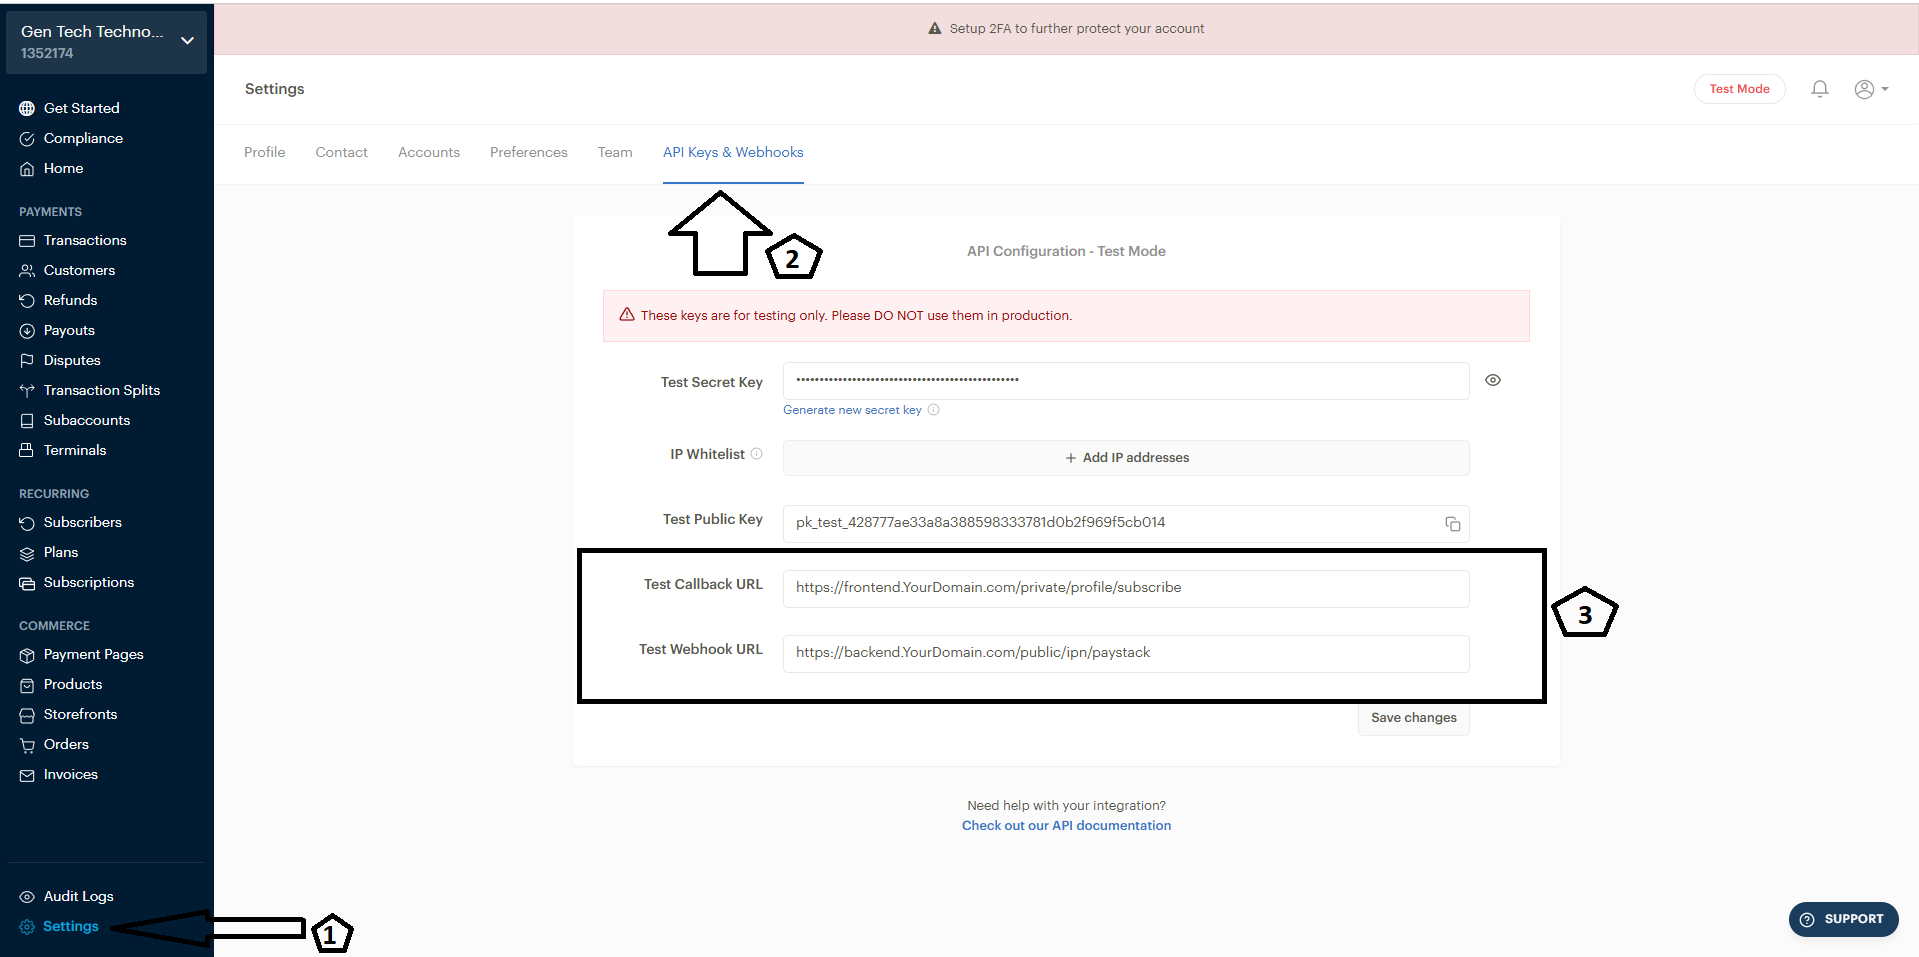
2. Callback URL & Webhook URL
Set up 2 items Callback URL & Webhook URL as follows
- Callback URL, enter the value as https://Backend.YourDomain.com/private/profile/subscribe for example if your backend address is api.domain.com then the value entered will be https://api.domain.com/private/profile/subscribe
- Webhook URL enter the value as https://Backend.YourDomain.com/public/ipn/paystack for example if your backend address is api.domain.com then the value entered will be https://api.domain.com/public/ipn/paystack
2. Setup in admin panel
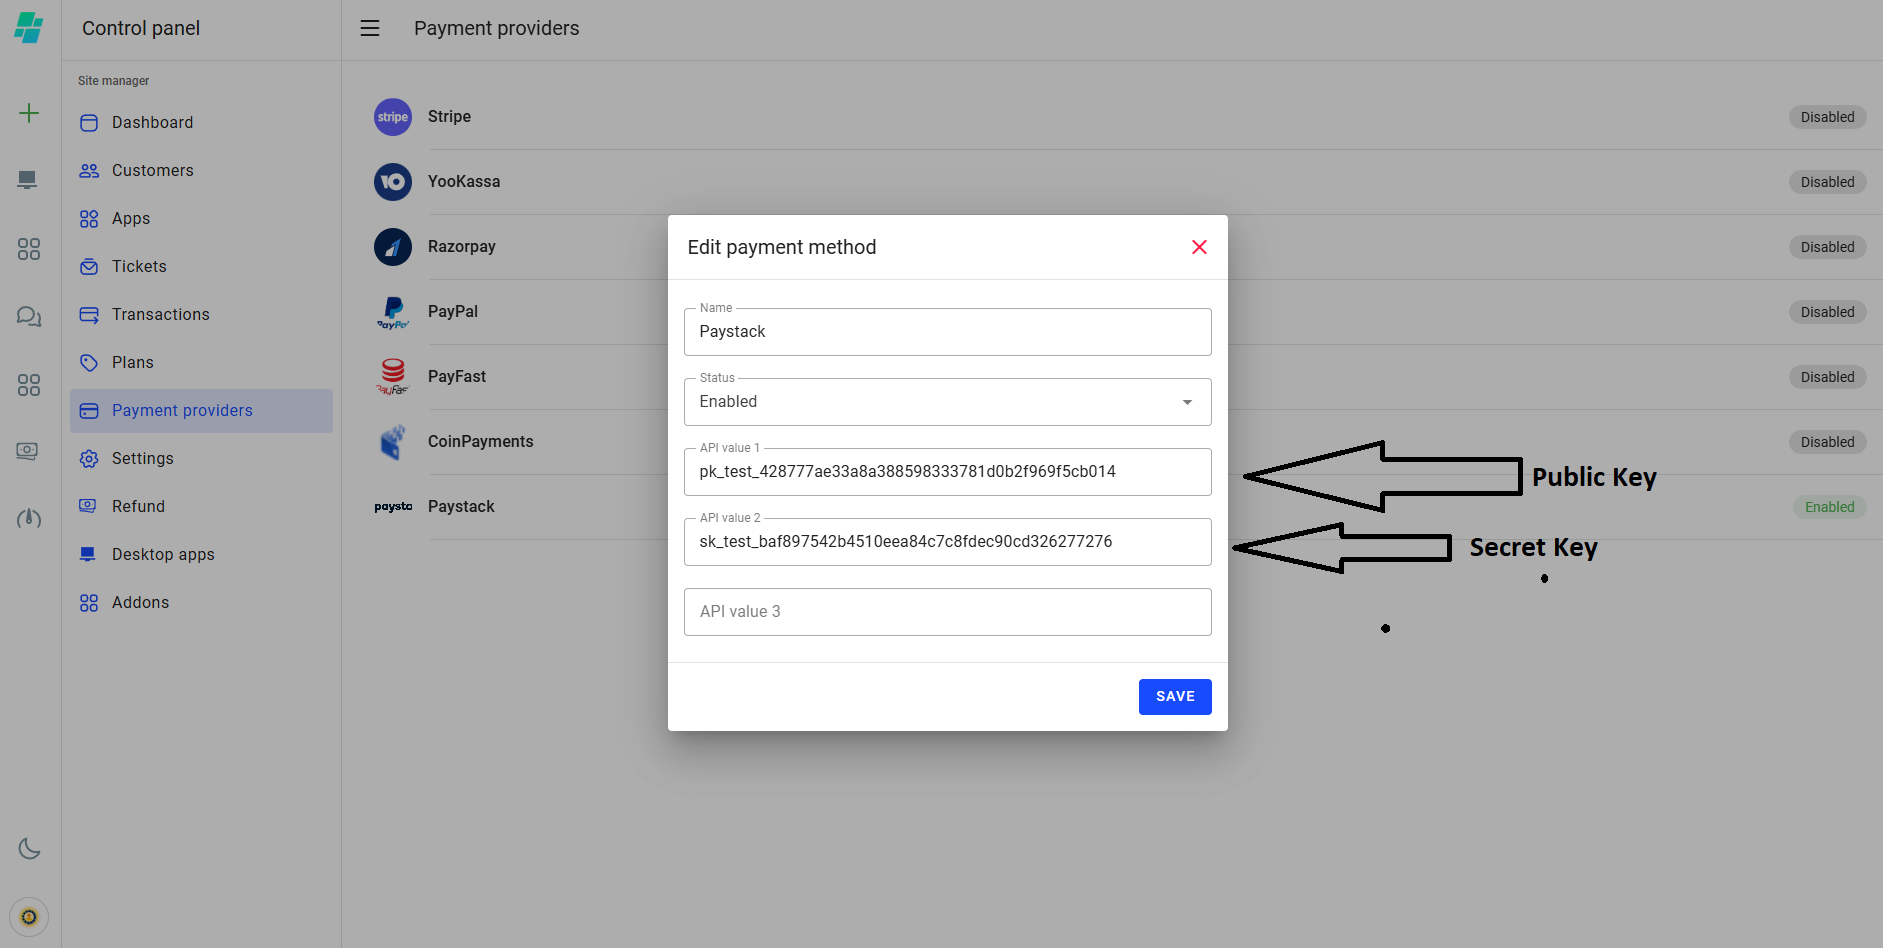
Copy Secret Key & Public Key into the corresponding fields, your Paystack is ready to use.
Other payment methods
Certainly, you can use any other local payment provider for subscription.
For the integration you need:
1. Add a new provider to the database.
All providers are stored in the “deposit_methods” table. Add a new line in the phpMyAdmin interface:
- id: it is generated automatically
- name: it is the name of the provider that is available for the user
- logo: it is the name of the logo file that you need to place at public_html/deposit
- status: 1, if the provider is active and used for subscriptions. Keep in mind that you can only have one active payment provider
- api_value (1,2,3): these are free variables that you may need for payment provider integration
- route: the address where the call for users` subscription and unsubscription are available
2. Create new controllers:
- app/Controllers/Api/Customer/Payment/{name_provider}/CreatePaymentRequest.php
This controller must be used to make the first payment for your subscription. Here {name_provider} is the name of the folder with your payment provider.
- app/Controllers/Api/Customer/Payment/{name_provider}/CancelSubscribe.php
This controller cancels a previously issued subscription. Please note that this controller is also used at the admin level for canceling a subscription from the control panel.
- app/Controllers/Ipn/{name_provider}.php
This controller processes incoming notifications from the payment provider about subscription events, new transactions, subscription cancellations, etc.
If your payment provider doesn't provide payment cycle management methods, you need to implement the subscription expiration date and customer's credit card charging self-checking. You can use the table “payment_intent” and the data model app/Models/PaymentIntenModel.php for this.
This model is used according to the following scheme:
- id: it is generated automatically. A unique value for each entry
- subscribe_id: it is subscription ID from the “subscribes” table “subscribes”
- method_id: Payment provider ID from the “deposit_methods” table
- is_pending: 1 if the subscription is not canceled this line is used to track the subscription and charge the customer's credit card
- payment_token: a free value that is used to charge the client's credit card
- planned_at: date when you need to start checking the client's subscription
-Flangapp does not schedule or check this table automatically. You have to develop the logic for checking values in the table by yourself, for example by running regular CRON tasks.
All controllers and methods should be registered in the routing control file app/Config/Routes.php. Controllers for creating subscription and unsubscription are registered in the private routes zone;
controllers for processing incoming notifications are registered in the public routes zone without prior authorization.
* Updated (Version 2.9)
Plans
You can add as many subscriptions or one-time plans as you like on your site.
The plan spreads to the functionality of 1 project/application, regardless of the final platform (Android or iOS).
For example, if a user has 1 application, they only need to sign up for one subscription (or one-time plan) to use the iOS and Android builds.
For each new project, you need to buy a new subscription (or one-time plan). The active plan permits these services:
- iOS and Android application builds.
- Push mailings for the Android application.
- Application availability for the end user.
The website, navigation, application template, and most other settings are updated in the application in real time. A new version of the build may only be required in the following cases:
- If the application launch icon is changed.
- If screen saver settings are changed.
- If some localization data (offline image) is changed.
- If application permission settings are changed.
* Updated (Version 2.9)
Subscription
If the subscription is not renewed, the client will lose the ability to create new application builds, send push messages, and users of the client's application will receive a notification while app launch that the project is not available.
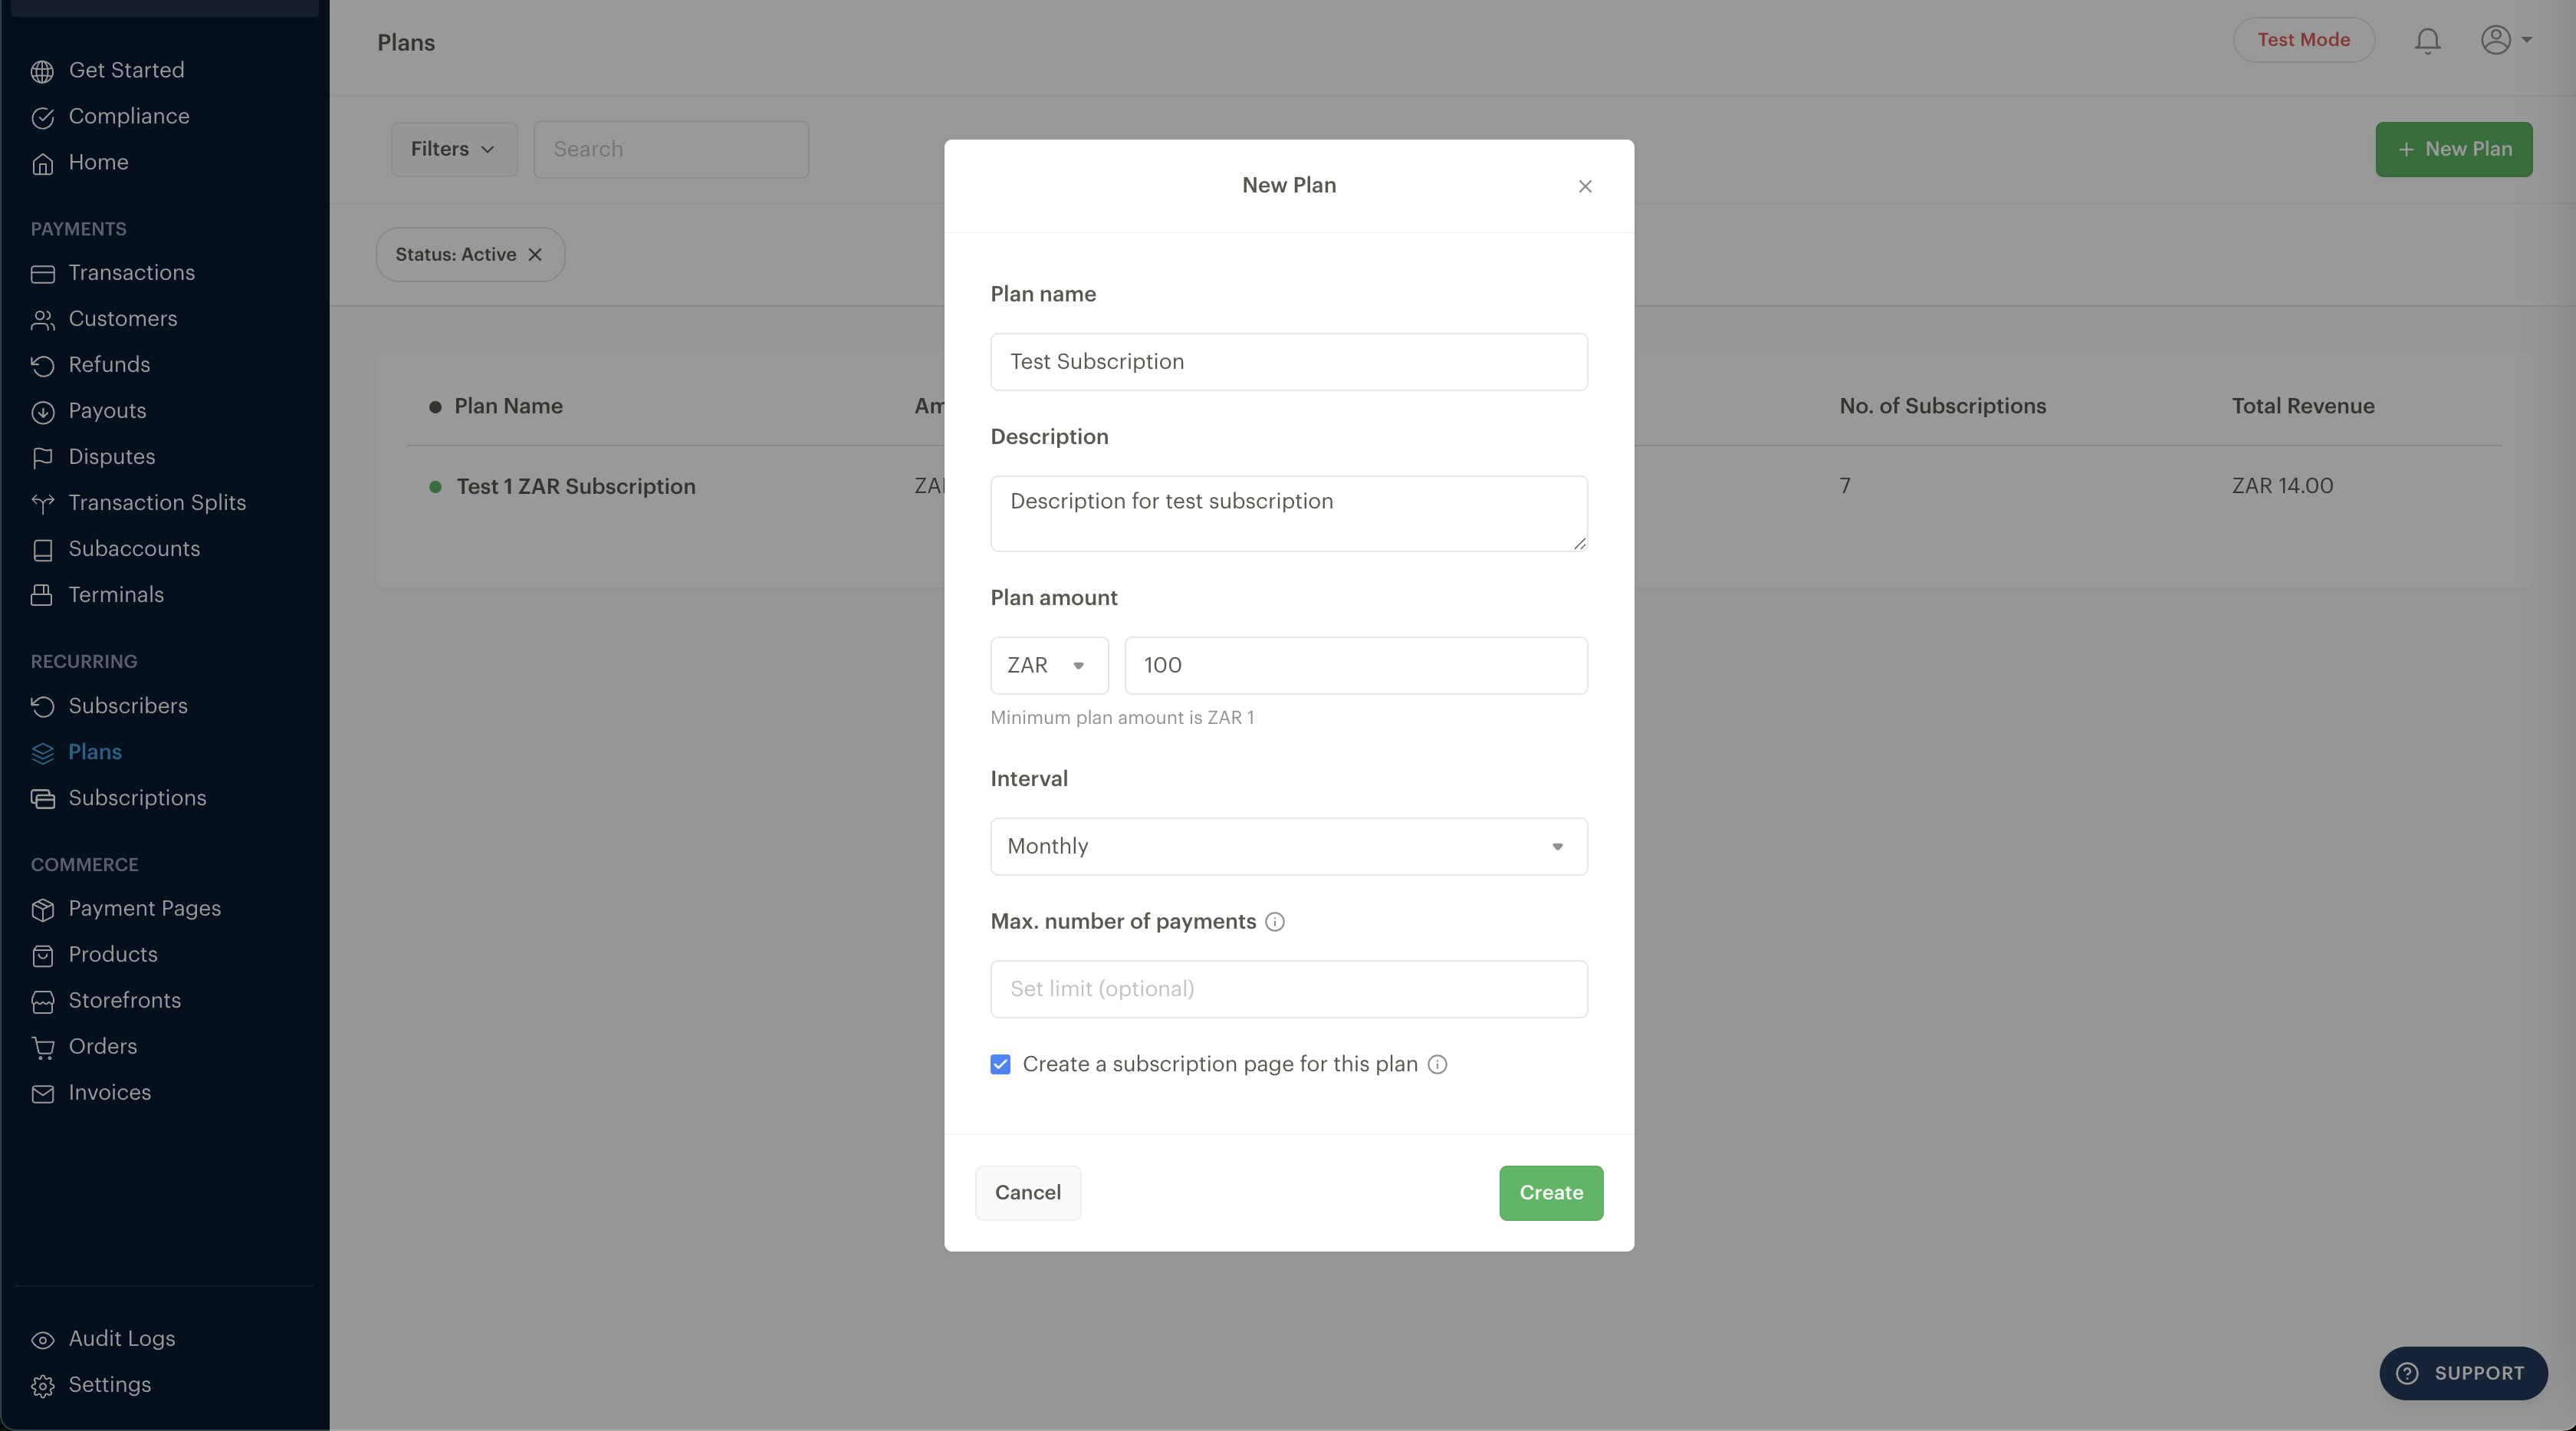
You can add a new subscription plan in the control panel in the section Dashboard - Plans - Create plan section. Fill in the form as shown below:
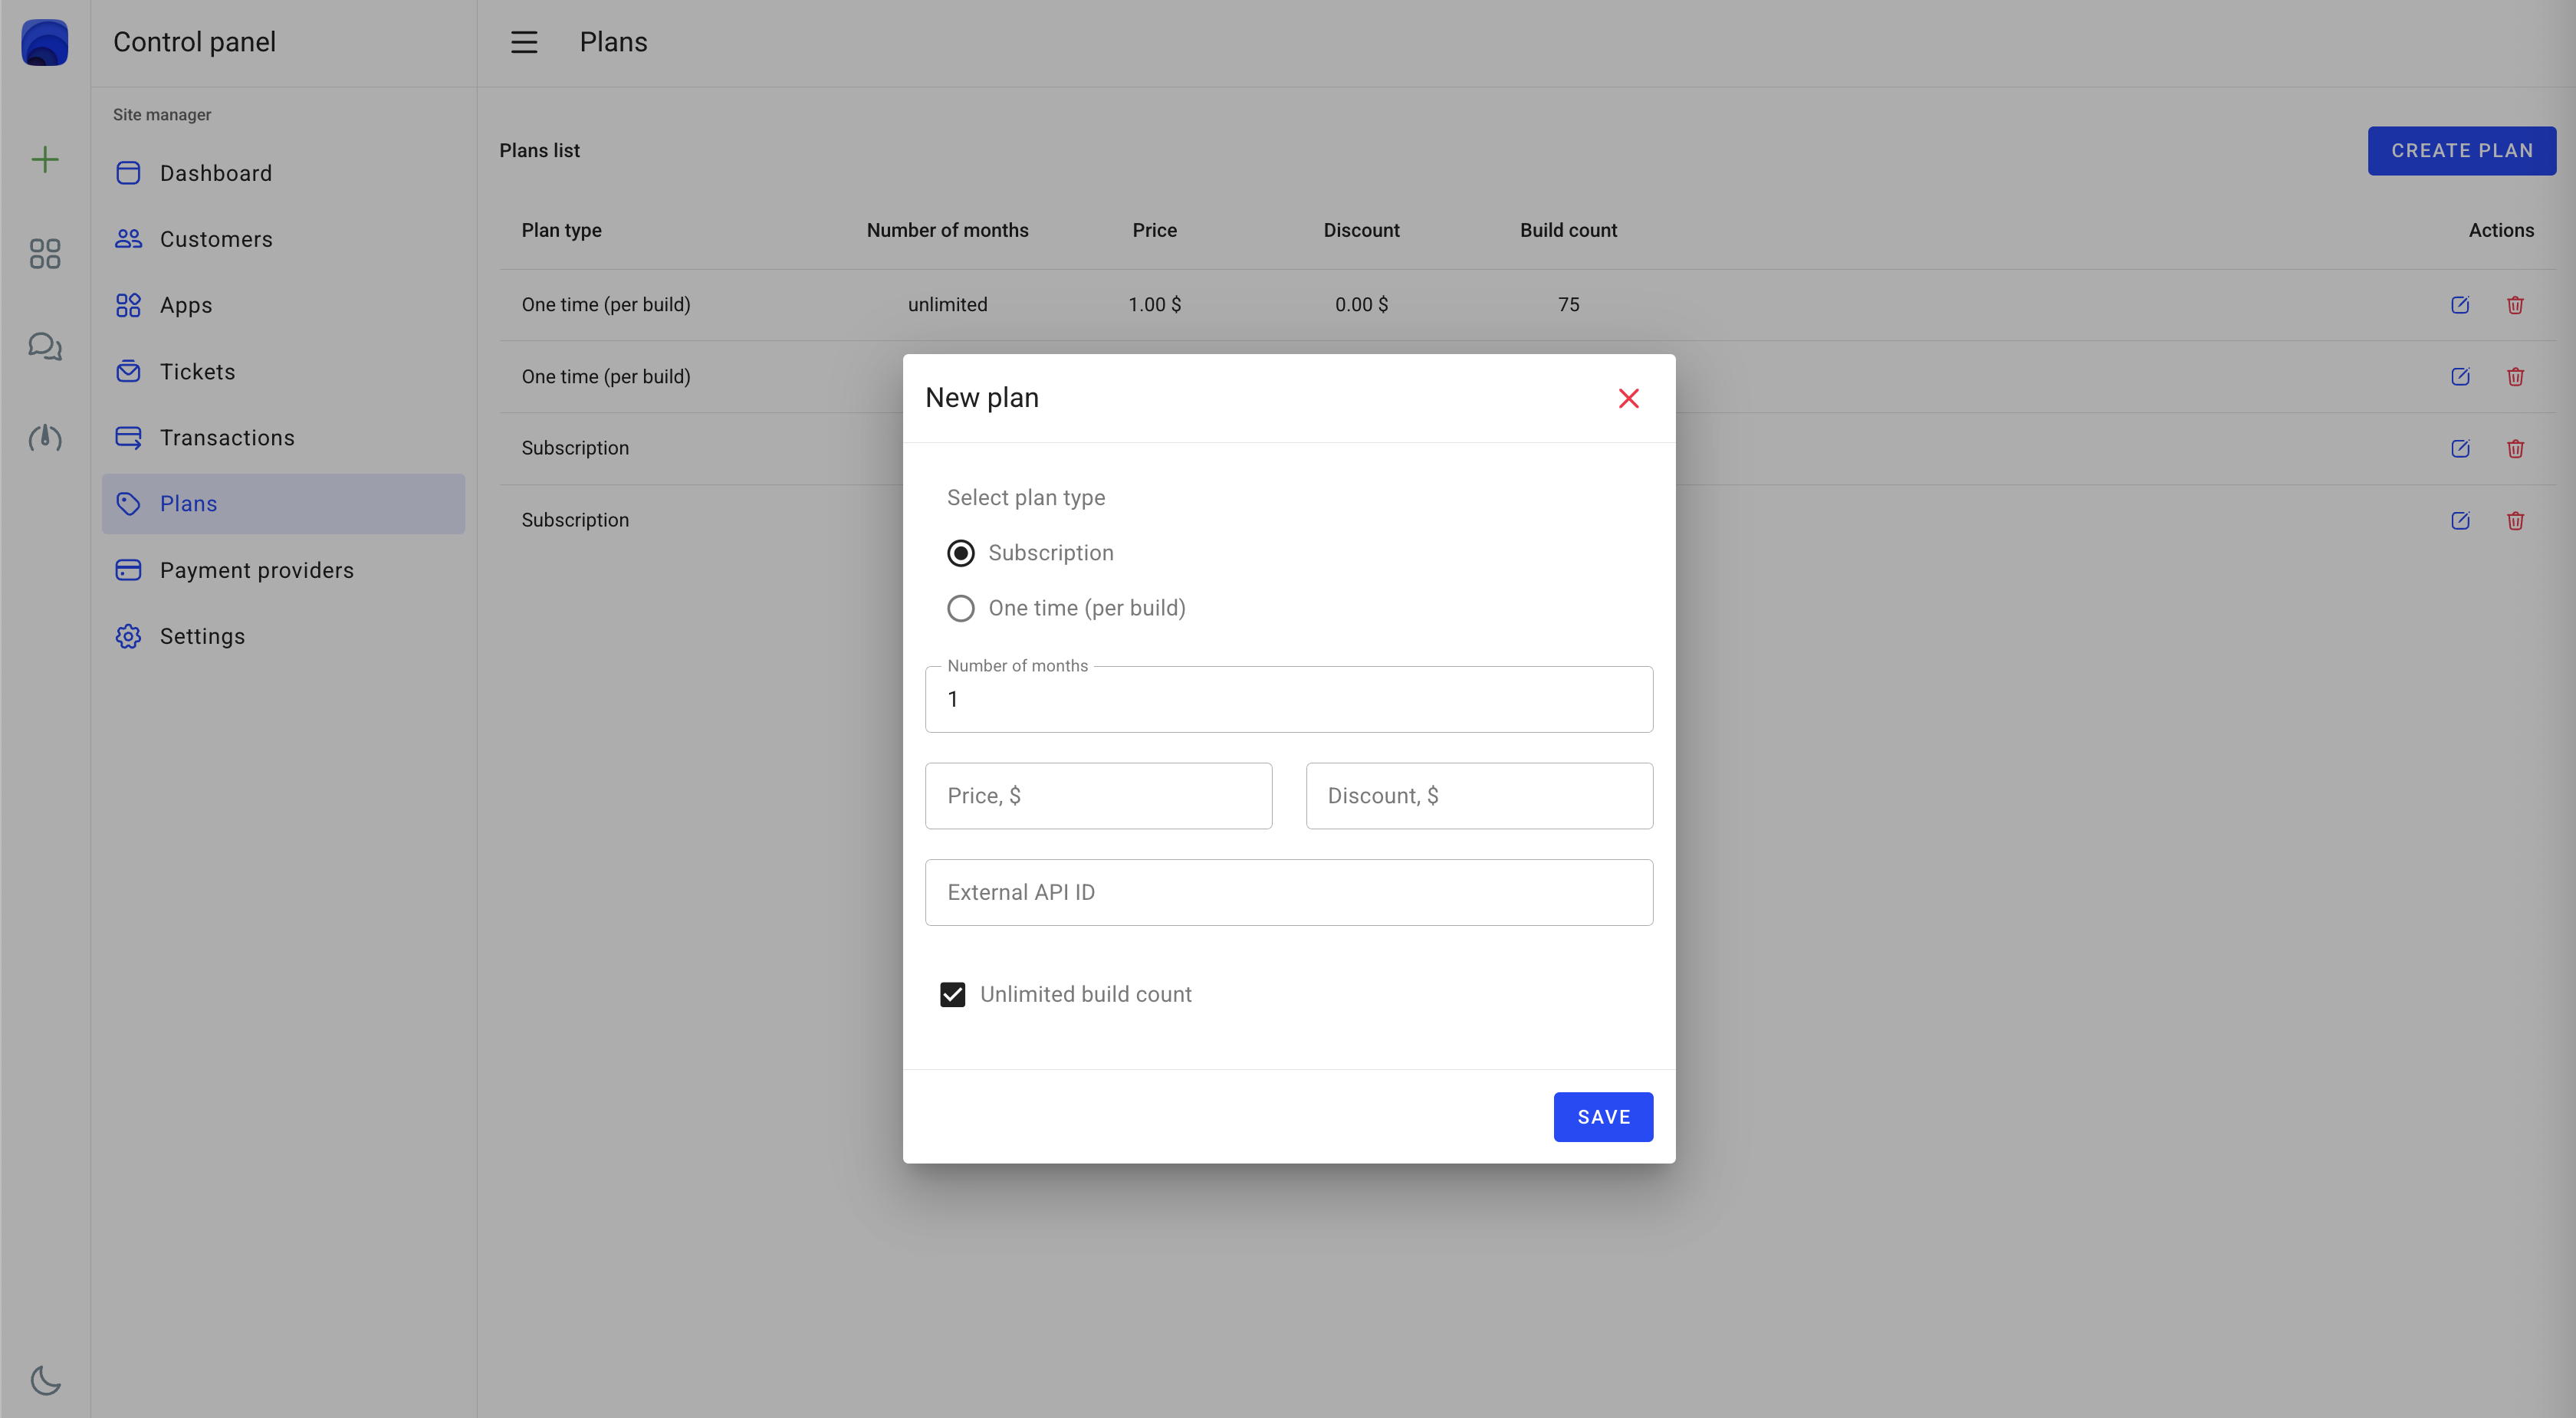
Select plan type
Select the subscription type of the plan.
Number of months
Define the subscription activity cycle in months (e.g., 1, 3, 6, 12). This determines how long the subscription will be active before renewal.
Price
Set the subscription price in the currency configured in your site settings. This is the amount users will be charged for the subscription period.
Discount
Comparative discount rate. This value does not affect the final price of the plan, but only shows the savings among plans. For example, you could enter a price of $1 for a non-discounted monthly subscription and a price of $10 for an annual subscription by entering $2 in this field. So your customers will see that they can save $2 when they sign up for an annual subscription.
* Updated (Version 2.9)
Checkbox unlimited build count
If this checkbox is checked, the plan will allow the user to create an unlimited number of builds. Otherwise, you can set the maximum number of builds that the user can create during the subscription period. After renewing the subscription, the number of builds will be reset to this value.
In the External ID field, you have to enter the subscription ID that was created in your payment provider account.
Stripe
You can create a new product with "Recurring" type in the “Product catalog” section https://dashboard.stripe.com/products?active=true:
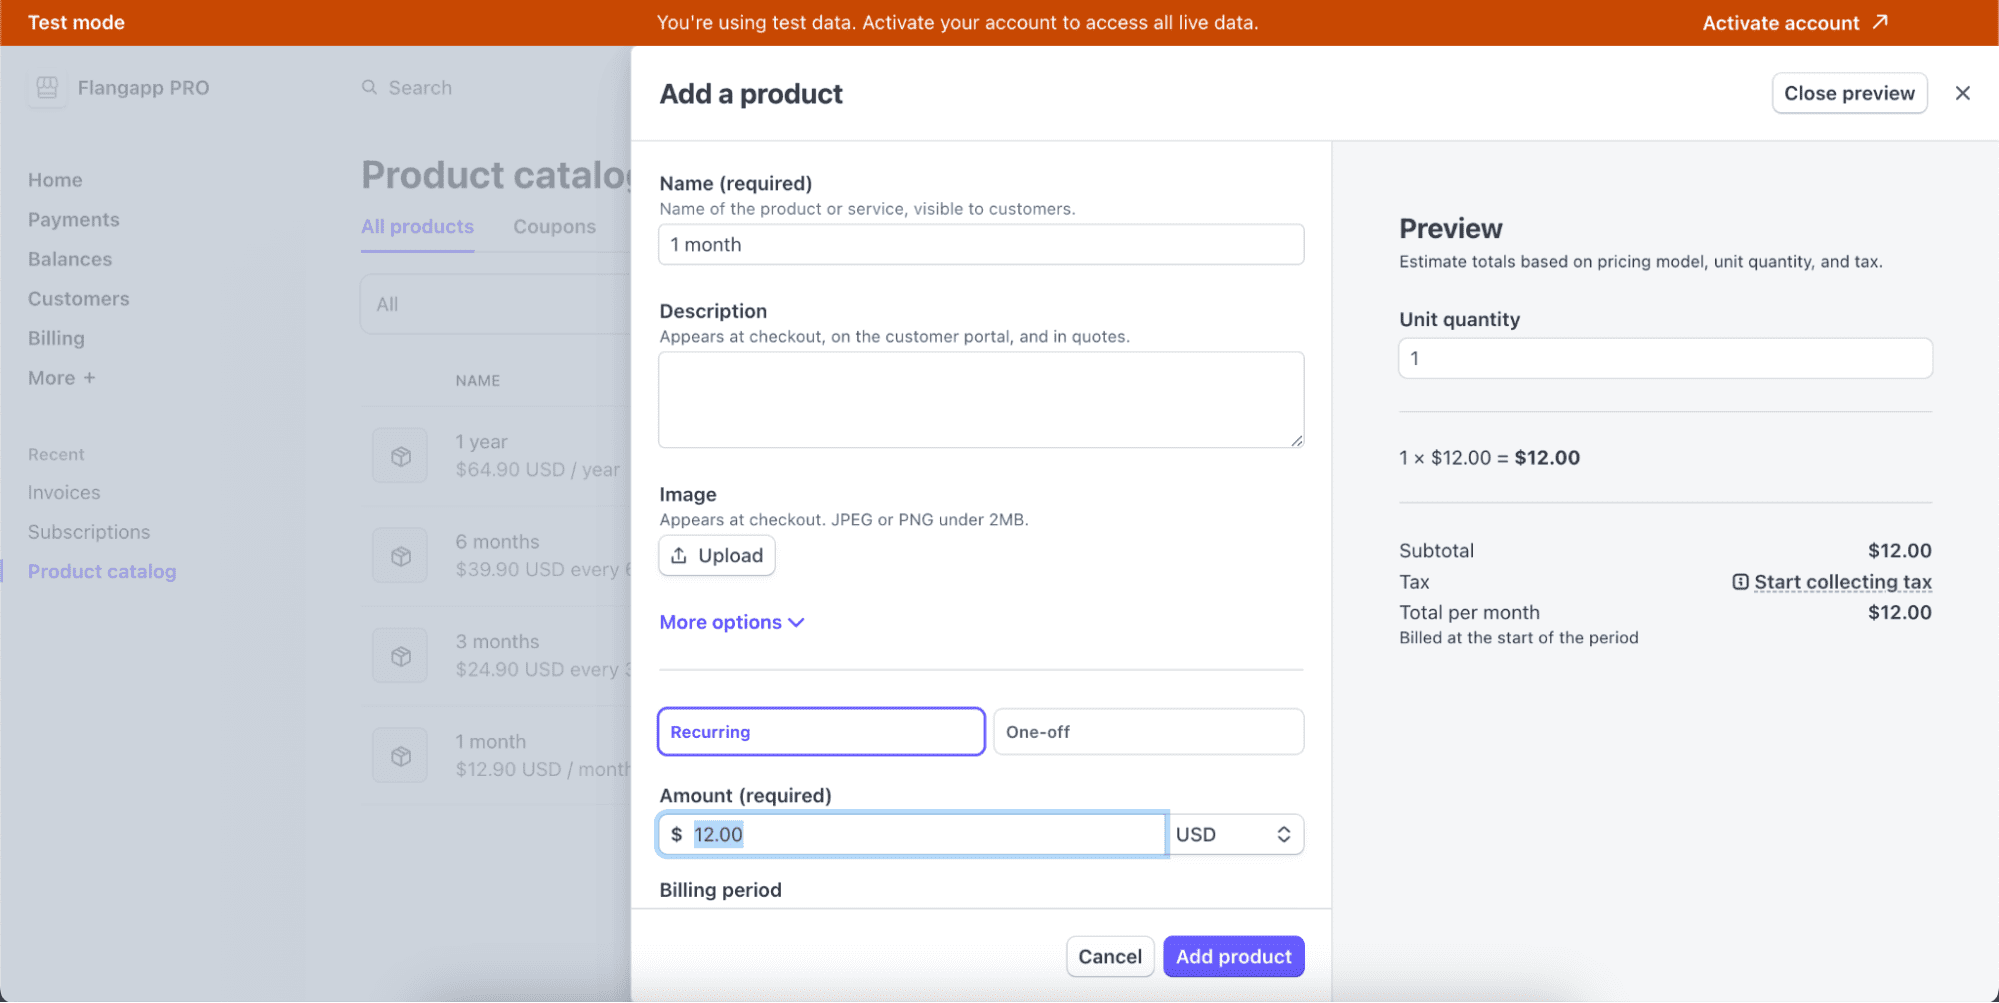
Right after creation confirmation, you will be able to copy the API ID (price_id):
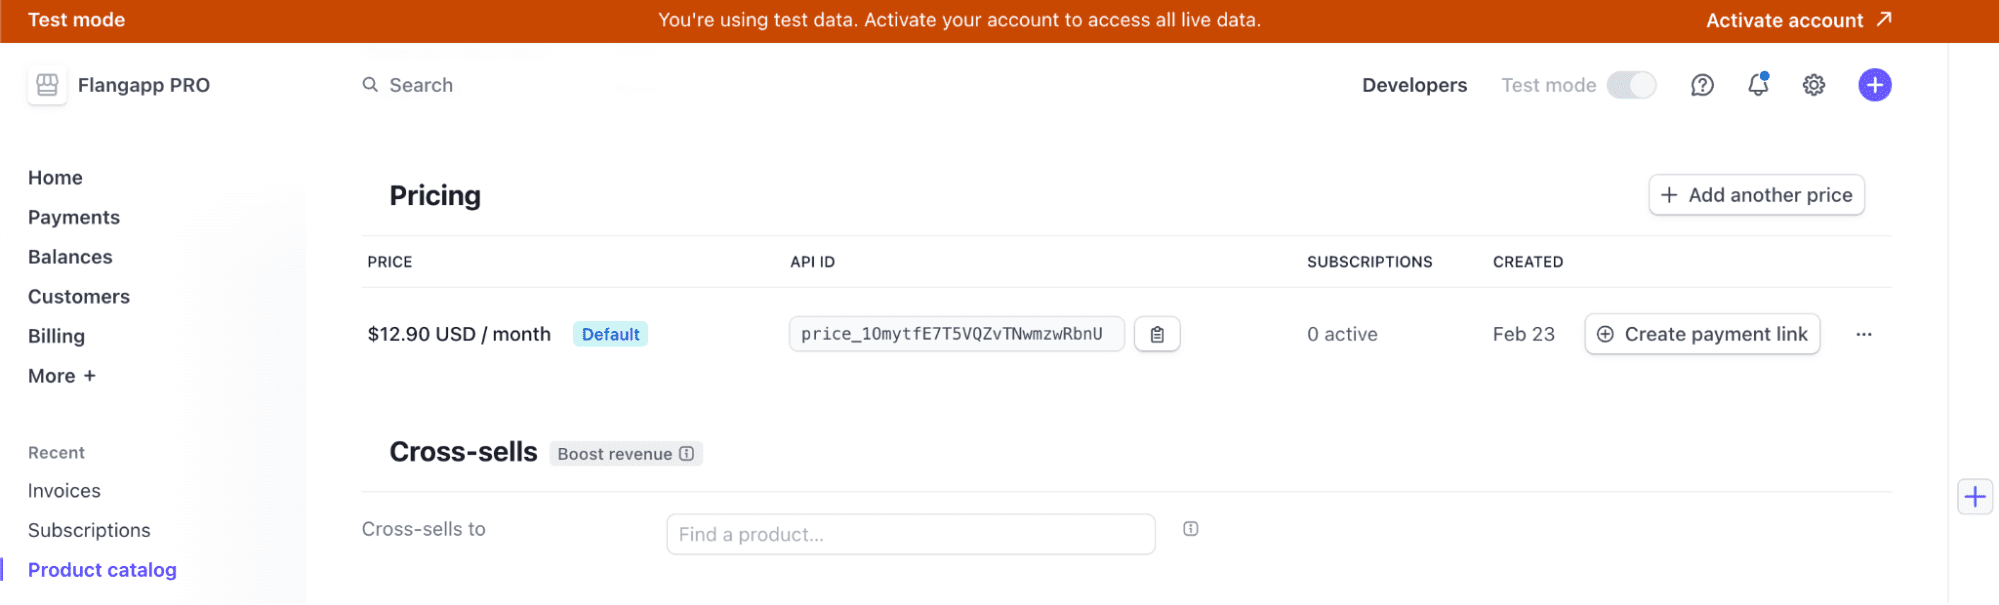
This value must be entered in the External Api ID field in the Flangapp plan settings. Please keep in mind that your billing cycle and subscription price have to match what you see in your Flangapp dashboard.
* Updated (Version 2.9)
PayPal
Go to your Business Dashboard https://www.paypal.com/mep/dashboard and create a new subscription in the Sales/Subscription Plans section:
Click the "Create Plan" button and then click the "Create a Subscription Product" button:
Fill in the form and click the "Next" button:

Select the "Fixed pricing" option and click the "Next" button:
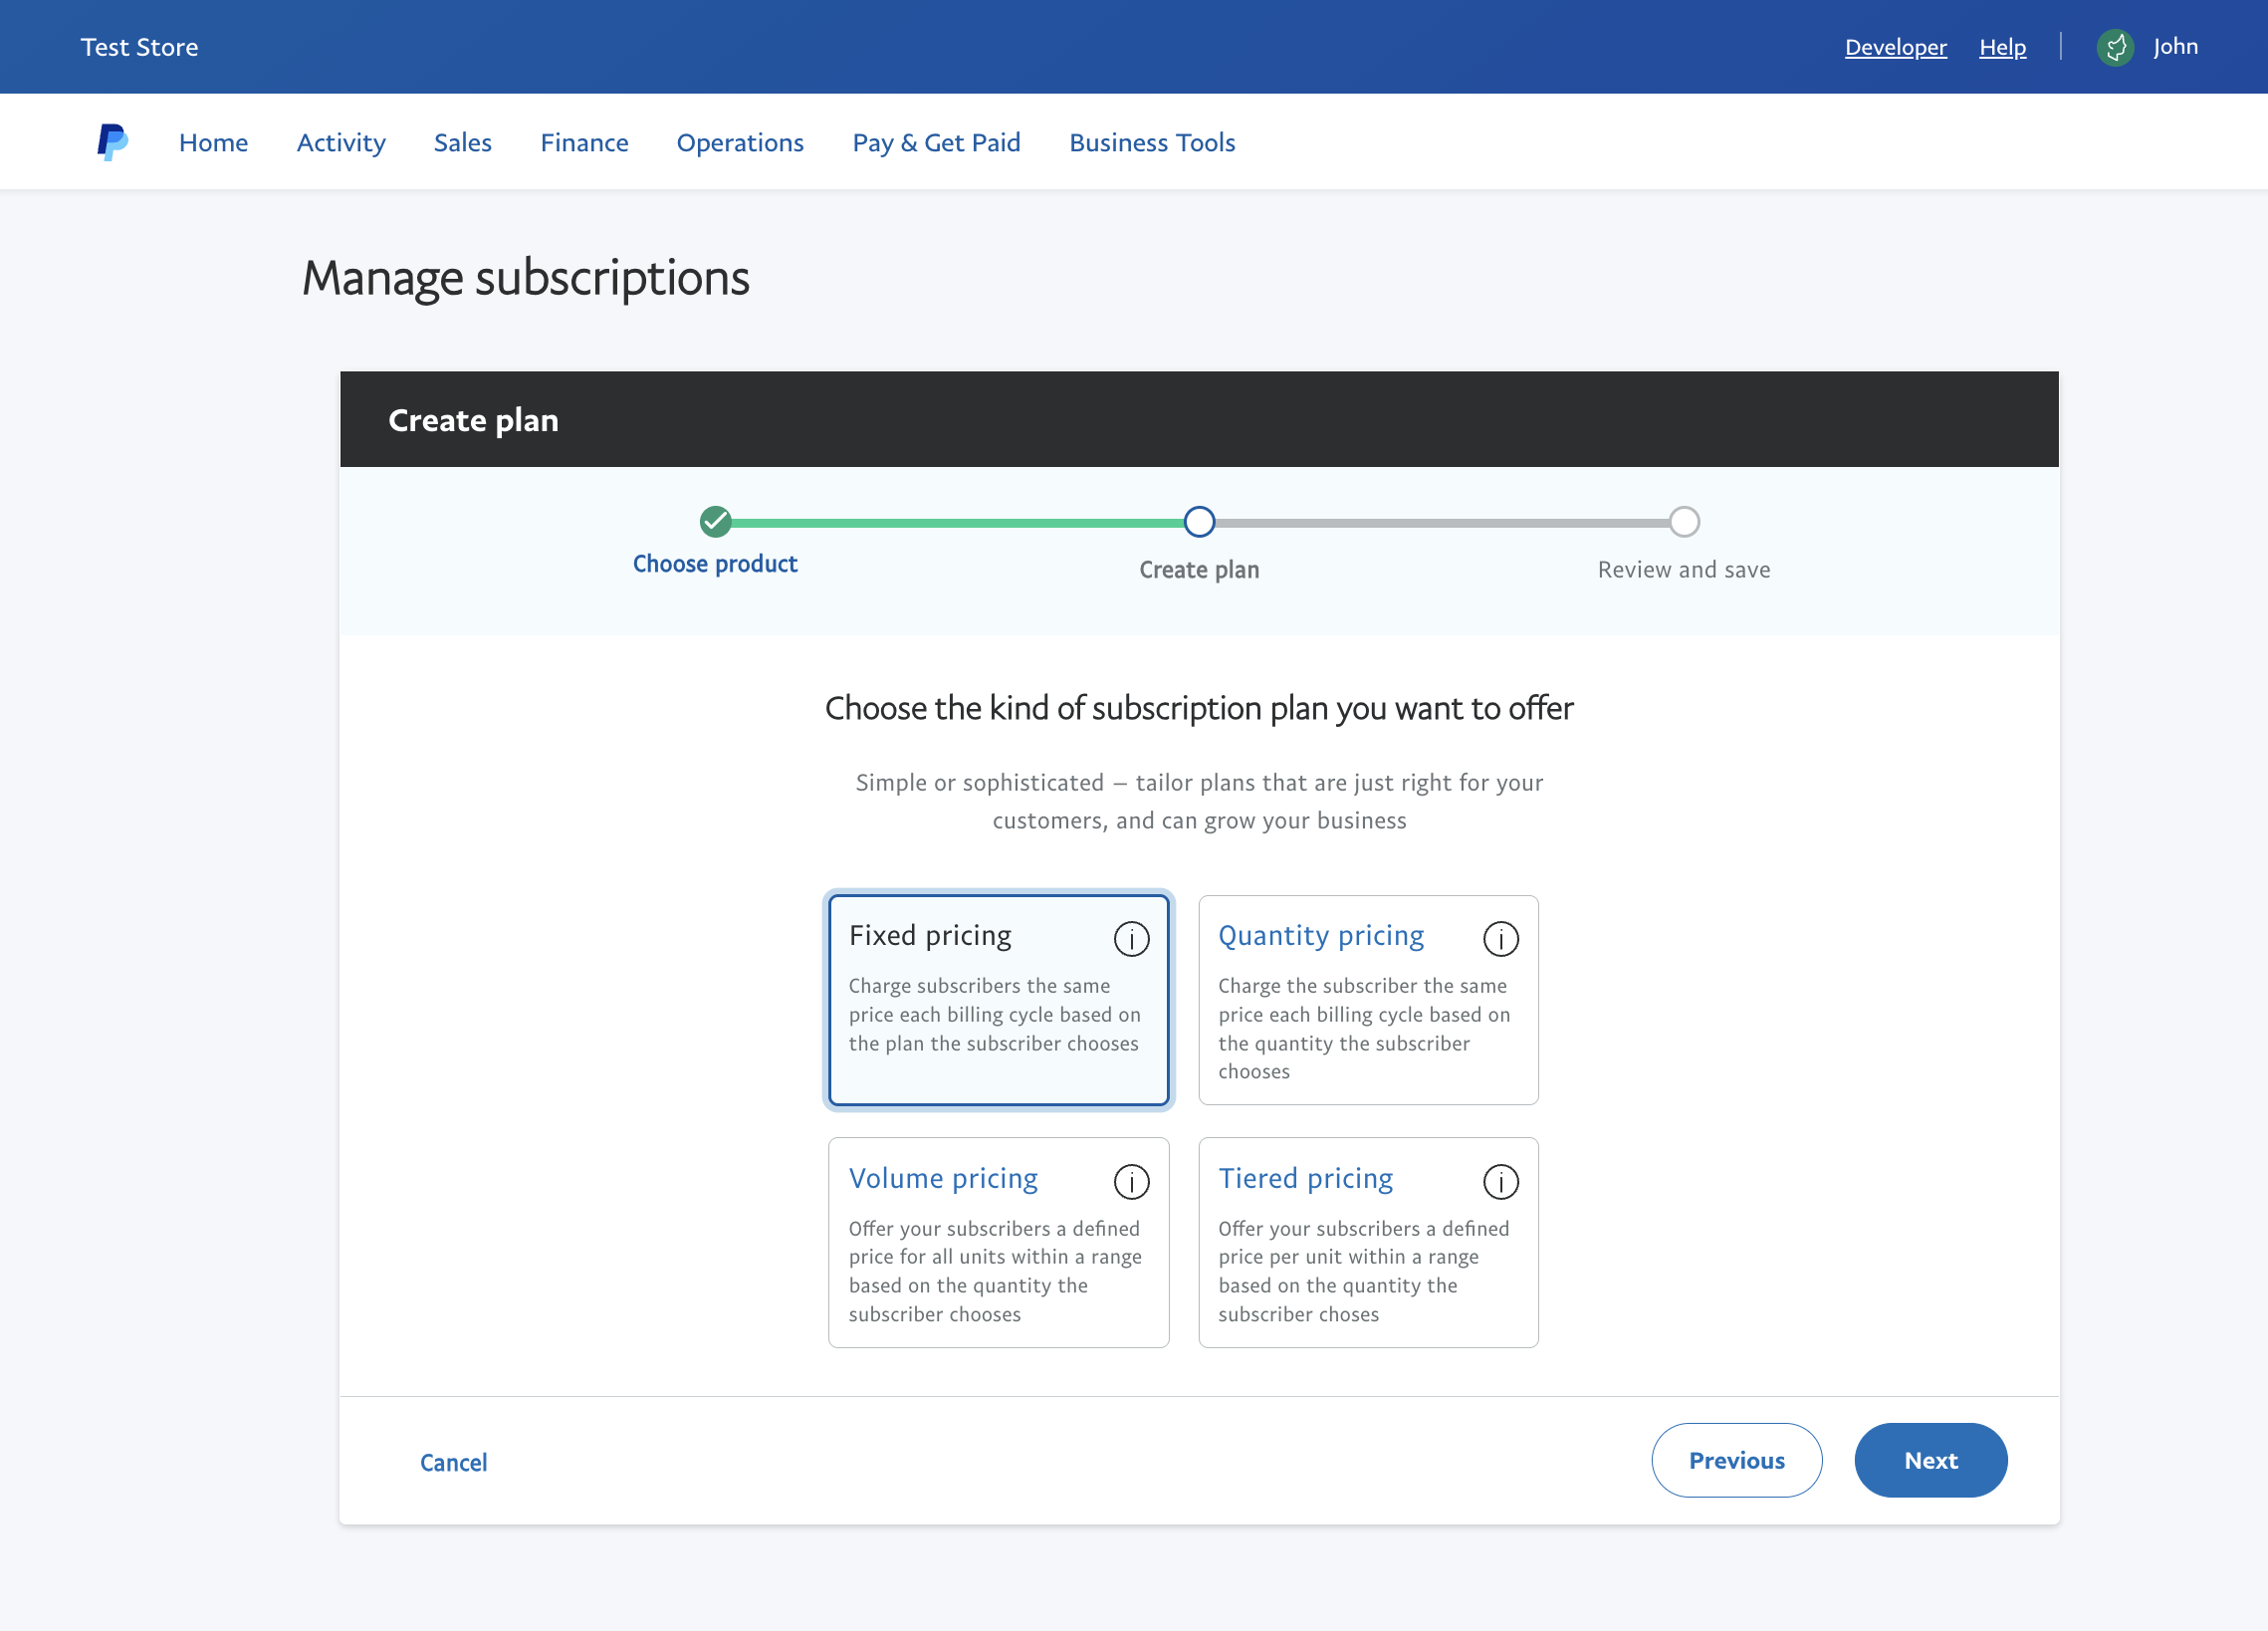
Fill in the form and click the "Next" button:
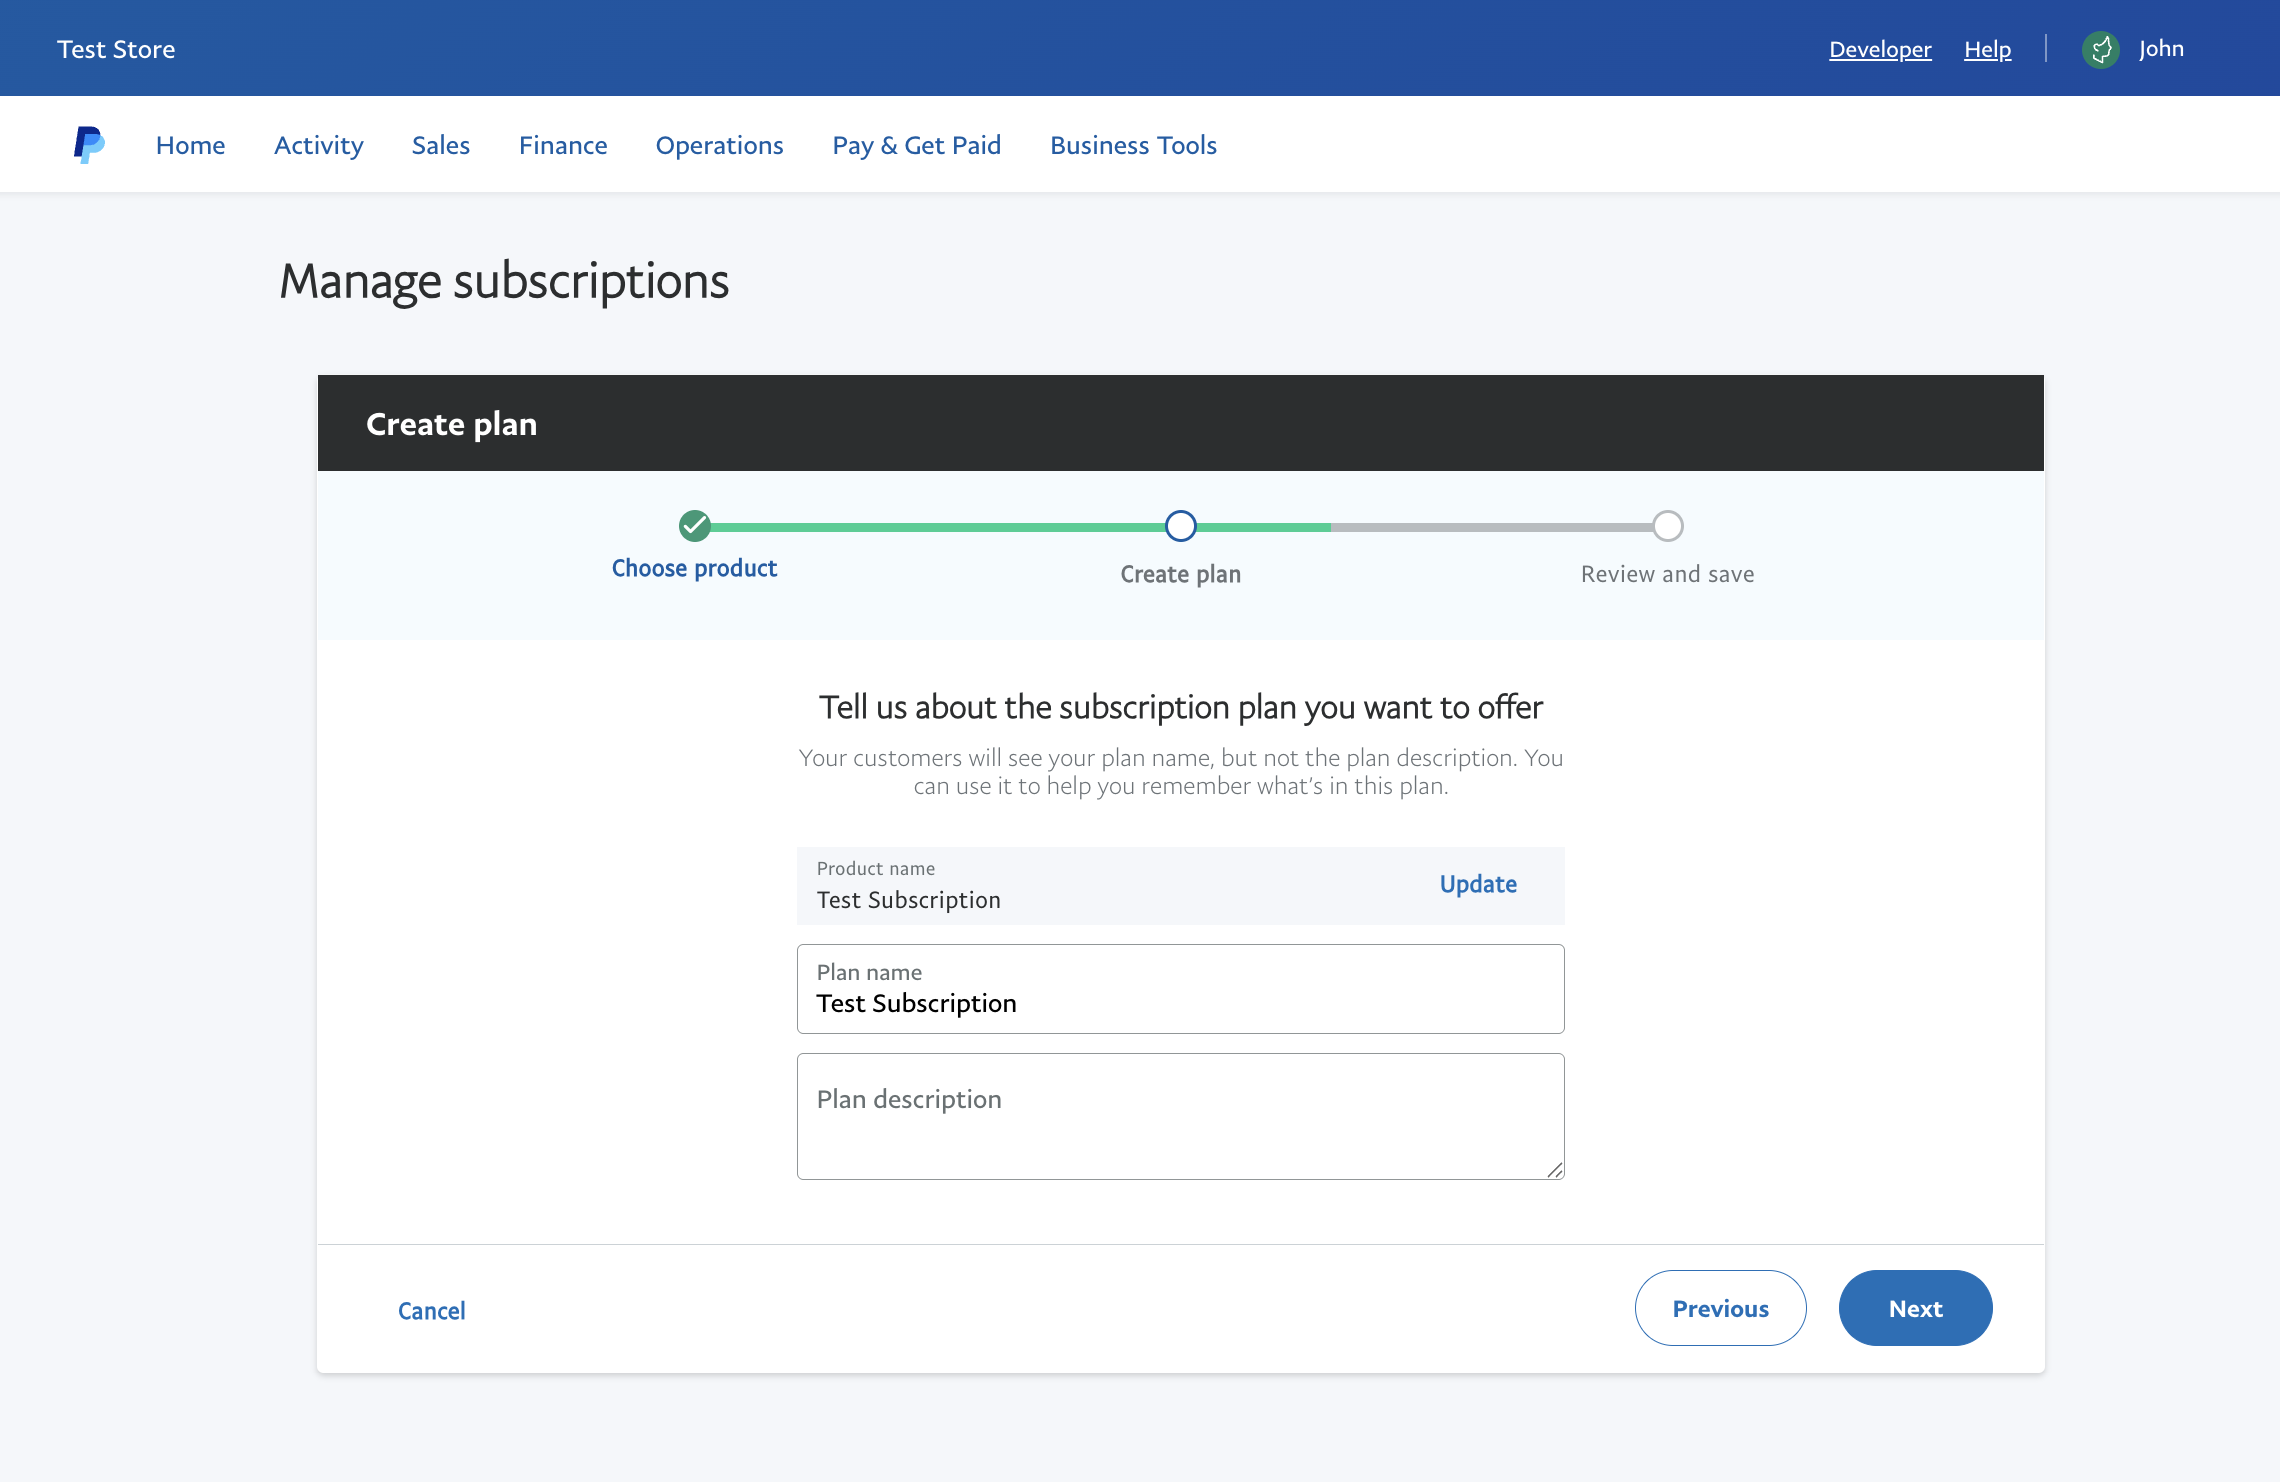
Fill in the form and click the "Next" button:

Before clicking the "Turn Plan On" button, you will be able to copy the Product ID:

This value must be entered in the External Api ID field in the Flangapp plan settings. Please keep in mind that your billing cycle and subscription price have to match what you see in your Flangapp dashboard.
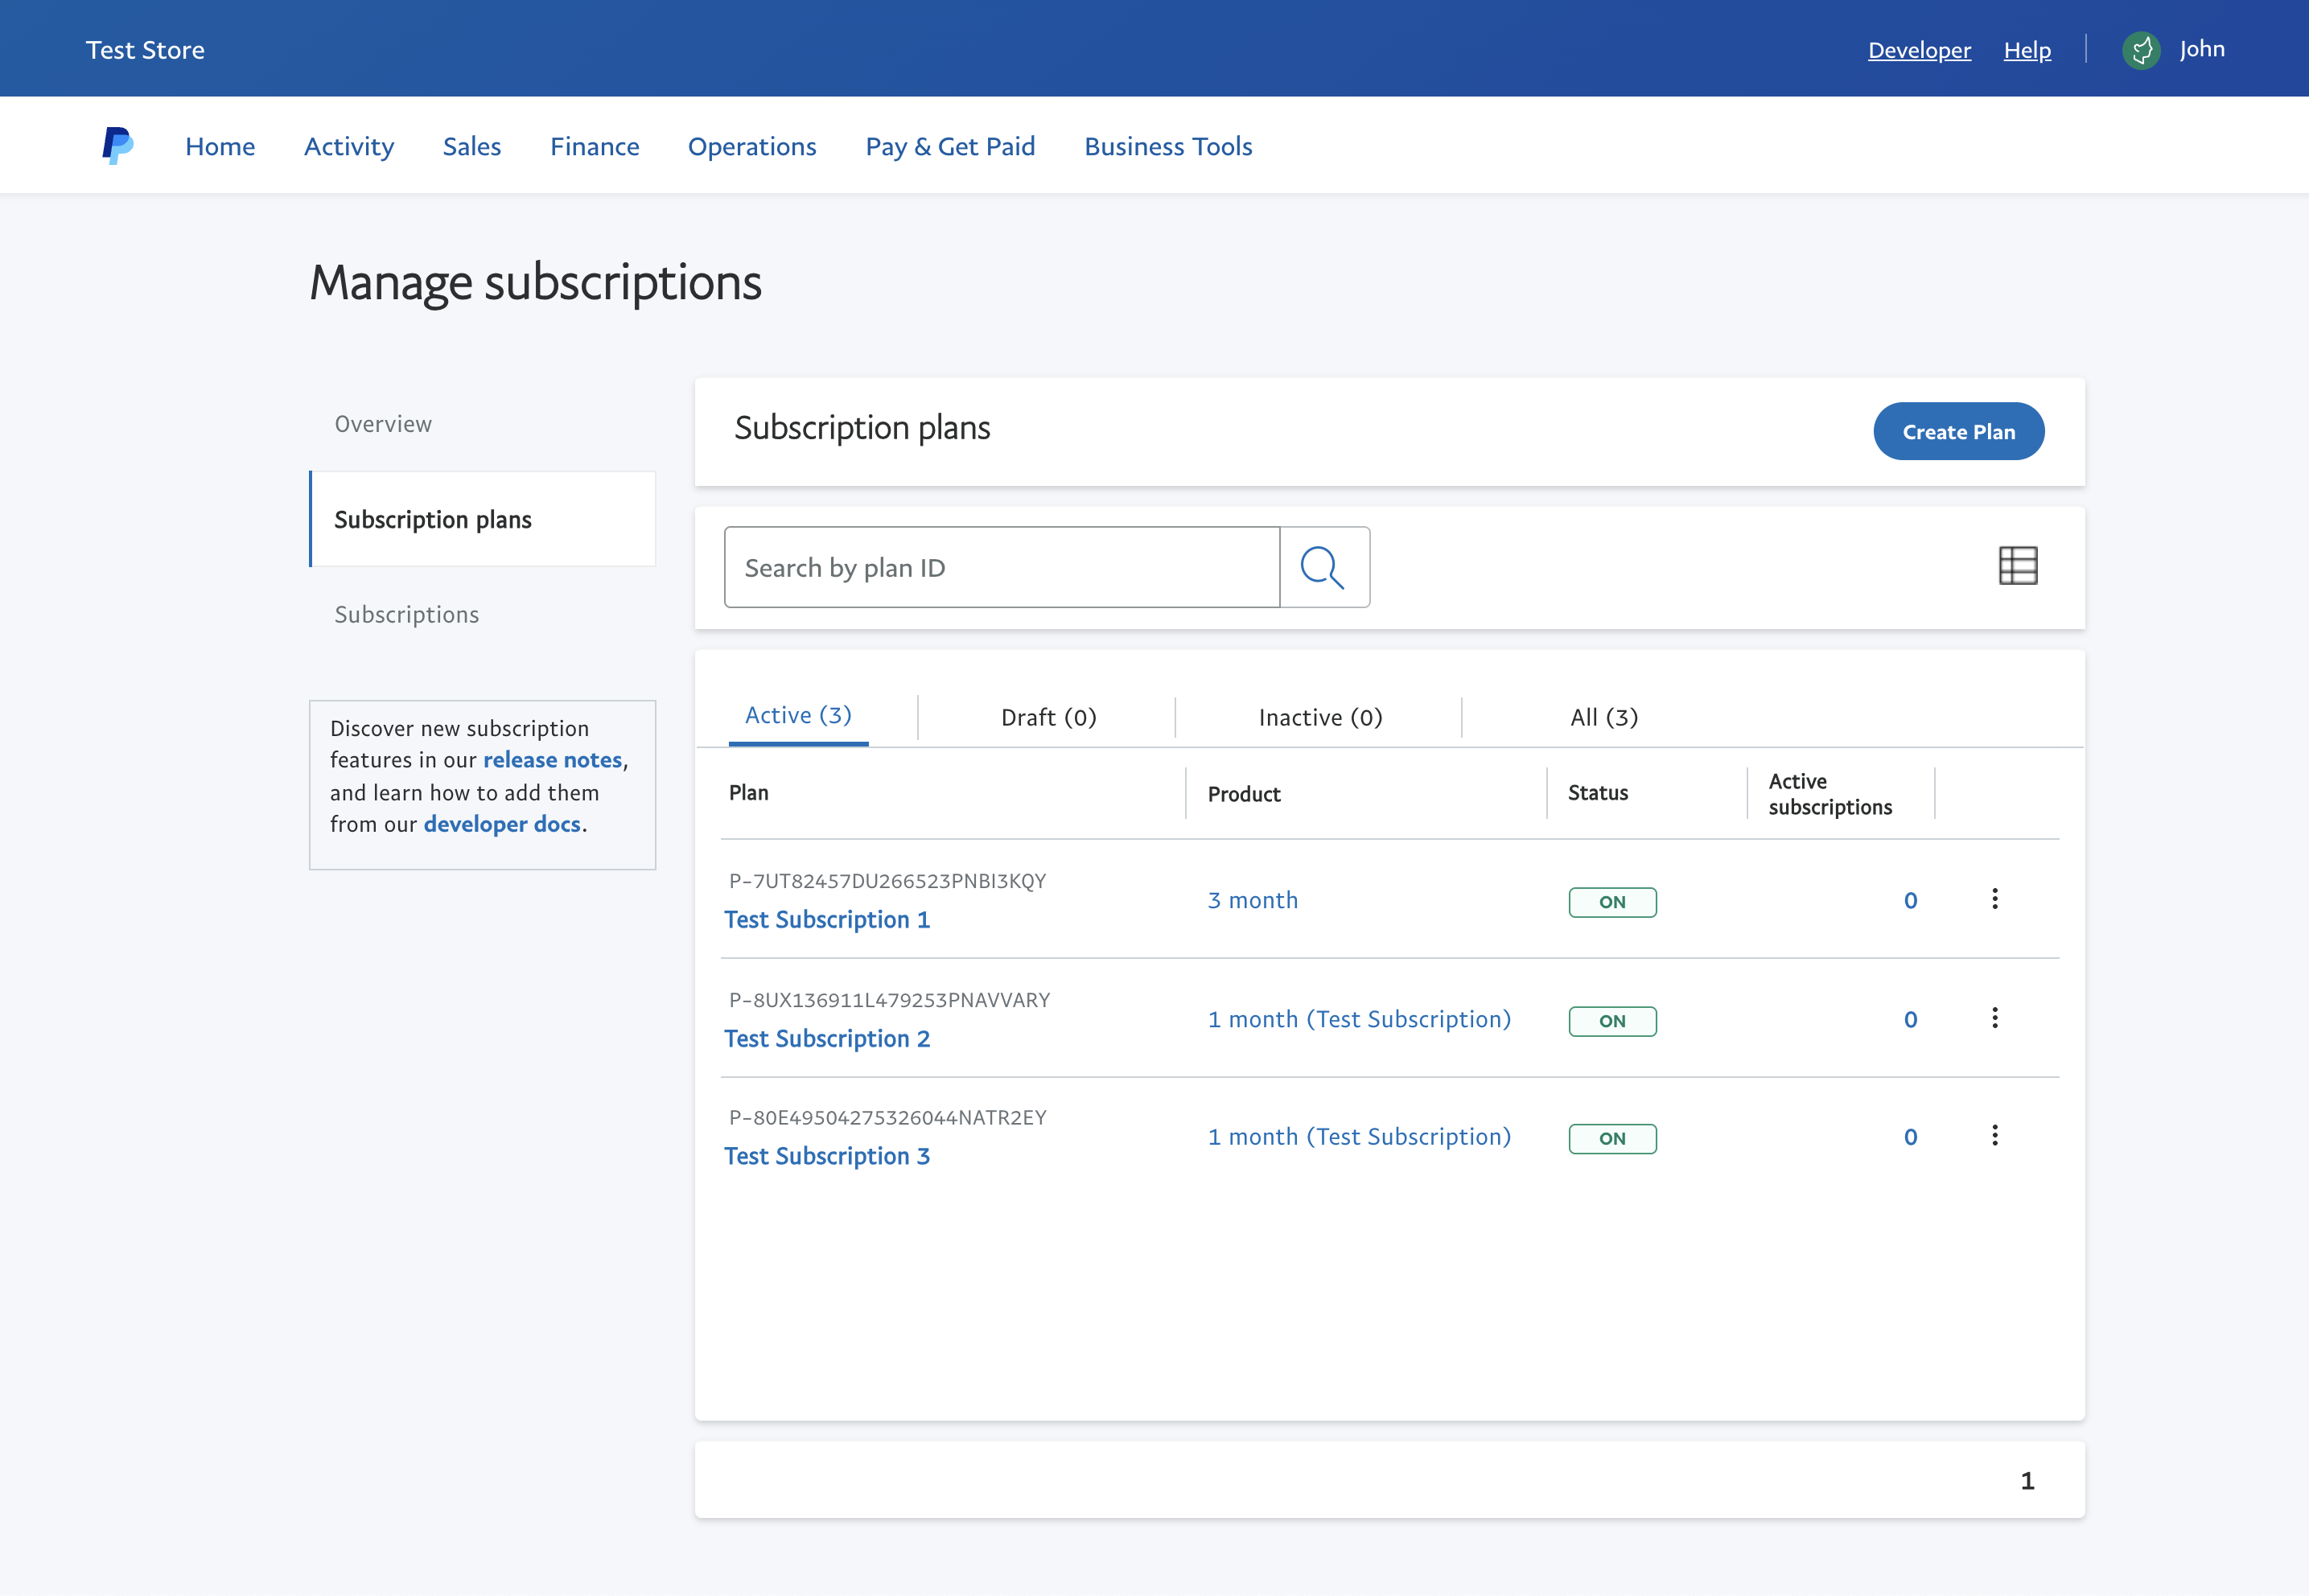
RazorPay
Create a new plan in your RazorPay account https://dashboard.razorpay.com/app/plans:
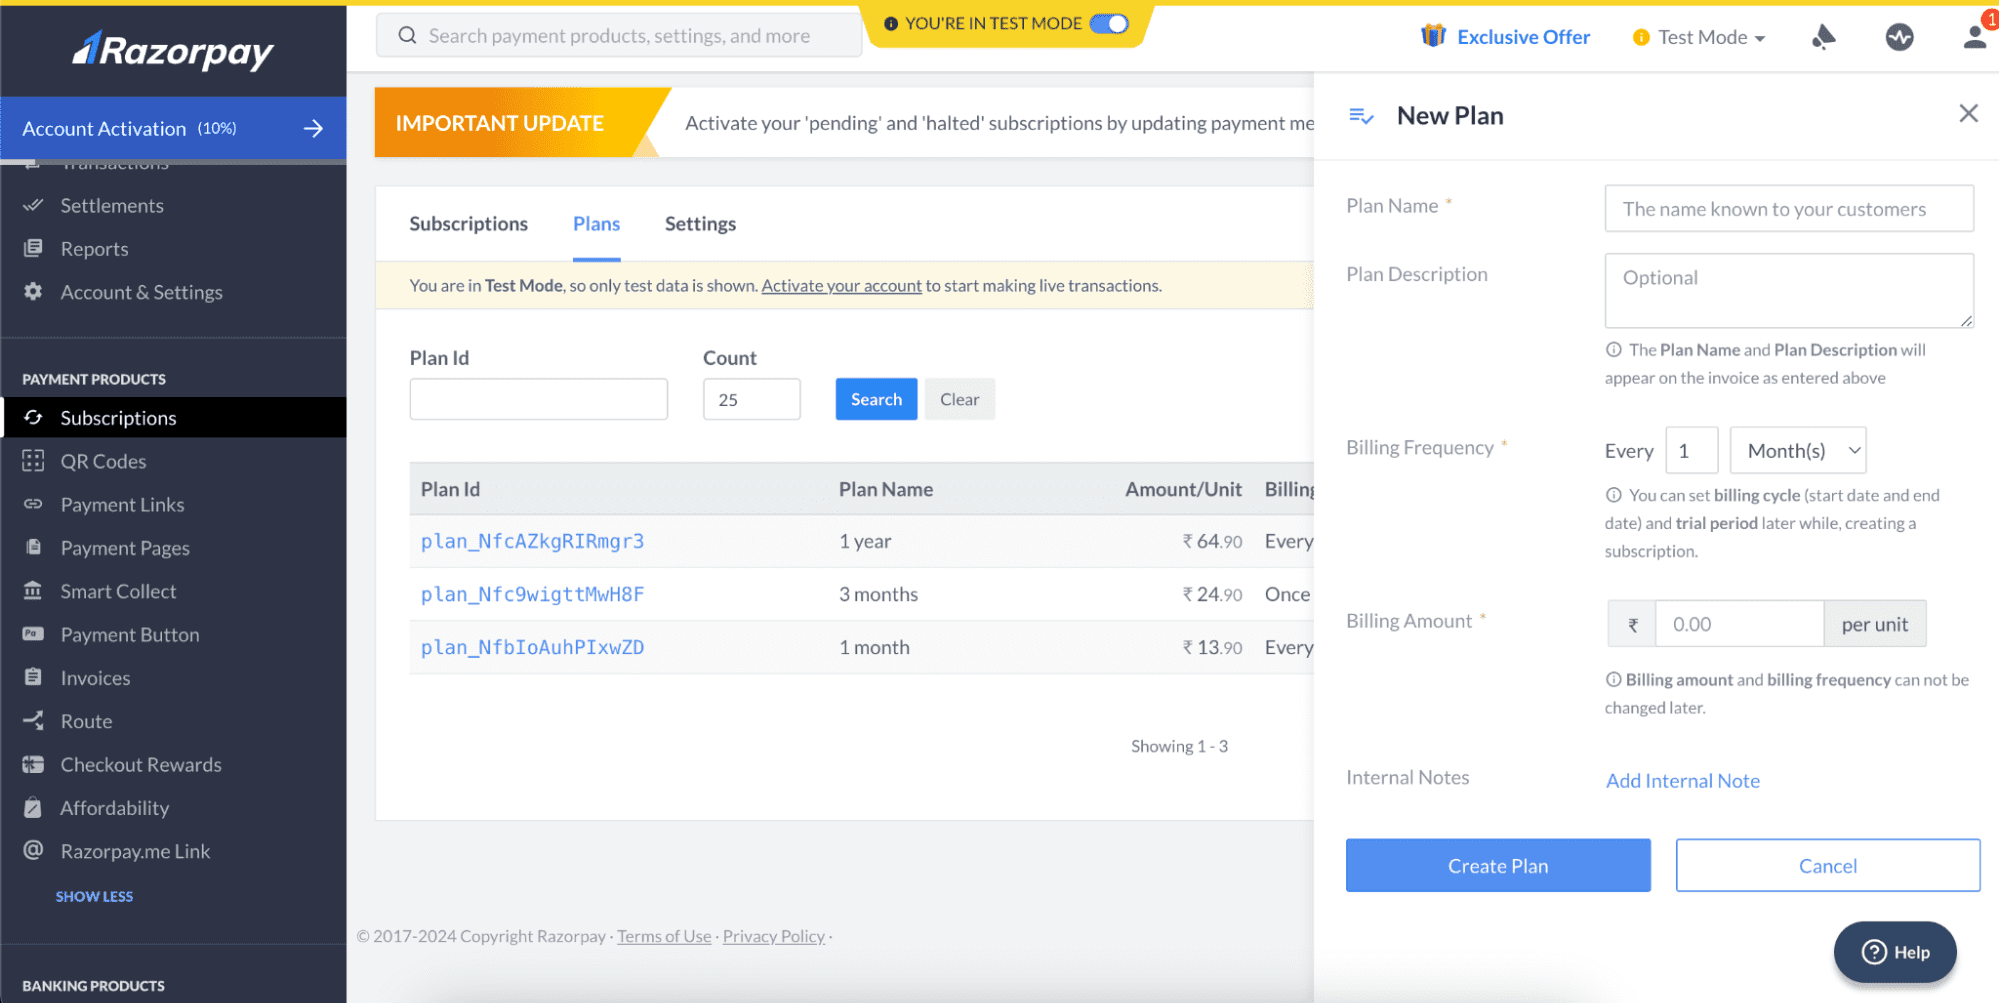
Right after creation confirmation, you will be able to copy the Plan ID. This value must be entered in the External Api ID field in the Flangapp plan settings.
Please keep in mind that your billing cycle and subscription price have to match what you see in your Flangapp dashboard.
YooMoney
Leave this field blank. You can change the terms of your subscription - payment cycle or cost while working. The new rules will only be available for new purchases. All previously purchased subscriptions will remain under the same terms and conditions until the current plan is cancelled.
* Updated (Version 2.9)
Paystack
Create a new plan in your Paystack account https://dashboard.paystack.com/#/plans?status=active:
Right after creation confirmation, you will be able to copy the Plan Code. This value must be entered in the External Api ID field in the Flangapp plan settings.
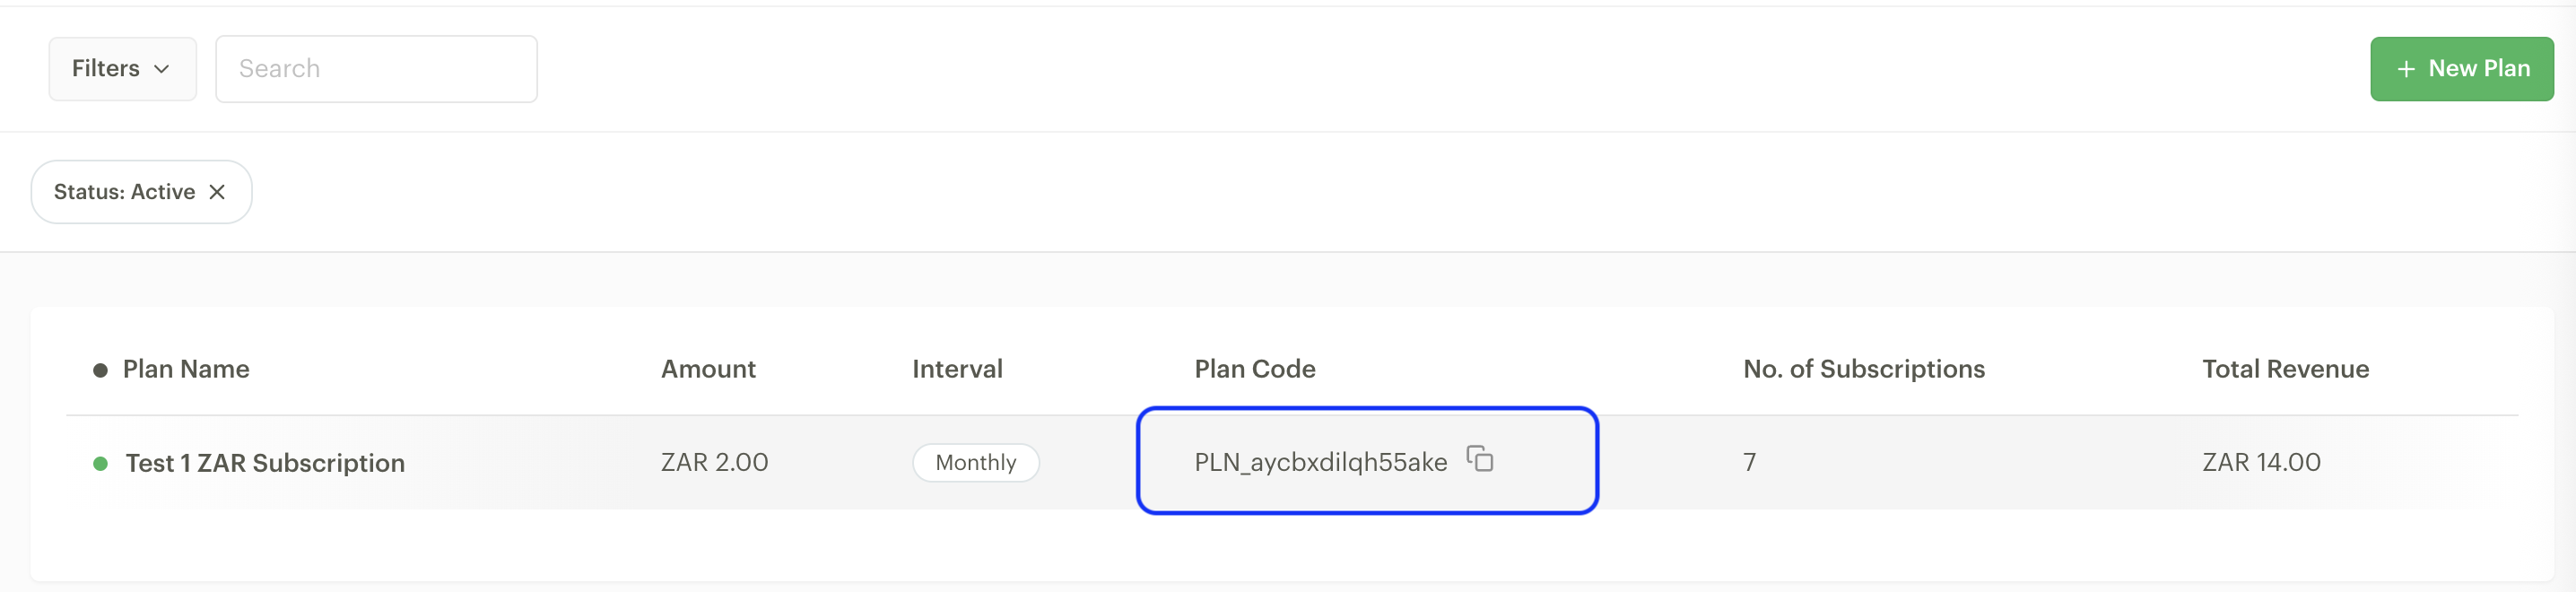
Please keep in mind that your billing cycle and subscription price have to match what you see in your Flangapp dashboard.
* Updated (Version 2.9)
One-time plan
A one-time plan will allow the user to create a fixed number of builds, but these builds will not be locked in time.
Once the available builds are exhausted, the user can't create a new build, but the application will still be available.
You can add a new one-time plan in the control panel in the section Dashboard - Plans - Create plan section. Fill in the form as shown below:

Select plan type
Select the one-time plan type of the plan.
Price
Set the one-time plan price in the currency configured in your site settings. This is the amount users will be charged for the subscription period.
Discount
Comparative discount rate. This value does not affect the final price of the plan, but only shows the savings among plans.
Build count
Set the number of builds that the user can create.
In the External ID field, you have to enter the subscription ID that was created in your payment provider account.
Stripe
You can create a new product with "One-off" type in the “Product catalog” section https://dashboard.stripe.com/products?active=true:
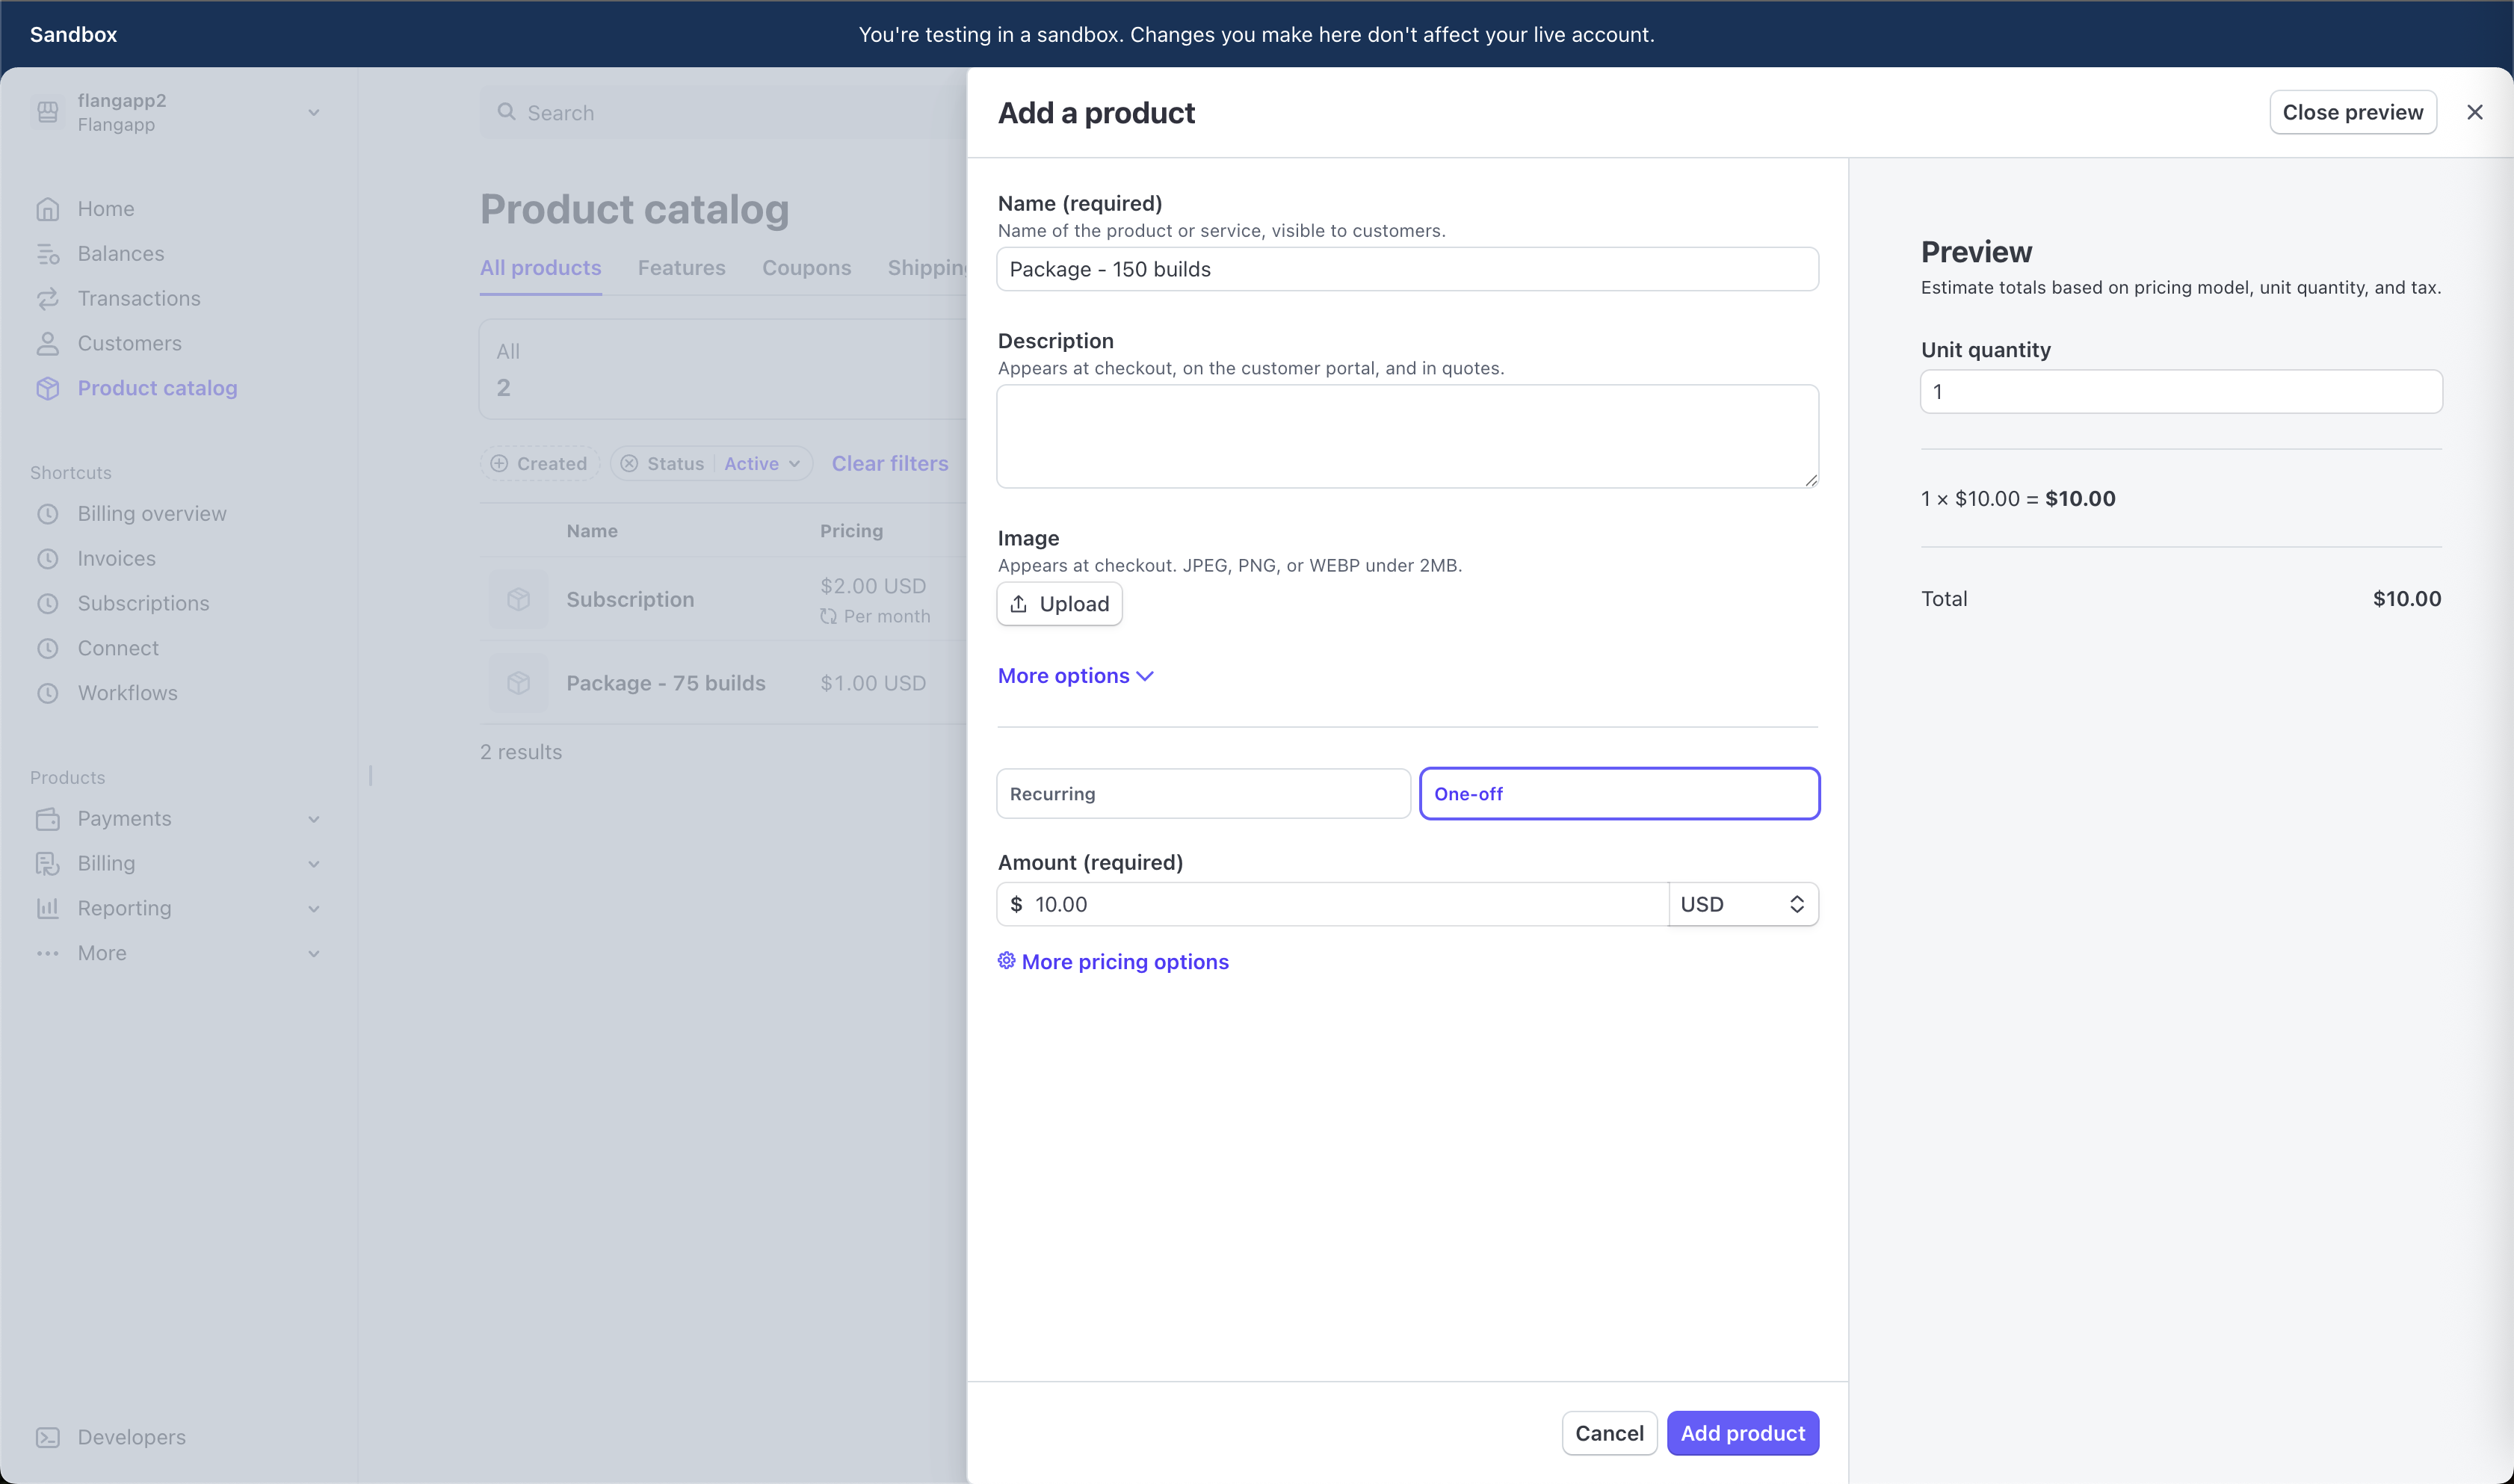
Right after creation confirmation, you will be able to copy the API ID (price_id):
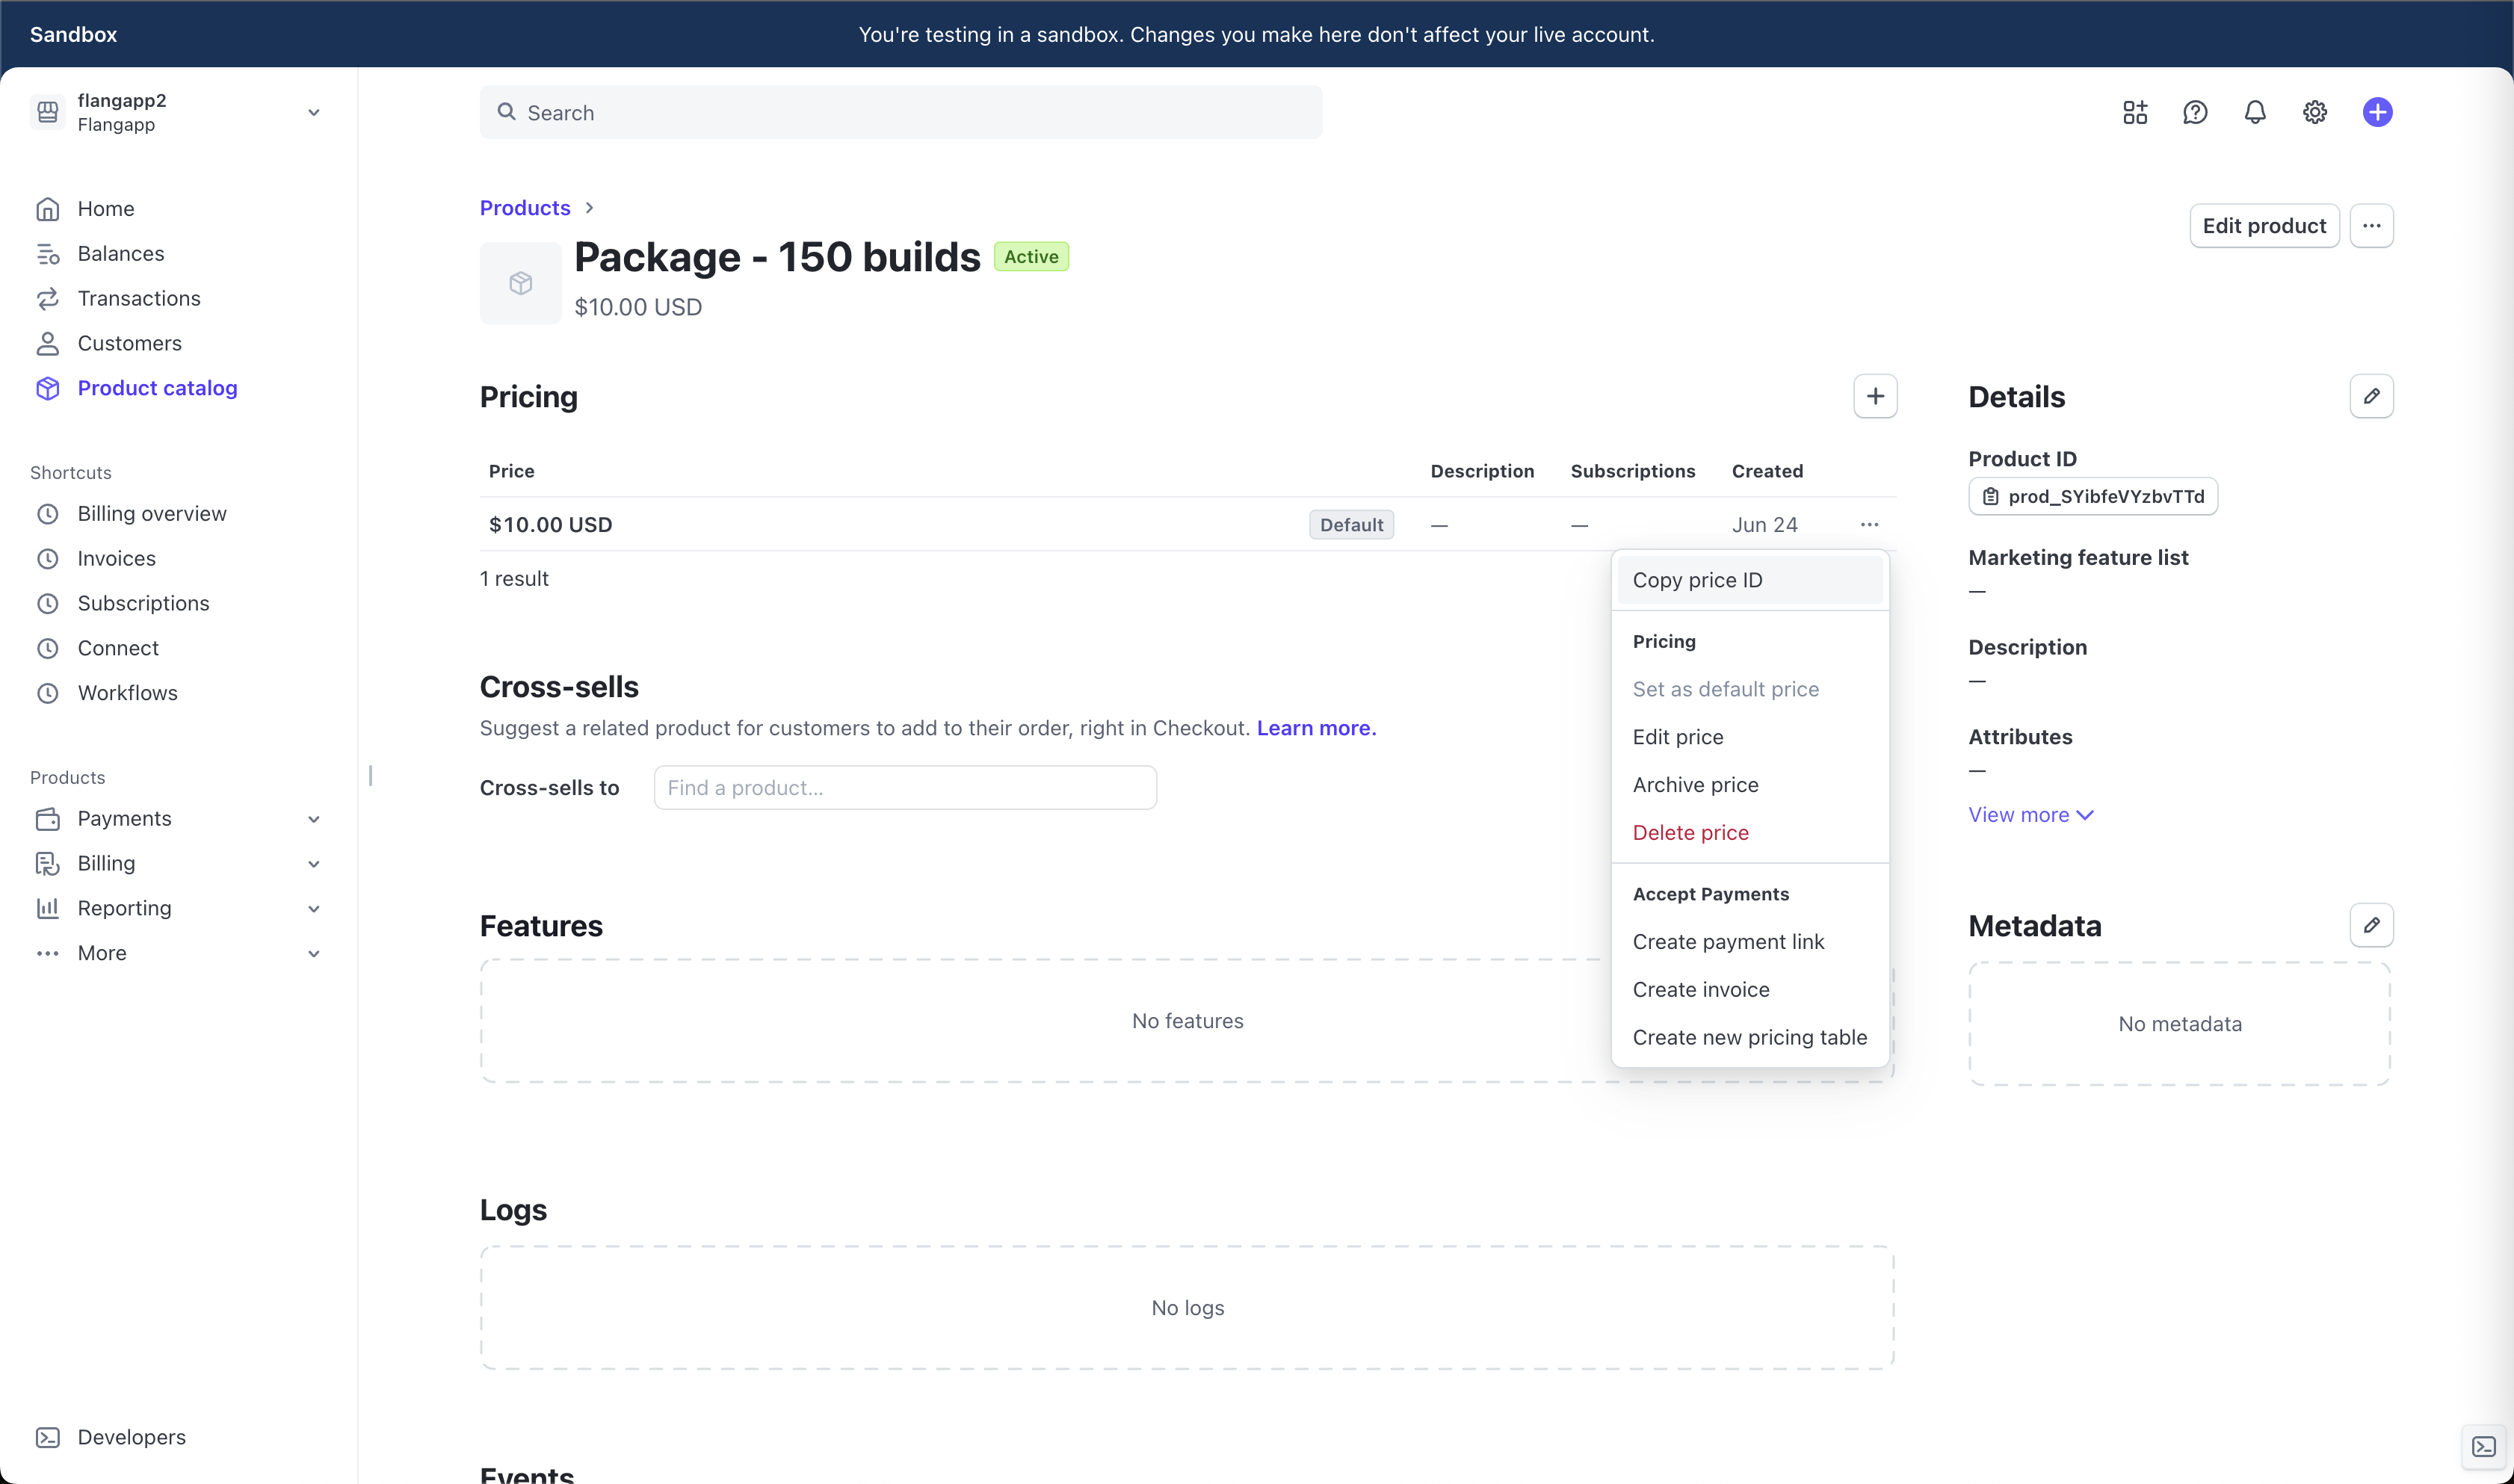
This value must be entered in the External Api ID field in the Flangapp plan settings. Please keep in mind that your billing cycle and subscription price have to match what you see in your Flangapp dashboard.
Paypal
Leave this field blank. It's not required for this payment provider.
RazorPay
Leave this field blank. It's not required for this payment provider.
YooMoney
Leave this field blank. It's not required for this payment provider.
Paystack
Leave this field blank. It's not required for this payment provider.
* Updated (Version 2.9)
Gifts
Flangapp allows administrators to create gift purchases for users (and for themselves) without actual purchasing.
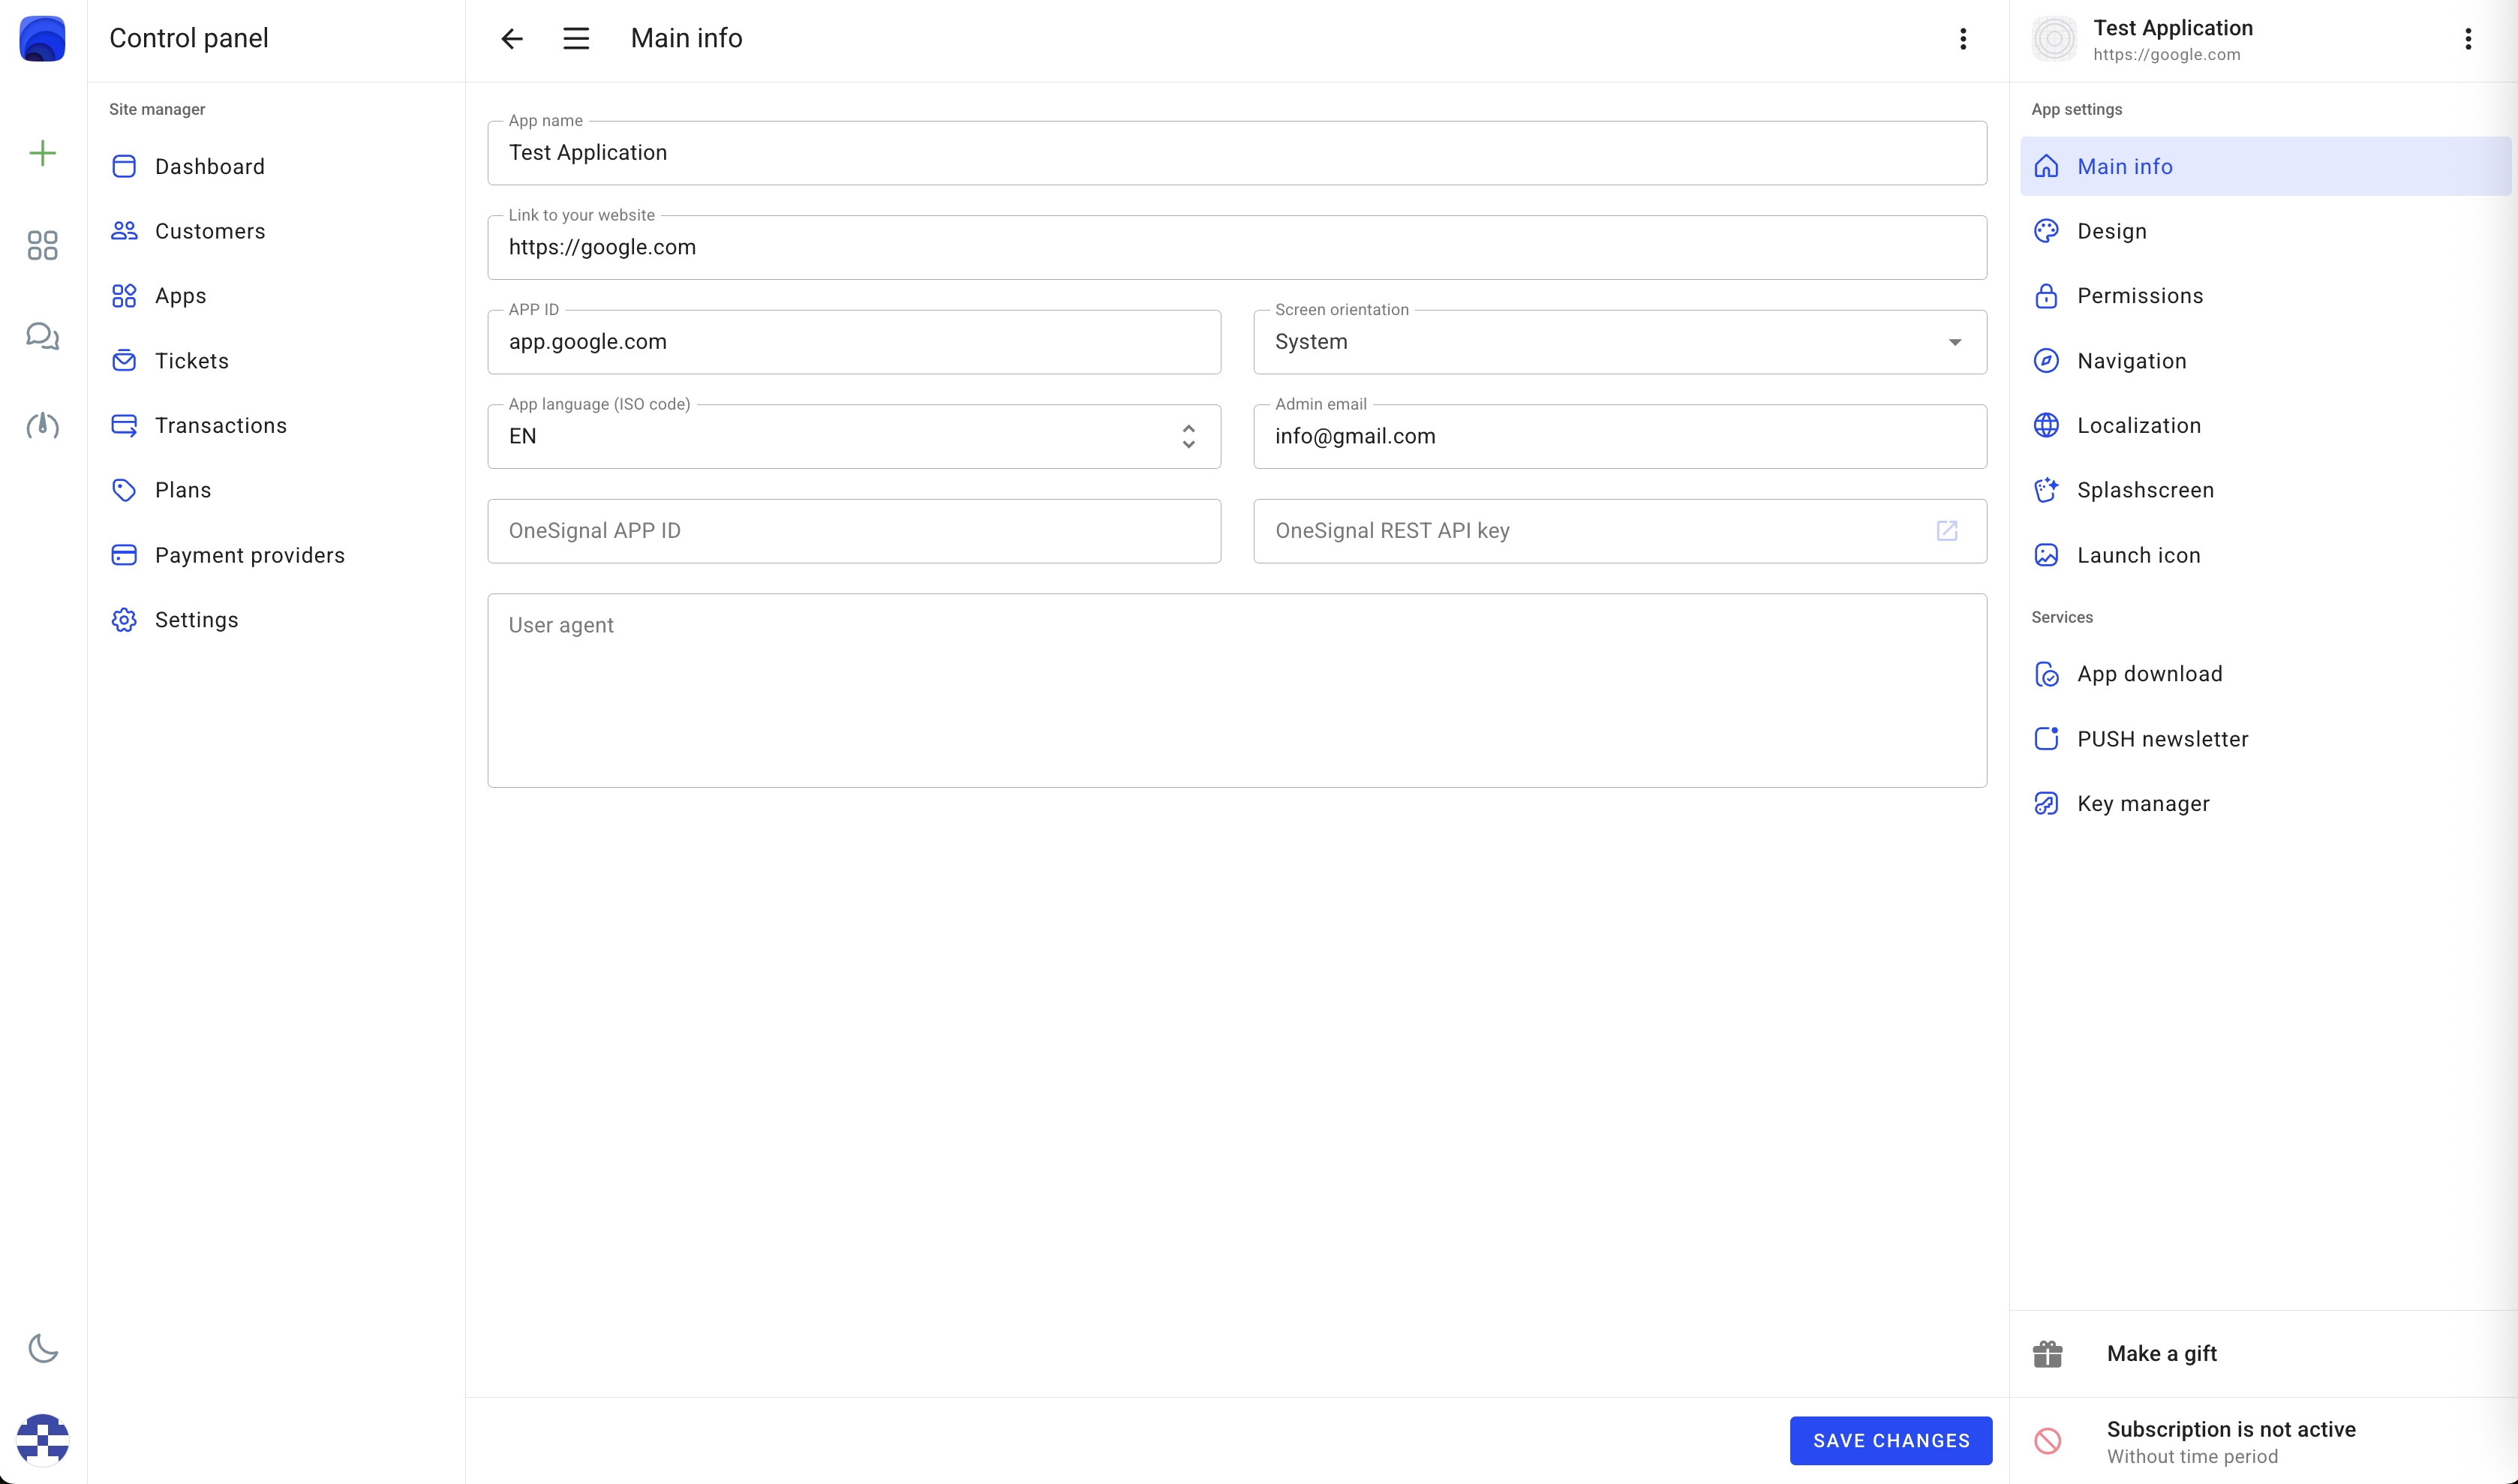
To create a gift purchase, go to the section Control panel - Apps - Choose an app without an active plan. Click the button to make a gift placed above the active subscription details on the bottom right part of the screen.
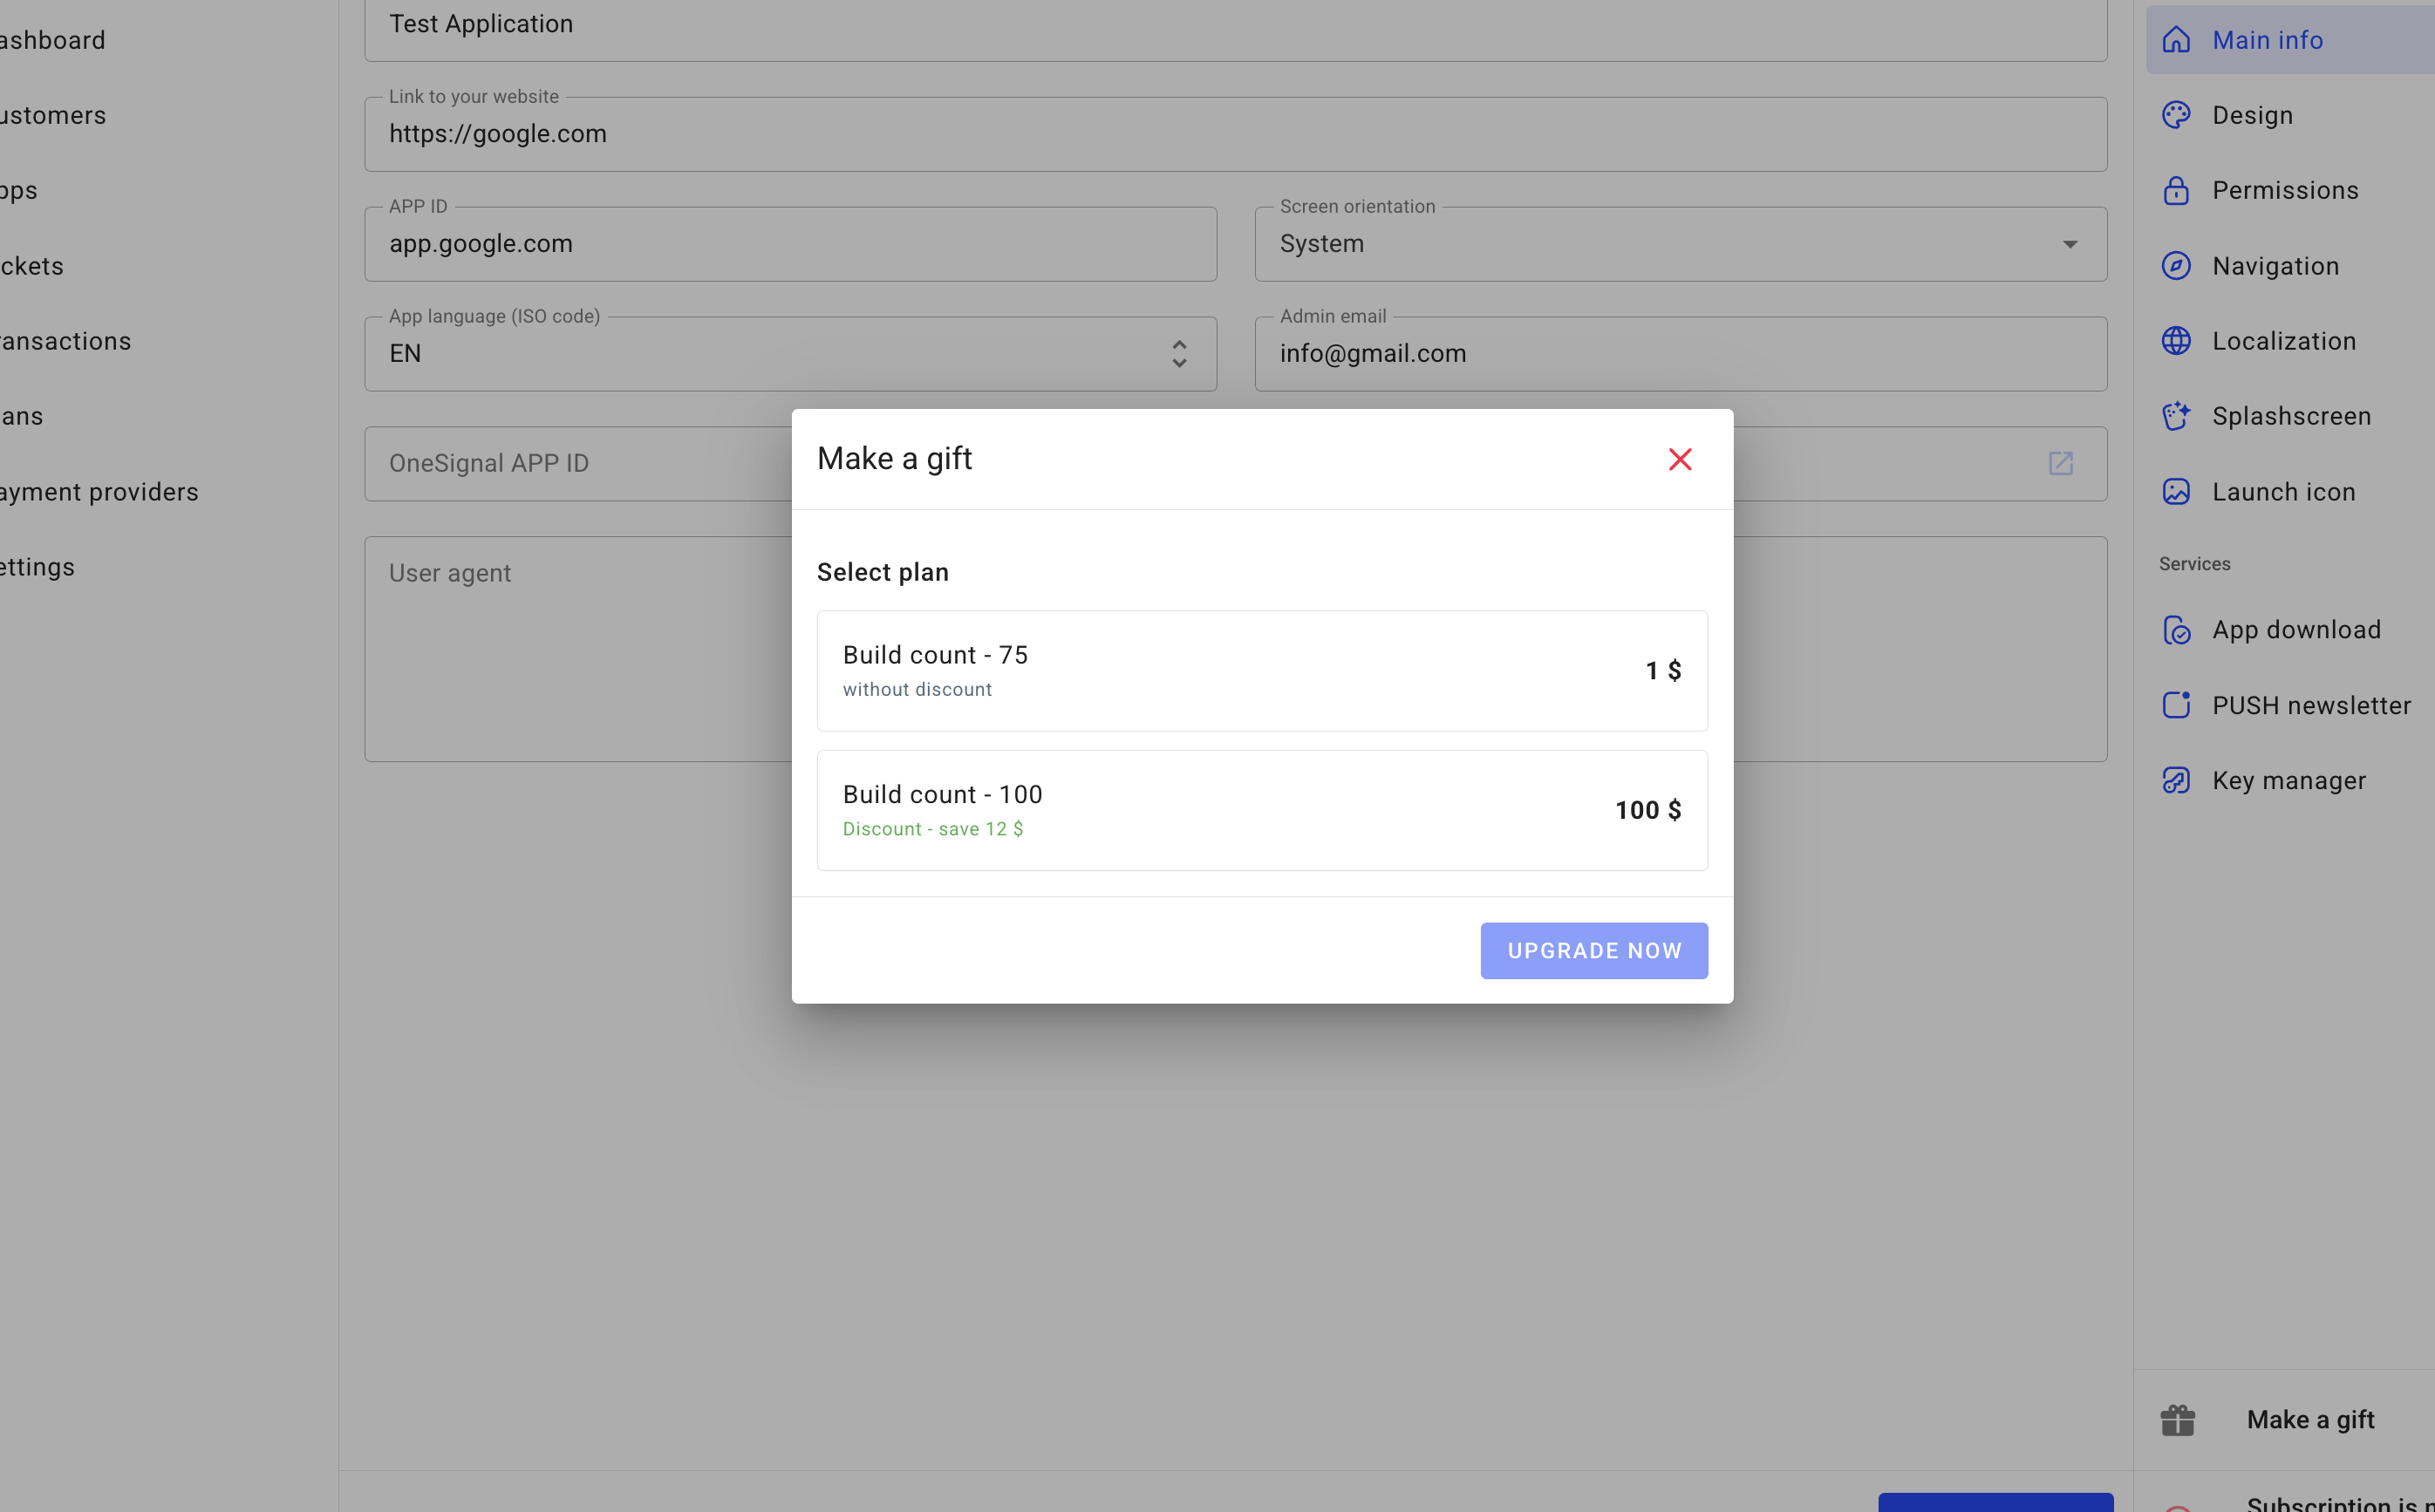
Choose the available one-time plan type and click the button "UPGRADE NOW" as shown below:
After that, the user who created this application will be able to make builds, just as if they had purchased this plan.
As an Admin, you can also create a gift for yourself.
Localization
By default Flangapp only comes in English, but you can use your local language for your site's interface.
First, you need to go to your backend site's app/Language folder. You will see the “en” folder - it contains all the language options in English. Create a new folder with the name of your localization, for example “es” for Spanish. Copy all the files from the “en” folder to the “es” folder and make changes to the translation strings. Next, open the app/Config/App.php file and find line 72:
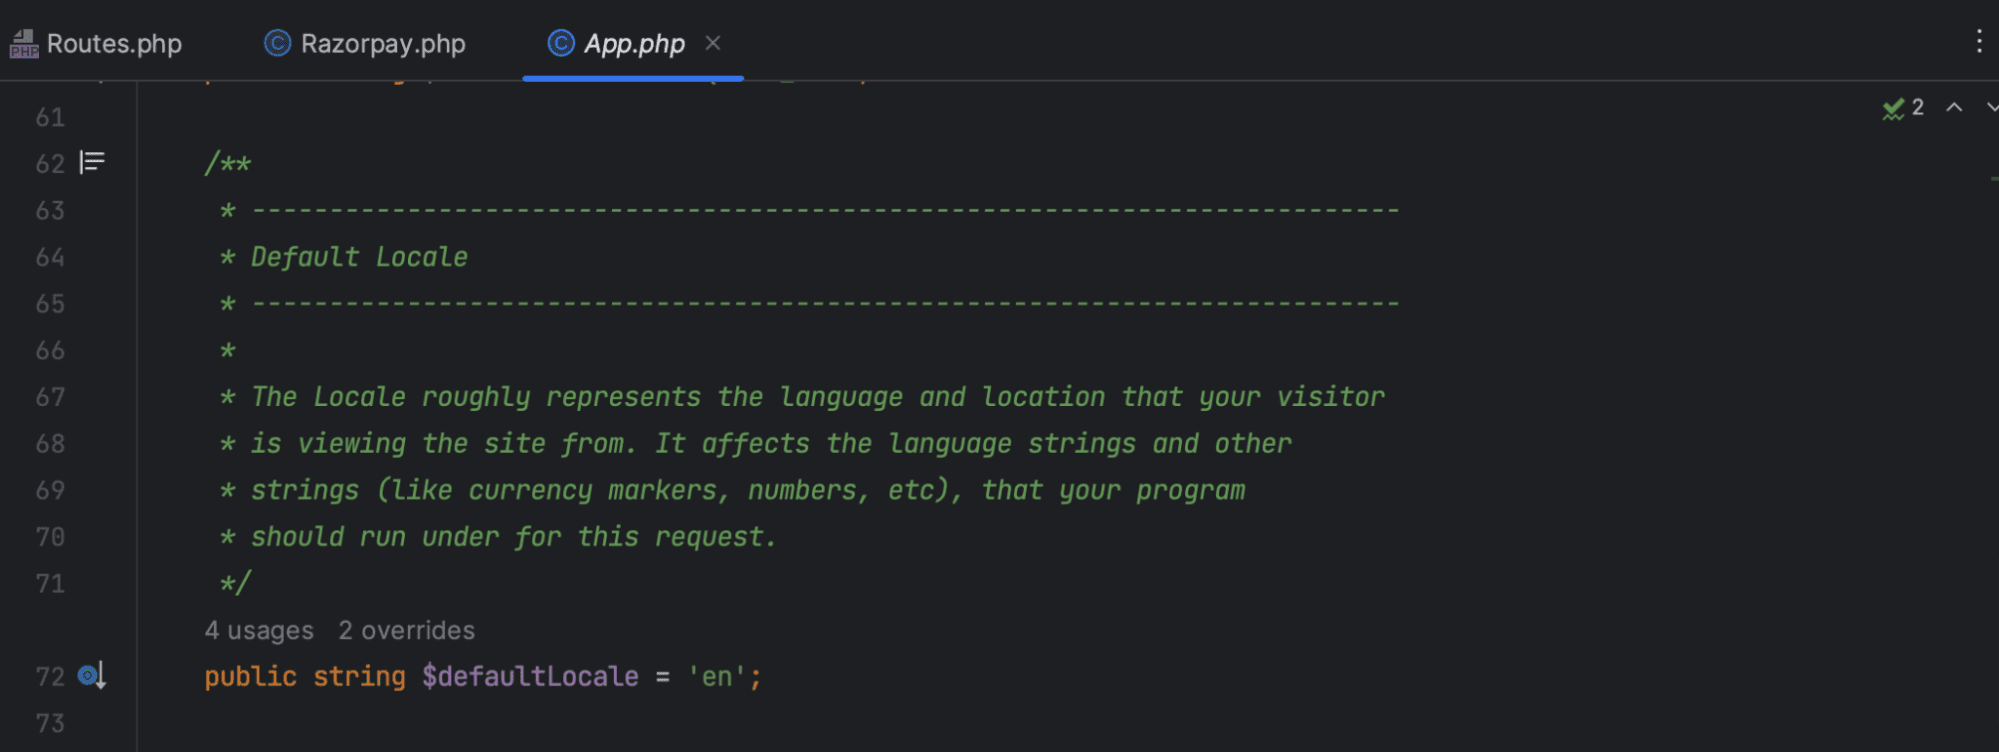
Set $defaultLocale = “es” to the variable if you want the default language to be Spanish.
If you want to use multiple languages, find lines 84 and 99 in this file:
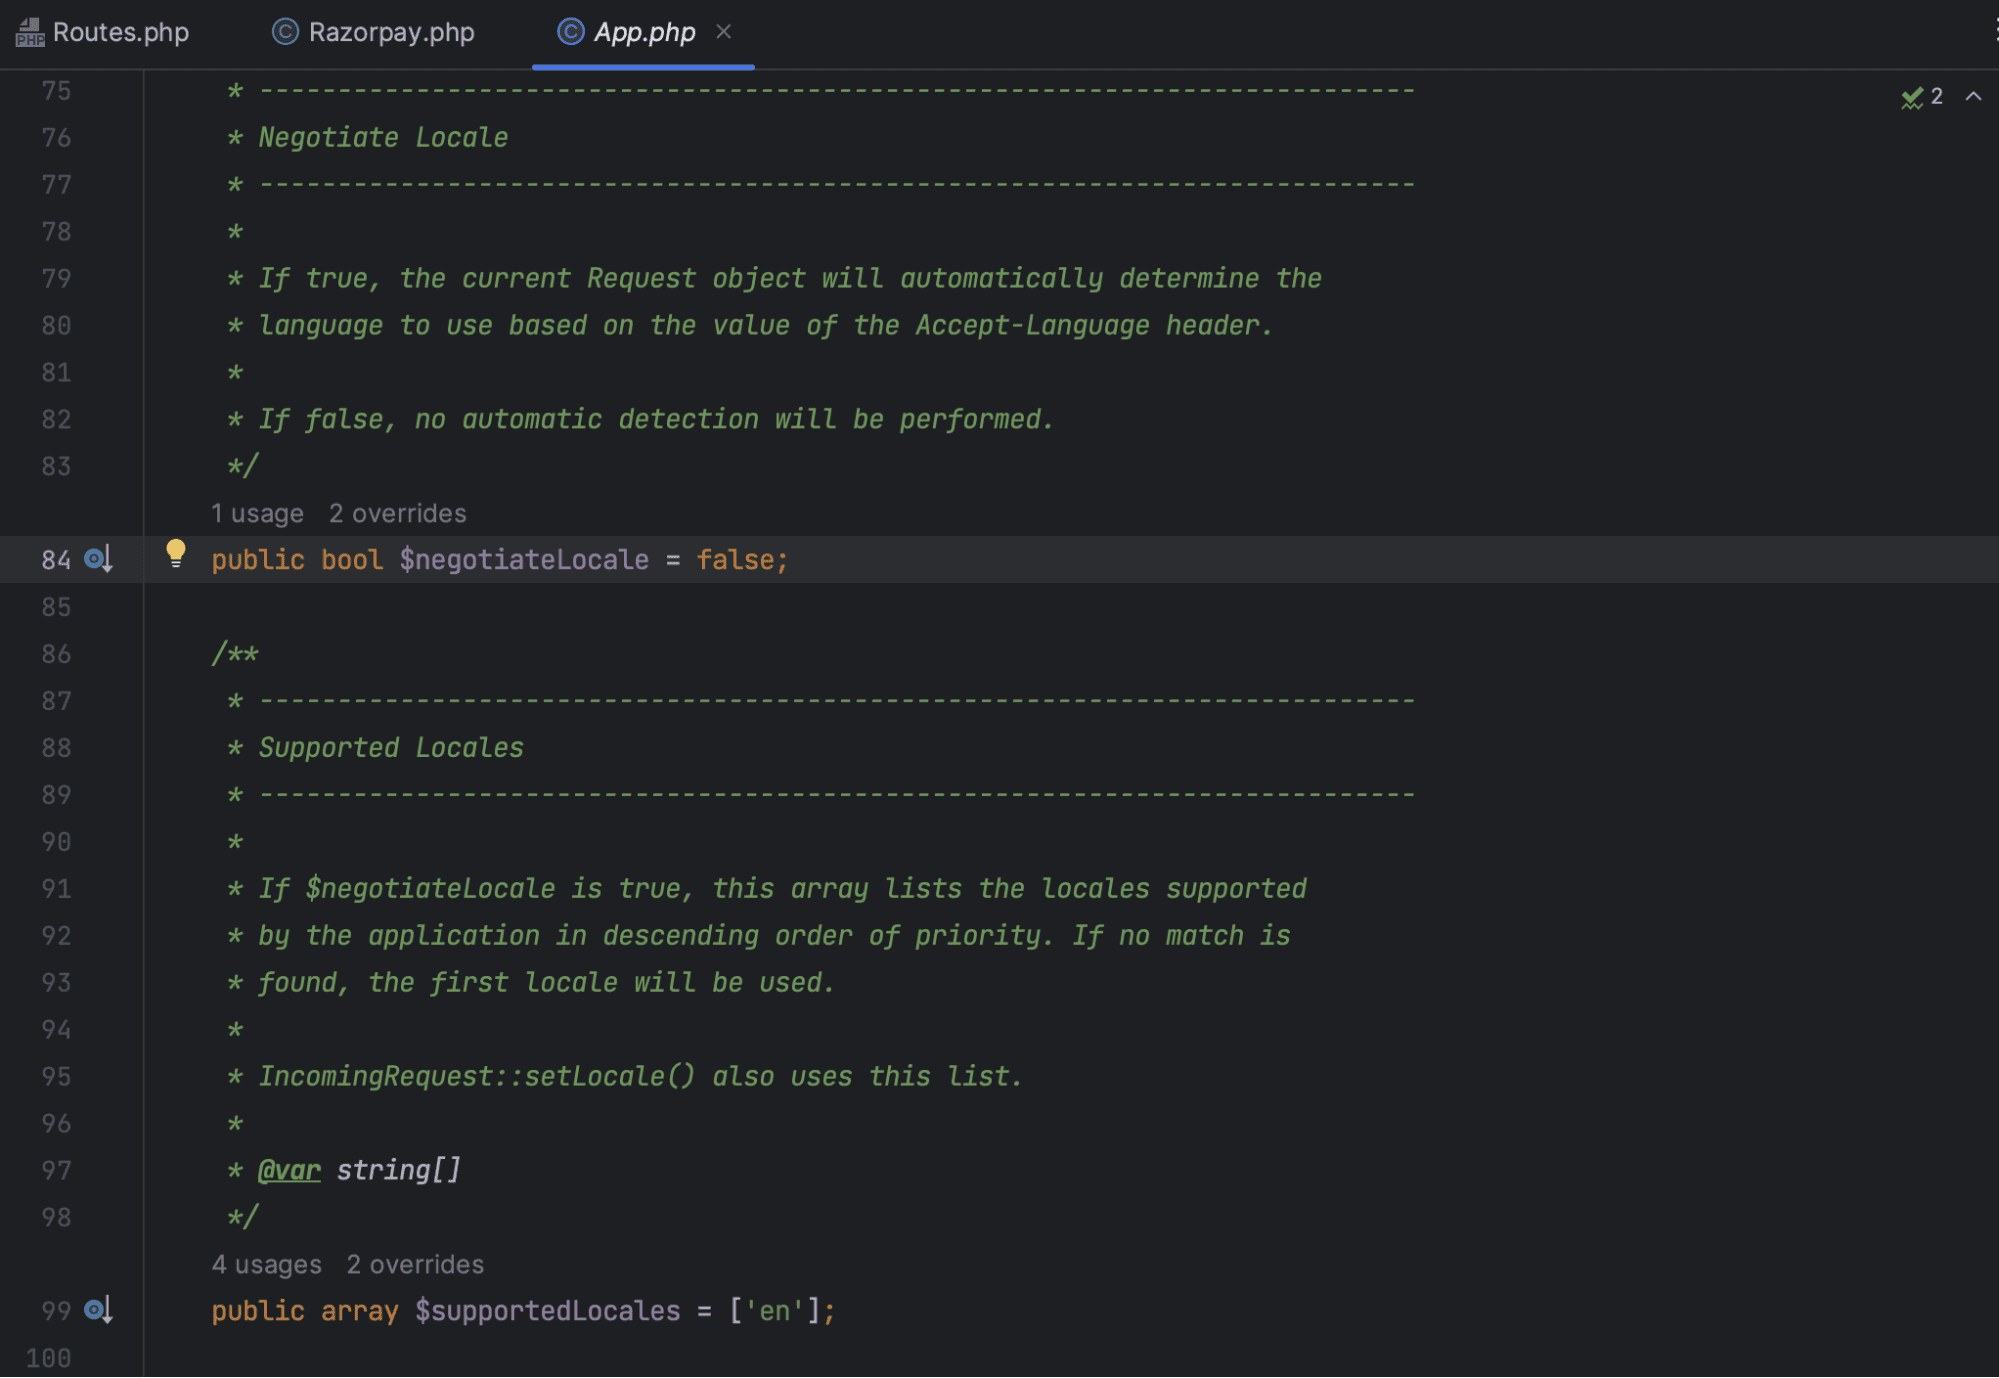
Set $negotiateLocale to true and set $supportedLocales to list all available languages, for example ['en', 'es'].
Now, the user's language will be determined automatically based on his browser settings.
Update
To update your website, simply copy or replace the files in the Update.zip file into the corresponding folder or file.
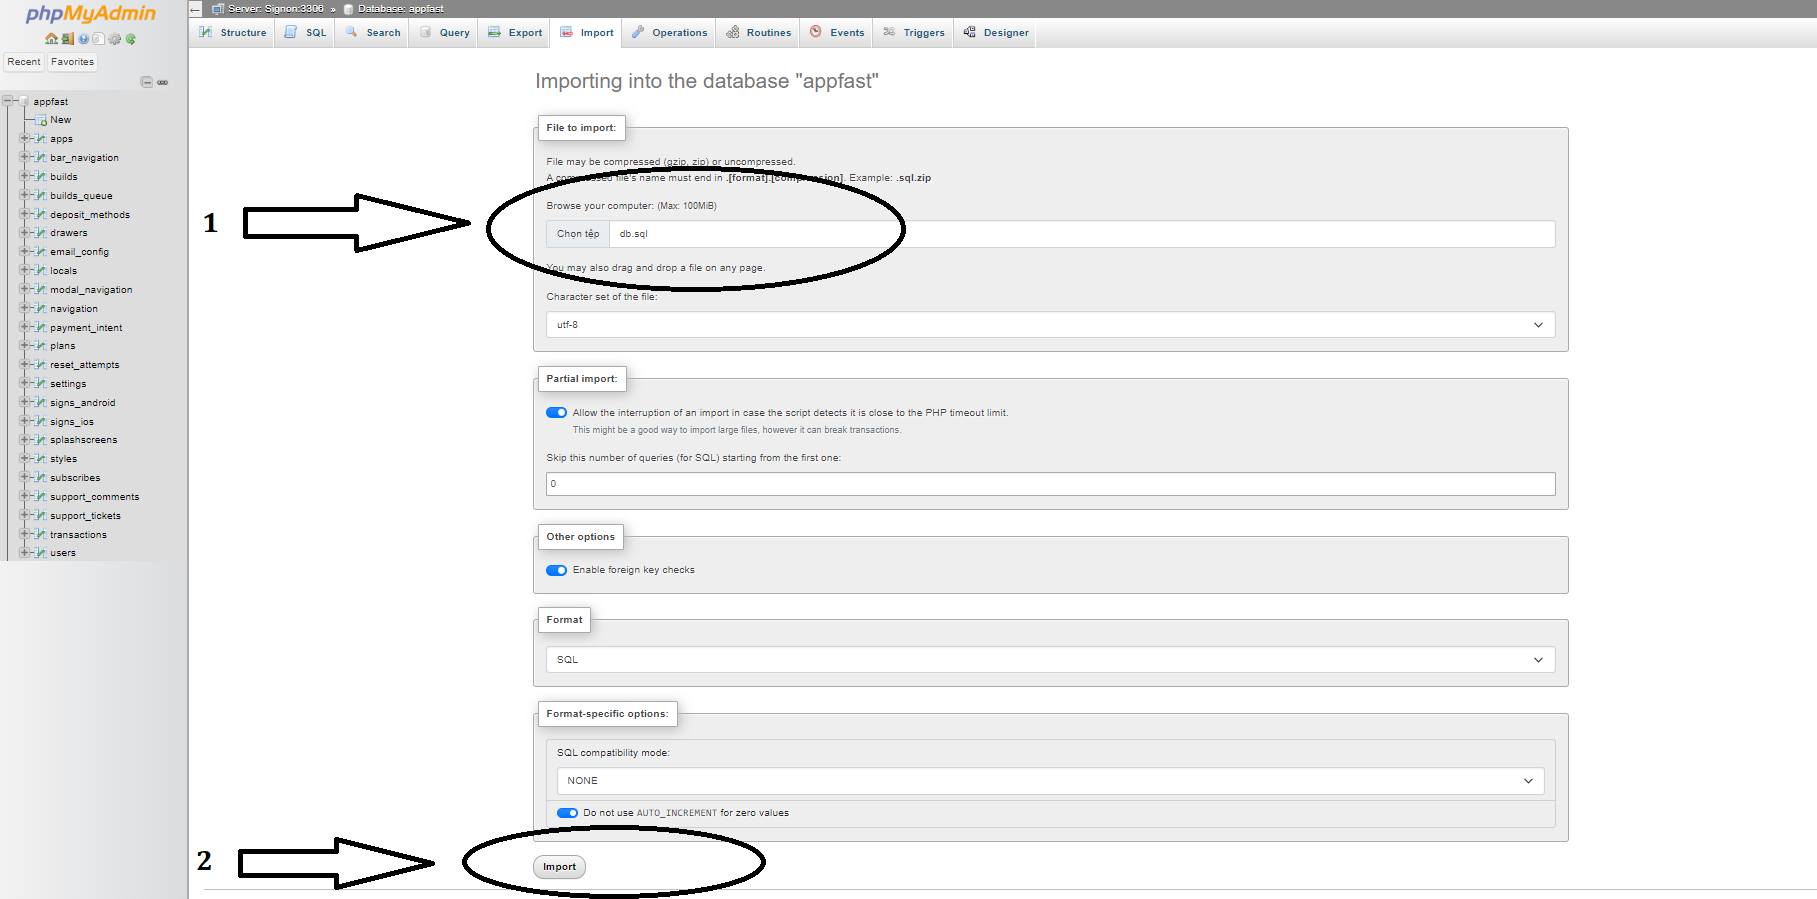
First, access your PHPMYADMIN and select FlangApp Database
Click on the Import button in MYphpadmin
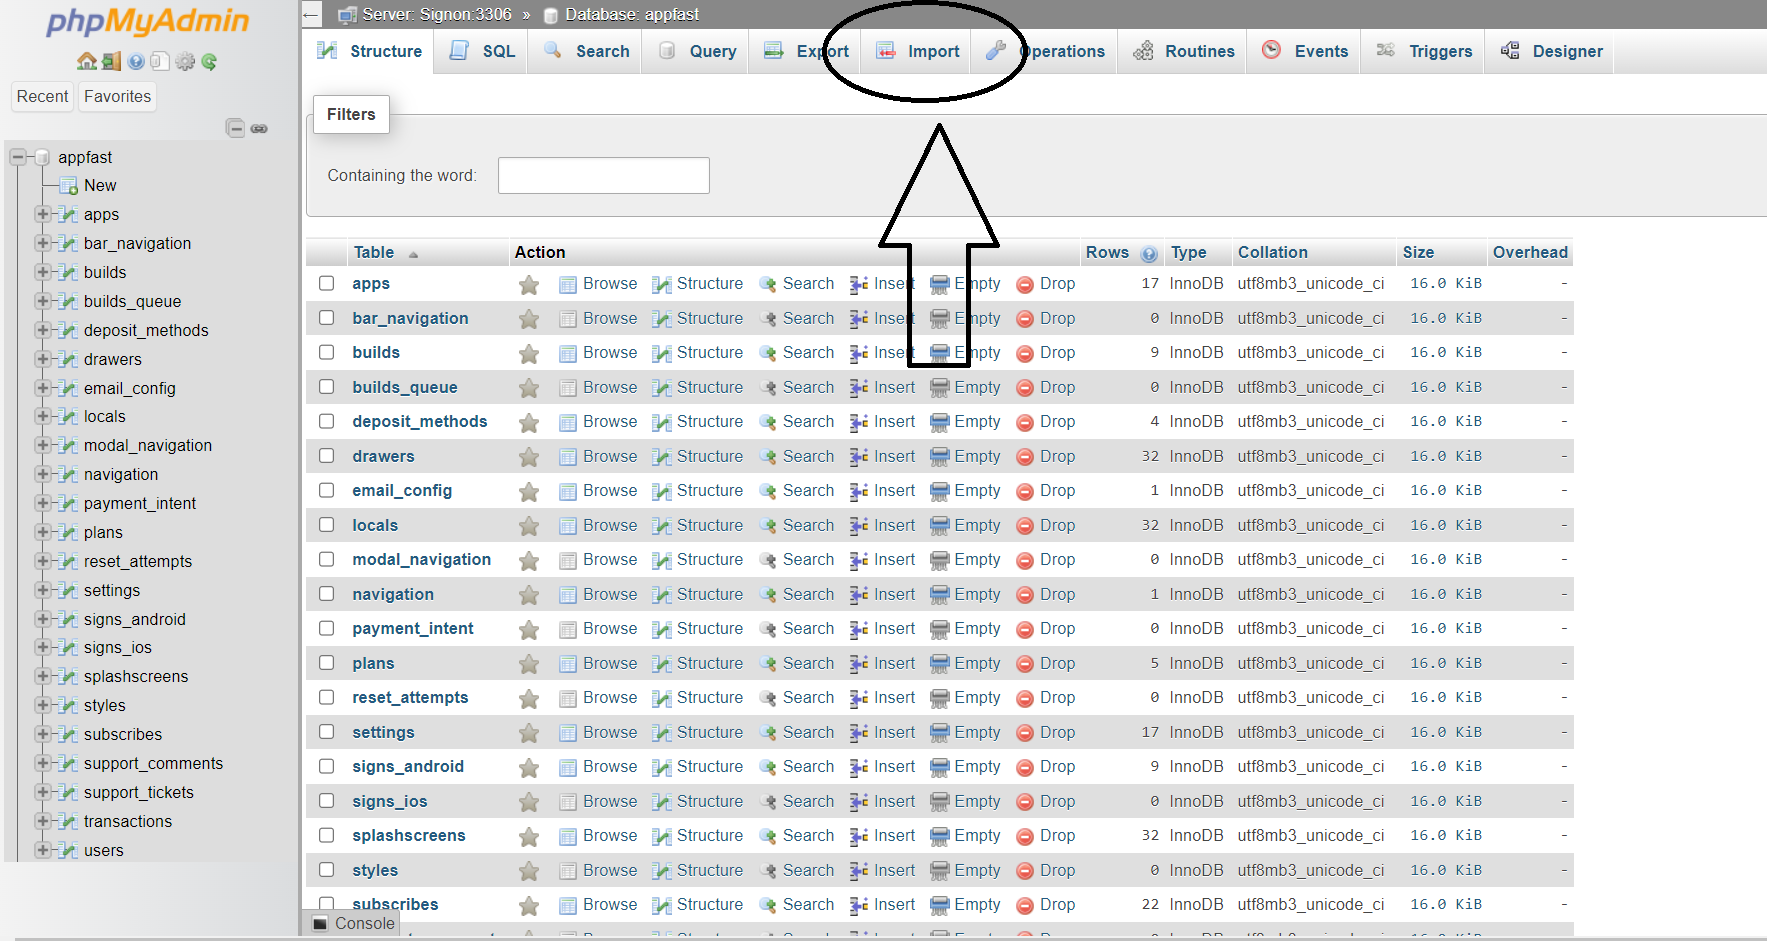
2. Select the db.sql file in the update folder
3. Click the Import button at the bottom of the page